There’s a certain rhythm to quilting, a harmony that comes from the hum of the sewing machine, the feel of fabric under your fingers, and the satisfaction of seeing a beautiful pattern come to life.
Today, we’re going to dive into the creation of the Harmony Quilt Block, a pattern that promises to bring a sense of peace and tranquility to your quilting journey.
This pattern wasn’t designed by me, but by Julie Baird, a talented quilter who has a knack for creating beautiful and intricate designs.
The Harmony Quilt Block reminds me of a time when I was learning to play the piano.
Just like learning to play a new piece of music, quilting requires patience, practice, and a keen eye for detail.
And when everything comes together, the result is a beautiful symphony of colors and patterns that’s as pleasing to the eye as a melody is to the ear.
About the Harmony Quilt Block
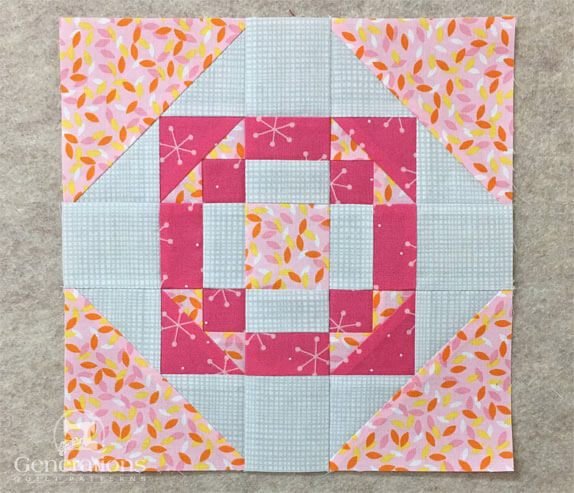
The Harmony Quilt Block is a project for experienced quilters, brought to us by our friends at Generations Quilt Patterns. This block, designed by Julie Baird, offers the choice of either paper piecing or traditional methods of creating your block.
The pattern includes detailed instructions, excellent illustrative photos, and pattern downloads.
The finished size of the block is 12.5″ x 12.5″ (32cm x 32cm), making it a versatile piece that can be used in a variety of quilt designs.
Materials Needed
The Harmony Quilt Block requires three types of fabric: a light, a medium, and a dark. The exact amount of fabric needed will depend on the number of blocks you plan to make. For one block, you’ll need the following:
- Dark Fabric: 4 pieces of 1¾” x 1¾”
- Medium Fabric: 4 pieces of 2⅛” x 2⅛”, 2 pieces of 5⅞” x 5⅞”, 1 piece of 3″ x 3″
- Light Fabric: 4 pieces of 2⅛” x 2⅛”, 1 piece of 1¾” x 13″, 1 piece of 3″ x 13″
You’ll also need basic quilting supplies, including a sewing machine, thread, scissors, and a rotary cutter.
Step-by-Step Instructions
Step 1: Cutting
Start by cutting your fabric according to the measurements provided. Label all your patches as we will refer to their numbers throughout this tutorial.
Step 2: Assemble the Units for a Harmony Square
Corners
Make 4 corners using either paper piecing or traditional piecing techniques. For paper piecing, follow the instructions provided in the pattern. For traditional piecing, follow the instructions below:
- With right sides together (RST), align the short side of a #2 medium fabric with the #1 dark fabric. Stitch on the solid line between #1 and #2. Press the seam towards the darker fabric.
- Repeat this process for #3 medium fabric.
- With RST, align the long bias edge of #4 dark fabric with the trimmed #2/#3 edges. Stitch the seam. Press.
- Repeat this process for #5 and #6 light fabric.
- With RST, align the long bias edge of #7 medium fabric with the freshly trimmed edges of #5/#6. Stitch the seam. Press.
After assembling the corners, trim the unit to size according to the pattern.
Step 3: Assemble the Harmony Square Quilt Block
Now that you have your corner units, it’s time to assemble the Harmony Square Quilt Block. Follow the assembly instructions provided in the pattern to complete your block.
Full Pattern: Click Here
Creating the Harmony Quilt Block is a journey of precision and creativity. As you stitch each piece, you’re not just creating a block; you’re creating a piece of art that’s filled with harmony and tranquility.
So, gather your materials, set up your sewing machine, and let’s bring a sense of peace and harmony into our quilting journey. Enjoy the process, and most importantly, have fun!


