As I reminisce about my quilting journey, a vivid memory stands out, marking the beginning of my fascination with the art.
It was a chilly autumn evening, and I was nestled on the cozy couch at my grandmother’s house, marveling at her skillful hands as they danced over fabric and thread, creating magic.
Her passion for quilting was infectious, and I found myself drawn into the world of colors, patterns, and the stories they told.
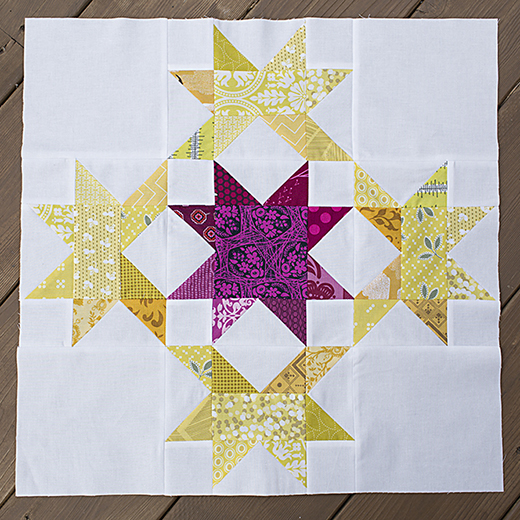
Years later, this fascination led me to uncover a treasure from the past, a quilt block that not only challenged my skills but also connected me to a rich history of quilt making – the Radiant Splendor.
Unearthing a Gem: The Journey of Radiant Splendor
The discovery of Radiant Splendor was like finding a hidden gem in a sea of patterns. While browsing through Nancy Cabot’s Quilt Collection, a block named Cubes and Tiles, from 1933, caught my eye. Its intricate design and the mystery behind its many names intrigued me.
This quilt block had traveled through time, acquiring different identities, including Stars and Cubes in a late 1800s Ladies Art Company quilt pattern catalog. Determined to leave my mark on this historical piece, I renamed it Radiant Splendor and embarked on a journey to decode its construction and share its beauty with fellow quilters.
Full Pattern: Click Here
The Fabric of Time: A Technical Look at Radiant Splendor
Diving into the creation of Radiant Splendor requires not just fabric and thread, but a connection to the quilt’s historical roots and an appreciation for its technical complexity. This block, with its mesmerizing pattern of stars and cubes, embodies the essence of traditional quilting while offering a canvas for modern interpretation.
Materials Needed for Your Radiant Splendor Quilt Block
To bring Radiant Splendor to life, you’ll need the following materials:
- Background Fabric (White):
- 4 pieces of 6-1/2” x 6-1/2”
- 12 pieces of 2-1/2” x 2-1/2”
- 20 pieces of 2-1/2” x 4-1/2”
- Center Star Fabric (Purple):
- 1 piece of 4-1/2” x 4-1/2”
- 8 pieces of 2-1/2″ x 2-1/2″
- Border Stars Fabric (Yellow):
- 4 pieces of 2-1/2” x 4-1/2”
- 32 pieces of 2-1/2″ x 2-1/2″
Preparing for a Quilting Adventure
Embarking on the Radiant Splendor project is not just about following instructions; it’s about immersing yourself in the process, understanding the intricacies of each piece, and how they come together to form a masterpiece.
Before diving into the technical steps, familiarize yourself with the pattern and envision how each component contributes to the overall design. Remember, quilting is not just about the end product but the joy and fulfillment found in each stitch.
A Deep Dive into Radiant Splendor’s Design Essence
The creation of the Radiant Splendor quilt block is more than just assembling pieces of fabric; it’s a deep dive into the heart of quilting tradition, blending historical patterns with personal creativity.
This project is not merely about following steps but about understanding and appreciating the intricate design and its significance. The Radiant Splendor block, with its interplay of geometric shapes and colors, exemplifies the beauty and complexity of quilt making, offering both a challenge and a reward to the quilter.
Gathering Your Materials: The Foundation of Radiant Splendor
Before embarking on your quilting journey, it’s crucial to have all your materials at hand. For the Radiant Splendor quilt block, you will need:
- Background Fabric (White):
- 4 pieces of 6-1/2” x 6-1/2”
- 12 pieces of 2-1/2” x 2-1/2”
- 20 pieces of 2-1/2” x 4-1/2”
- Center Star Fabric (Purple):
- 1 piece of 4-1/2” x 4-1/2”
- 8 pieces of 2-1/2″ x 2-1/2″
- Border Stars Fabric (Yellow):
- 4 pieces of 2-1/2” x 4-1/2”
- 32 pieces of 2-1/2″ x 2-1/2″
Setting the Stage for Success
As you prepare to bring Radiant Splendor to life, consider these tips to enhance your quilting experience:
- Organization is Key: Keep your workspace and materials organized. This clarity in your physical space reflects in your work, allowing for a smoother quilting process.
- Mindfulness in Selection: The colors and fabrics you choose play a significant role in the final appearance of the Radiant Splendor block. Consider the interplay of colors and how they complement each other to bring out the block’s vibrancy.
- Precision Cutting: Accurate cutting is fundamental in quilting. Ensure your pieces are precisely measured and cut to guarantee the block comes together perfectly.
Embracing these initial steps with enthusiasm and care sets the foundation for a rewarding quilting journey. The Radiant Splendor project is not just an opportunity to create something beautiful but also a chance to engage deeply with the quilting process, learning and growing as you go.
Step-by-Step Instructions: Crafting Your Radiant Splendor
Embarking on the journey to create the Radiant Splendor quilt block is a thrilling venture into the heart of quilting. Here’s your guide to bring this beautiful design to life.
Step 1: Mark and Prepare the Squares
Begin with your purple and yellow 2-1/2″ x 2-1/2″ squares. On the wrong side of each, draw a diagonal line from one corner to the opposite. This line will serve as a stitching guide.
Step 2: Construct the Flying Geese
Pair each 2-1/2” x 4-1/2” white rectangle with a purple square, right sides together, aligning one square at the rectangle’s end. Sew along the diagonal line. Trim the excess fabric, leaving a 1/4″ seam allowance, then press open. Attach another purple square to the opposite end of the rectangle in the same manner to complete a flying geese unit. Repeat this process using yellow squares for additional units.
Step 3: Assemble the Center Star
Layout your purple flying geese units around the 4-1/2″ x 4-1/2″ purple square, creating the star’s arms. Place the 2-1/2″ x 2-1/2″ white squares at the corners. Sew these pieces into three rows, then stitch the rows together to form the center star block.
Step 4: Create the Border Stars
Each border star involves two yellow flying geese units, a 2-1/2″ x 4-1/2″ yellow rectangle, and two 2-1/2″ x 2-1/2″ white squares. Assemble these components into two rows and then connect them to complete the border star. Repeat for all four border stars.
Step 5: Bring It All Together
Lay out the central star block, the border stars, and the 6-1/2″ x 6-1/2″ white squares following the Radiant Splendor design. Sew the pieces into rows, then stitch the rows together to complete your quilt block.
Additional Tips for a Flawless Radiant Splendor
- Accuracy is Essential: Ensure all pieces are cut and sewn precisely. Accurate piecing makes assembling the block easier and more satisfying.
- Pressing vs. Ironing: Press your seams instead of ironing. Pressing prevents the fabric from stretching and keeps your pieces accurate.
- Enjoy the Process: Quilting is as much about the journey as it is about the finished product. Take your time with each step, and don’t rush the process.
The Reward of Patience and Precision
Completing the Radiant Splendor quilt block is a testament to your dedication and skill in quilting. This block, with its intricate design and vibrant colors, not only adds to your quilting repertoire but also connects you to the rich history of quilting.
As you admire your work, remember that each stitch and piece of fabric holds a story, your story, woven into the timeless art of quilting.


