Growing up in a small town, I was always fascinated by the night sky.
The stars seemed so close, so bright, that I felt like I could reach out and touch them.
I would spend hours lying in the grass, gazing up at the stars, dreaming of far-off galaxies and distant worlds.
As a quilter, I’ve always wanted to capture that sense of wonder and awe in a quilt.
Recently, I’ve been working on a Maple Star Quilt Block, a block that combines the beauty of a star with the elegance of a maple leaf.
And I’m excited to share the process with you.
The Maple Star Quilt Block
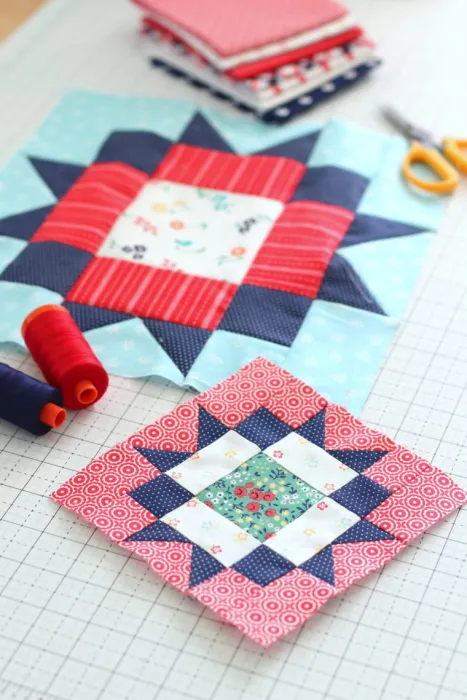
The Maple Star Quilt Block is a beautiful block that combines the beauty of a star with the elegance of a maple leaf. It’s a block that is simple yet visually stunning, a block that can be made in different sizes to suit your needs. This block is part of the Riley Blake block challenge, and it’s been a joy to work on.
Materials Needed
The materials needed for the Maple Star Quilt Block will depend on the size of the block you wish to make. You will need a variety of fabrics for the star and the background. For my quilt, I decided to use fabric from my Sugarhouse Park fabric collection for Riley Blake Designs, as well as mixing in a few prints from collections past.
Step-by-Step Instructions
Unfortunately, the specific step-by-step instructions for the Maple Star Quilt Block are not provided in the blog post. However, you can find the printable block instructions for the Maple Star Quilt Block and all other blocks in the 2022 Quilt Block Challenge here.
Additional Tips
When piecing these blocks, I have a couple of tips to share:
- Fast Flying Geese Method: I used my fast flying geese method for making the 4 flying geese units needed for each block. It’s just another option that you might find helpful.
- Scant ¼” Seam Allowance: I highly recommend using a scant ¼” seam allowance. A seam allowance that is just slightly too wide, repeated when sewing multiple rows together, will cumulatively mean a block that is a lot smaller than planned. And sewing the 6″ block version, I moved my needle to the right just a hair more so that technically my seam allowance was more like 3/16th of an inch. This minor adjustment will make a big difference in the finished accuracy when piecing smaller blocks with lots of little pieces and seams.
- Block Assembly: After creating the flying geese units and ensuring your seam allowances are accurate, it’s time to assemble the block. Lay out your pieces according to the pattern, paying close attention to the direction of the flying geese units. Sew the pieces together into rows, then sew the rows together to complete the block. Press your seams to one side or open, depending on your preference.
- Quilt Assembly: Once all your blocks are completed, it’s time to assemble the quilt. You can arrange the blocks in a traditional setting, or get creative and come up with your own layout. Once you’re happy with the arrangement, sew the blocks together, add any borders if desired, and your quilt top is complete!
- Quilting and Finishing: The last steps are to create your quilt sandwich (quilt top, batting, and backing), quilt it as desired, and add the binding. For this quilt, a simple quilting design might be best to let the star design shine.
Full Pattern: Click Here
The Maple Star Quilt Block is a beautiful block that combines the beauty of a star with the elegance of a maple leaf. It’s a block that is simple yet visually stunning, a block that can be made in different sizes to suit your needs. Whether you’re a beginner or an experienced quilter, this block is a fun and rewarding project to undertake. So grab your materials, download the instructions, and start your quilting journey. Happy quilting!


