In the vast tapestry of human history, quilting stands out as a unique blend of art, tradition, and storytelling.
Each quilt block, like the pages of a book, tells a tale of its own, woven with threads of passion, patience, and creativity.
The art of quilting is not just about stitching fabrics together; it’s about connecting generations, preserving memories, and celebrating the beauty of craftsmanship.
As we embark on this journey to explore the Nell’s Star Quilt Block, we are not just learning a pattern; we are becoming a part of a legacy.
This legacy is rich with stories of grandmothers teaching their grandchildren, of communities coming together, and of individual quilters pouring their heart and soul into each design.
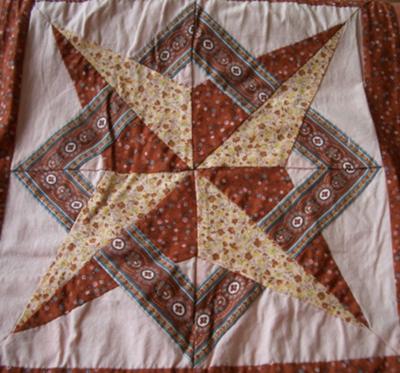
The Nell’s Star Quilt Block, in particular, holds a special place in this legacy, representing both the timeless beauty of the stars and the innovation of modern design.
When I was a child, my grandmother used to tell me stories about her quilting adventures. One day, she shared a tale of a quilt pattern she had once seen but never managed to recreate.
She described it as a star that shone brighter than any other in the quilted sky. Years later, while browsing through some patterns online, I stumbled upon the Nell’s Star Quilt Block.
It was as if fate had led me to this design, reminding me of the stories my grandmother had shared. Today, I’m thrilled to guide you through the process of crafting this beautiful quilt block.
Materials Needed
- Background Fabric (Bac)
- Star-Light Fabric (S1)
- Star-Dark Fabric (S2)
- Band Fabric (Band)
- Paper piecing pattern (available for download in both 8″ and 12″ sizes)
- Adobe software (for downloading and printing the pattern)
Step-by-Step Instructions
-
- Gathering Materials:
- Begin by ensuring you have all the necessary materials at hand. This includes the background fabric, star-light fabric, star-dark fabric, band fabric, and the paper piecing pattern.
- Ensure you have the most current version of Adobe installed on your computer for accurate pattern printing.
- Pattern Download:
- Depending on your desired quilt size, choose between the 8″ or 12″ finished block patterns.
- Download the pattern and remember to set the ‘Custom Scale’ to 100% for accurate results during printing.
- Fabric Preparation:
- Wash, dry, and iron your fabrics to ensure they’re clean and free from wrinkles.
- Consider using a fabric starch for added stiffness, making the paper piecing process smoother.
- Cutting the Fabric:
- Lay out your fabric on a flat surface, ensuring there are no folds or creases.
- Using the provided cutting chart, begin cutting your fabric patches. Always cut a little generously to account for any errors or adjustments.
- Initiating the Piecing Process:
- Understand that this block is based on a 4×4 grid and requires careful attention to detail.
- Ensure there’s a clear contrast between the star point and background fabrics to make your star stand out.
- Paper Piecing:
- Start with the printed pattern and place the first fabric piece (usually the background) on the unprinted side, ensuring it covers the entire first section with a bit of overhang.
- Place the second piece of fabric right sides together with the first, aligning the edges.
- Stitch along the printed line on the pattern, extending the stitching slightly beyond the start and end of the line.
- Fold the paper along the stitched line and trim the seam allowance to a quarter inch.
- Press the fabric open and continue this process for each section of the pattern.
- Assembling the Sections:
- Once all sections (A, B, C) are pieced, it’s time to assemble them.
- Begin by stitching Section B to Section C. Use pins to ensure alignment and press the seam allowance either open or closed based on your preference.
- Join Section BC to Section A, paying close attention to aligning the edges, star points, and band edges.
- Final Assembly:
- After all sections are joined, you’ll see the completed Nell’s Star quilt block taking shape.
- Ensure the star points do not touch the block’s edge. The band’s points will align with the edge once sewn into a quilt.
- Quality Check:
- Lay out the finished block and inspect for any misalignments or missed stitches.
- Make any necessary corrections and give the block a final press with an iron.
- Finishing Touches:
- Consider adding a border or sashing if you’re incorporating this block into a larger quilt design.
- Remember, the beauty of the Nell’s Star Quilt Block lies in its intricate design, so take your time and enjoy the process.
- Gathering Materials:
Tips for Success:
- Consider using heavily starched fabric for paper piecing. This makes finger pressing easier and ensures the fabric doesn’t fold over itself during stitching.
- If you’re new to paper piecing or need a refresher, consider checking out tutorials or guides on Foundation Paper Piecing.
- Use Quality Thread: Opt for a high-quality cotton thread that matches or complements your fabric colors. Good thread reduces the chances of breakage and ensures smoother stitching.
- Maintain Consistent Seam Allowances: Always ensure you’re using a consistent 1/4-inch seam allowance. This not only ensures your pieces fit together perfectly but also gives your quilt block a professional finish.
- Stay Organized: As you cut your fabric pieces, label them or keep them in separate, labeled bags or containers. This will help you easily identify each piece and prevent any mix-ups during the piecing process.
- Regularly Check Your Needle: Ensure your sewing machine needle is sharp and free from any damage. A blunt or bent needle can cause uneven stitches or even damage your fabric. Consider changing your needle after every project or when working with particularly thick fabrics.
Full Pattern: Click Here
As we wrap up our exploration of the Nell’s Star Quilt Block, it’s essential to take a moment to reflect on the journey we’ve undertaken. We’ve not only learned the intricacies of a pattern but have also delved deep into the heart of what quilting truly represents.
Each stitch, each choice of fabric, and each design decision is a testament to the love, dedication, and artistry that goes into quilting.
The Nell’s Star Quilt Block, with its rich history and intricate design, serves as a reminder of the timeless nature of this craft. As you move forward, whether you’re a seasoned quilter or just beginning your journey, remember that quilting is more than just a hobby; it’s a celebration of heritage, creativity, and community. May your quilting adventures be filled with joy, discovery, and countless stories to tell.


