Hello, I’m Julie, and it’s with genuine excitement that I invite you on a quilting adventure to create the Giant Dahlia quilt.
This exquisite pattern, revered for its breathtaking beauty and intricate design, has captivated the hearts of quilting enthusiasts for generations.
Embarking on this Giant Dahlia quilt project is a journey of creative discovery and skillful challenge that promises immense satisfaction.
As you piece together each segment, you’ll find yourself immersed in a craft that is both demanding and deeply rewarding.
The completion of this quilt offers not just a visual masterpiece but a testament to the dedication and love poured into every stitch. Join me as we explore the steps to bring this stunning piece of quilted art to life, creating a legacy that will be admired for years to come.
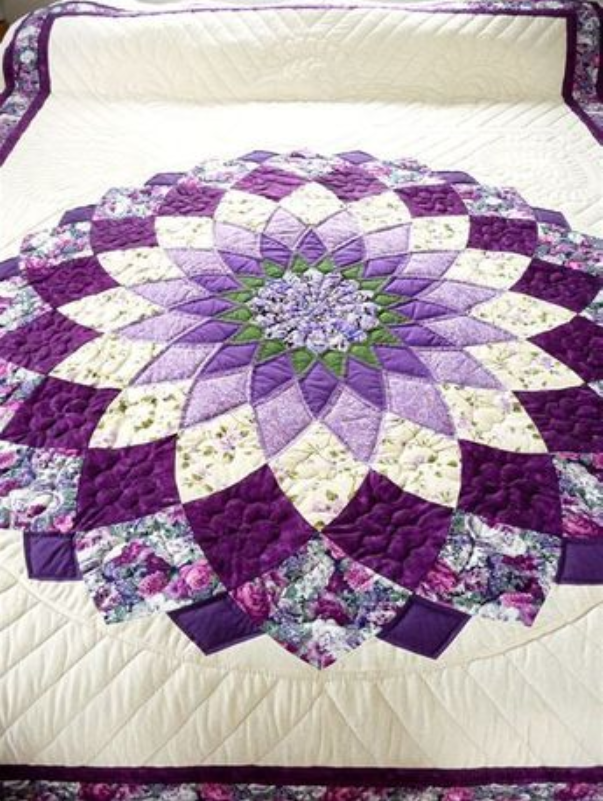
The Enchantment of the Giant Dahlia Pattern
The Giant Dahlia is a pattern that stands out for its intricate design and captivating aesthetics. Created by Hubert See Mehren from Des Moines, Iowa, it has won accolades for its unique beauty.
The pattern resembles a dahlia flower in bloom, with each petal meticulously crafted to form a mesmerizing whole. It’s a work of art that brings life to any space it occupies.
Gathering Your Materials
To begin your Giant Dahlia quilt, you’ll need a variety of fabrics. Here’s a suggestion using rose as the base color:
- 1/4 yard of rose solid
- 2 1/2 yards each of light and dark rose print
- 5/8 yard of medium rose print
- Additional yards of light, medium, and dark rose print for different sections
- 7 yards of muslin
- 7 1/2 yards of backing and facing fabric
- Batting measuring 80″ x 102″
Creating Your Dahlia
- Detailed Template Preparation: Begin by carefully creating templates from the provided pattern pieces. Pay special attention to those that need to be cut on the fold to ensure symmetry. If cutting in layers is easier, use the half pattern to make a whole piece template. This step is crucial for accurate piecing later on.
- Piecing the Center with Precision: The central A section is the heart of your quilt. Start by piecing this section, taking extra care where all the points converge in the center. This requires patience and precision. Consistently pressing all seams in the same direction will ensure a smooth and flat finish.
- Assembling the Spiral Section Methodically: Begin the spiral section with piece B and continue adding C, D, E, F, and G in order. It’s a meticulous process where each piece must align perfectly to create the spiral effect. After completing this sequence, attach I to H, then to G, following a counter-clockwise pattern. This step is about building the layers that form the Dahlia’s petals.
- Joining Spiral Units for the Centerpiece: You’ll need to create and join 16 of these spiral units to complete the central Dahlia design. This step is like putting together a puzzle; each unit must fit seamlessly with the others, creating the illusion of a blooming flower.
- Attaching Outer Pieces for Expansion: Once the center is complete, add the J pieces to expand the design. This involves joining them at the corners, a step that begins to bring the entire Dahlia design into perspective.
- Center Applique with Finesse: For the center applique, fold the panel to mark the center. Piece together L, K, and M units, creating a floral design. This requires turning under the edges for a clean finish and using fold lines as a guide for placement. Applique the design onto the panel with a slipstitch or blind applique stitch for a seamless look.
- Completing the Inner Quilt Artistically: Attach the panel to the previously completed larger flower panel. This unifies the inner portion of the quilt and is a significant step towards seeing your Dahlia come to life.
- Crafting the Borders Creatively: Piece together the K-L-M-N units to create the quilt’s borders. This step is like framing your artwork, giving it a defined edge and enhancing the overall design.
- Final Assembly with Care: Join two strips with 8 border units each for the sides and two strips with 6 units each for the top and bottom. Add these to the quilt, setting in corner M units to complete the top. This step requires an eye for detail to ensure everything aligns perfectly.
- Layering and Quilting: Finish the quilt by layering it with backing and batting. Mark your quilt design and begin the quilting process. Due to the complexity, stretching the quilt on a frame is recommended. This step is where your quilt truly becomes a three-dimensional piece of art.
Full Pattern: Click Here
Creating a Giant Dahlia quilt is an enriching experience, culminating in a beautiful work of art. This quilt, with its complex design and bold colors, is not just a bedspread; it’s a statement piece that reflects the skill and dedication of the quilter. I hope this journey brings as much joy and satisfaction to you as it has to me.


