There’s something magical about the way fabrics hug each other in a quilt, especially when I’m working on a project like Half Way Home.
A few months back, I found myself diving deep into my stash, rummaging through colorful bundles of denim, chambray, and stunning Kona cotton.
As the sun filtered through my studio window, I was reminded of how fabric can spark such joy and creativity!
This time, I was determined to tackle Half Way Home, crafted by the talented Heather Jones.
This quilt isn’t just a piece of art; it’s a cozy little slice of happiness that’s about to turn my living room into a soft, inviting space.
As I began sorting my fabric choices, a wave of excitement bubbled up!
I couldn’t help but think of the countless blocks I would be piecing together for Half Way Home.
With a pattern level described as ‘Confident Beginner,’ this quilt beckoned me with the promise of growth.
I was ready to take on new techniques and embrace a little improvisational piecing.
Let’s embark on this vibrant quilt journey together!
Exploring Improvisational Piecing in Half Way Home
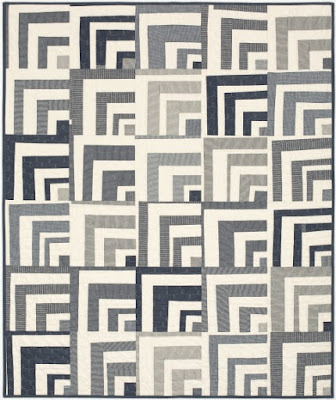
The beauty of Half Way Home lies in its improvisational piecing.
This style encourages a delightful freedom that takes the pressure off perfection!
Each block allows you to express your creativity as you mix and match different fabric strips without any measurements weighing you down.
And let me tell you; this added spontaneity makes each block unique, and that’s one of the best feelings as a crafter!
When piecing together various strips of denim and chambray, I found it exhilarating to let my scissors run wild or use my rotary cutter creatively.
Not only did this approach allow me to unleash my artistic vision, but it also meant that I had plenty of room for surprises along the way.
That’s the joy of working on Half Way Home: it encourages you to explore the unexpected in every corner.
The Essential Fabrics for Your Half Way Home Quilt
Now, let’s dive into the heart of our project: the materials needed for Half Way Home.
To ensure you’re ready to roll, here’s a handy list of all the materials you’ll need:
- 1/2 yard Indigo denim (Fabric A)
- 1/2 yard Indigo denim (Fabric B)
- 1/2 yard Denim (Fabric C)
- 1/2 yard Indigo denim (Fabric D)
- 1/2 yard Indigo denim (Fabric E)
- 1/2 yard Indigo denim (Fabric F)
- 2-1/2 yards Oyster Kona Cotton (Fabric G)
- 4 yards Backing Fabric
- 1/2 yard Binding Fabric
- 62″ x 74″ Sized Quilt Batting
Gathering all these colorful goodies brings a sense of anticipation!
I always find it’s a good idea to lay everything out and admire the combination of fabrics before diving in.
It sets the tone for creativity and sparks the imagination, enhancing your enthusiasm for working on Half Way Home!
Prepping Yourself for Success
To ensure a smooth sailing experience with your quilt project, it’s vital to read through the instructions before getting started on Half Way Home.
Familiarizing yourself with the steps can help avoid any hiccups down the road.
Additionally, I have a personal mantra: measure twice and cut once!
This little slogan has saved me so much fabric.
Don’t forget to press your seams open unless the instructions tell you otherwise in the Half Way Home pattern.
Trust me, this tip will make your quilt lay flat and look professional as you piece together those gorgeous blocks.
A little preparation goes a long way!
Ready, Set, Quilt!
Below are the step-by-step instructions for assembling your Half Way Home quilt.
Don’t worry if things don’t go perfectly the first time; enjoy the process and have fun!
Full Pattern: Click Here
Additional Tips for Quilting Success
As you tackle the blocks for your Half Way Home quilt, remember that improvisation is encouraged!
Explore various fabric placements and try using a mix of fabric backs facing up to create depth and movement in your design.
Each block you create is an opportunity to play!
If you’re hesitant about stitching the blocks together, don’t stress!
Sew the blocks into rows and take your time.
It’s all about enjoying the journey; the destination will take care of itself when you let creativity guide you.
Advanced Considerations for Your Half Way Home Quilt
Once you get comfortable with the construction of Half Way Home, you may want to explore adding additional embellishments or techniques.
For example, consider quilting in a contrasting color thread to enhance the visual appeal of your work!
This little twist can elevate your quilt, creating a beautiful and artistic finish.
You can also experiment with different quilting patterns—such as stippling or straight lines!—to add texture to your quilt.
Feel free to get creative; let the materials inspire you and reflect your personality in this stunning quilt!
Celebrate Your Creations!
Congratulations on embarking on this amazing journey to create your Half Way Home quilt!
Each stitch and block reflects your hard work, creativity, and passion.
As you wrap yourself in this cozy masterpiece, take a moment to admire how far you’ve come.
If this experience has ignited your passion for quilting, be sure to check out more articles filled with inspiration and creativity.
There’s a treasure trove of amazing content just waiting for you to discover, and I’ve prepared an incredible piece you can dive into by clicking here.
Happy quilting, and may your creativity always flow!


