Creating is more than just following a set of instructions for me; it’s about weaving stories into every piece.
SEE A NEW PATTERN HERE
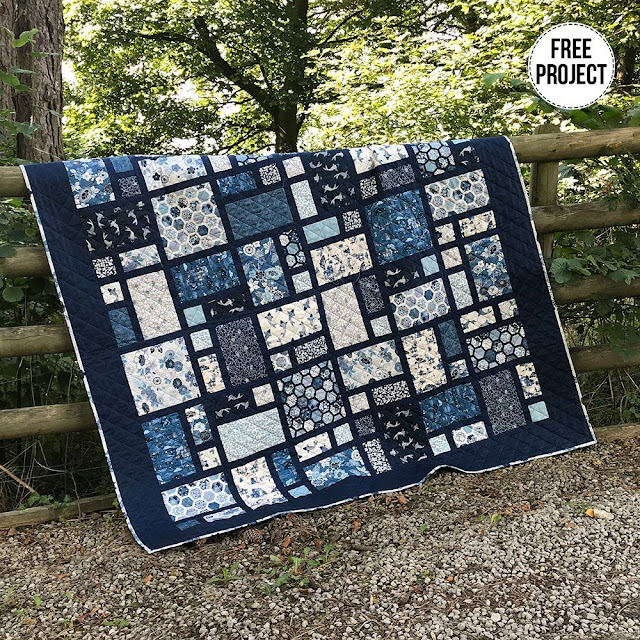
I remember the feeling of excitement as I opened my fabric stash and laid my hands on the rich textures and colors of the Indigo Quilt.
The name alone evokes images of serene blue skies and blooming flowers, and I was thrilled at the thought of bringing this beautiful pattern to life in my sewing room.
The Indigo Quilt designed by Lynne Goldsworthy of lilysquilts.blogspot.com has a charm that struck a chord within me.
It’s not just a quilt; it’s a canvas where I can express my inner artist.
The vibrant hues are like the soundtrack of my sewing journey, blending together harmoniously as I stitch each piece.
Today, I’ll guide you through how I tackled this beautiful quilt, step by step!
Choosing the Right Fabrics for the Indigo Quilt
One of the most exciting aspects of making the Indigo Quilt is selecting fabrics.
My process usually starts with a color palette in mind.
For this particular quilt, I chose vibrant florals alongside soothing indigos to really emphasize the contrast and brightness that this pattern embodies.
The fabric plays a fundamental role in executing the design of the Indigo Quilt effectively, so take your time to pick combinations that speak to you!
Don’t shy away from exploring new combinations!
You can create fantastic effects by mixing different textures and patterns while adhering to the instructions for the Indigo Quilt’s layout.
Use the color wheel as your friend, and do not hesitate to play around until something feels just right!
Important Techniques to Master Before You Begin
Understanding some fundamental techniques is crucial before diving into the Indigo Quilt.
Precision in cutting is one of the essential skills.
The quilt involves several pieces of various shapes and sizes, and working with accurate dimensions will make the process smoother and more enjoyable for you.
I guarantee that taking the time to master your cutting techniques will pay off in the final product!
Another key area is the seams.
Use consistent ¼” seams throughout the project, as this can significantly affect the overall appearance of your finished quilt.
Spend a few moments perfecting your sewing machine settings, as you’ll be thanking yourself later when the blocks line up perfectly without any fuss.
Materials Required for the Indigo Quilt
- 1.7m square fabric in various colors (Indigo-style fabrics recommended)
- 1/2 yd for binding strips
- Backing fabric: 4m / 4 ¼ yds (optional)
- Wadding – make sure it’s the right thickness for your need!
- Cutting mat, rotary cutter, and ruler for accurate cuts
- Sewing machine with a quarter-inch foot
- Iron for pressing seams
- Thread, preferably 40wt Aurifil in a dark blue color
Preparation Tips for the Indigo Quilt
Before plunging into the sewing adventure of the Indigo Quilt, prepare yourself to embrace creativity comfortably.
Clear a spacious area in your workspace where you can lay out your fabrics and cut them with ease.
Having space to breathe allows for better visualization and organization!
It’s also a good idea to layout your pieces before sewing anything.
This way, you can see how the Indigo Quilt will come together and make any last-minute adjustments.
Don’t forget to refer to the cutting requirements and familiarize yourself with all pieces as you go!
Preparation is key to enjoying the process.
Step-by-Step Instructions for the Indigo Quilt:
Below, I’ll provide the step-by-step instructions for making the Indigo Quilt.
Remember, you can access the full pattern and additional instructions at the provided link below!
Full Pattern: Click Here
Additional Tips for Success
As you embark on your Indigo Quilt journey, take a moment to appreciate that quilting is an art of patience.
If you find mistakes or hiccups, embrace them!
Some of the most beautiful moments come out of imperfections.
Remember to press your seams after each step; it makes a significant difference.
It might also help to sew in a quiet space or with a playlist that sparks joy.
Enjoying the ambiance helps bring life to your methodical sewing, so don’t be afraid to play around with the environment you create.
Advanced Techniques to Consider for the Indigo Quilt
If you’re looking to add flair to your Indigo Quilt, consider exploring quilting patterns that can elevate your work.
For instance, a diagonal crosshatch gives a subtle texture that enhances the quilt’s beauty.
I often use a 40wt Aurifil thread in darker shades to contrast against lighter shades of fabric for added depth.
Be experimental with designs when you’re comfortable!
Advanced techniques like free-motion quilting can also turn the Indigo Quilt into a masterpiece.
Just remember, practice makes improvement, so give it a try!
Celebrate Your Quilting Journey with the Indigo Quilt
As you wrap up your Indigo Quilt, take a moment to admire the fabric choices, stitches, and the overall journey you’ve embarked on.
Whether it’s a cozy throw or a decorative piece, every inch of effort is worth celebrating.
Quilting is not just about the final product; it’s about the experience, the smiles, and the creativity you’ve poured into it!
If you are eager to find more amazing content like this, I invite you to explore the treasure trove of articles on my blog.
Each piece has been crafted with love, ready for you to dive into.
I’ve prepared an incredible piece you won’t want to miss, just a step away from your next creative encounter by clicking here.
Happy quilting!


