Hey there!
I’m Julie, and I’m so excited to share my quilting journey with you.
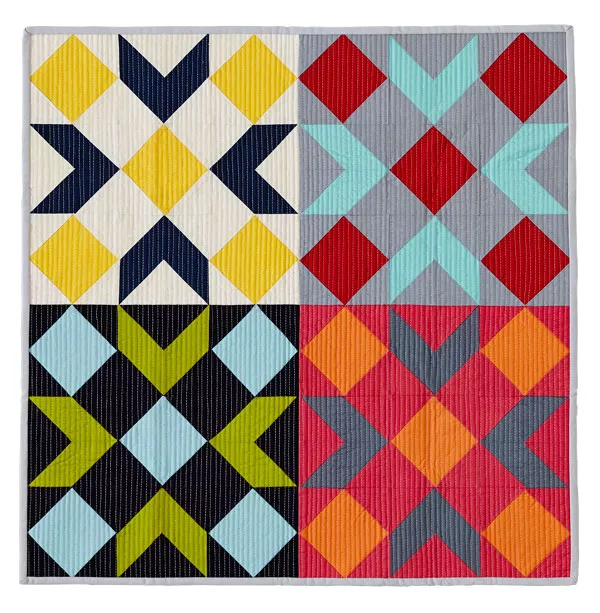
Recently, I decided to take on the challenge of creating a Mini Barn Quilt.
It’s one of those projects that feels like a breath of fresh air, while also packing a punch of creativity.
Every piece of fabric I selected excited me more than the last, making the process feel like a vibrant tapestry of possibilities.
As I started working on the Mini Barn Quilt, I couldn’t help but think about how quilts evoke such a sense of warmth and belonging.
Each square creates a memory, a story stitched into fabric.
The process was so enjoyable that I found myself fully immersed, and I can’t wait to guide you through it!
The Beauty of Modern Design in the Mini Barn Quilt
What strikes me about the Mini Barn Quilt is its ability to blend traditional crafting with a modern flair.
This pattern allows you to play with solid fabrics and vertical line quilting, giving off a chic and contemporary vibe.
It’s approachable for beginners, yet also appealing to seasoned quilters wanting to experiment with new styles.
The design mimics a classic barn quilt but adds a twist that makes it uniquely your own.
As you work through this project, you’ll notice how versatile the layout can be, allowing your personality to shine through in your final piece.
Trust me, this is a project worth diving into!
Understanding the Components of the Mini Barn Quilt
The Mini Barn Quilt isn’t just a simple pattern; it’s an opportunity for creativity and experimentation.
Each component, from the selection of fat quarters to the assembly of blocks, plays a crucial role in achieving that perfect finished quilt.
You can customize this project based on your fabric choices and personal style.
Don’t shy away from mixing colors and patterns!
Using the Bella Solids collection by Moda Fabrics opens up a world of possibilities.
They have a stunning range of solid fabrics that will harmonize beautifully in your Mini Barn Quilt, making it truly one-of-a-kind.
Materials Needed
- 12 fat quarters (18×21” pieces) of assorted solids (4 each for positions 1, 2, and 3 blocks)
- 1½ yards of solid light gray fabric for binding and backing
- 34″ square batting
Gathering these materials is the first thrilling part of your project.
It’s like picking out the perfect ingredients for a recipe!
Once you have your fabric ready, you will feel the excitement build as you prepare to create your Mini Barn Quilt.
Make sure to choose colors that inspire you!
Whether you opt for vibrant hues or muted tones, your personal touch will elevate your Mini Barn Quilt from a simple project to a cherished creation.
Preparing for Success
Before you jump into stitching, take a moment to prep your workspace and fabrics.
Ironing your fabrics before cutting will ensure accurate measurements and cleaner seams.
Plus, a tidy workspace will make the process much more enjoyable!
Additionally, review the pattern instructions thoroughly.
Familiarize yourself with each step so you can visualize how your Mini Barn Quilt will come together.
This forethought can save you time and frustration as you work through the blocks and assembly.
Step-by-Step Instructions:
Prepare to transform those gorgeous fabrics into a beautiful Mini Barn Quilt!
Below, you’ll find the detailed steps to guide you through the process.
Make sure to access the full pattern via the link provided for additional insights.
Full Pattern: Click Here
Additional Tips for Quilting Success
As you work through constructing your Mini Barn Quilt, keep in mind the importance of pressing your seams open after each step.
This simple technique can help to reduce bulk and give your quilt a polished finish.
Don’t hesitate to take breaks!
Sometimes, stepping away for a bit can help clear your mind and give you fresh energy to approach the next steps of the project.
Plus, a little time away can reignite your passion for the Mini Barn Quilt.
Diving Deeper: Advanced Techniques to Explore
If you’re feeling adventurous, experiment with different quilting techniques on your Mini Barn Quilt.
Adding decorative stitches can enhance the modern flair, making it more than just a block of fabric but a stunning art piece!
Consider using contrasting thread colors for your quilting lines; this can create interesting visual dynamics that showcase the quilt pattern in a fun and unique way.
Embrace the freedom to innovate and make this quilt truly yours.
Celebrating Your Creative Journey
Congrats!
You’ve made it through the process of creating your Mini Barn Quilt.
Take a moment to embrace the hard work and dedication you put into each stitch.
The satisfaction of completing such a beautiful project is a celebration in itself!
Feeling inspired?
This blog is brimming with incredible content just waiting to be explored!
Dive deeper into my other articles to enhance your quilting skills.
Trust me, you won’t be disappointed!
Start your fun journey by giving this link a click! Together, let’s keep the creativity flowing!
Reflect on your started journey with this quilt; every piece of fabric tells a story, and now you have created a piece that will recapture memories for years to come.
Until next time, happy quilting!


