Have you ever looked at a quilt and thought, “Wow, that could totally belong in a cozy winter wonderland”?
SEE A NEW PATTERN HERE
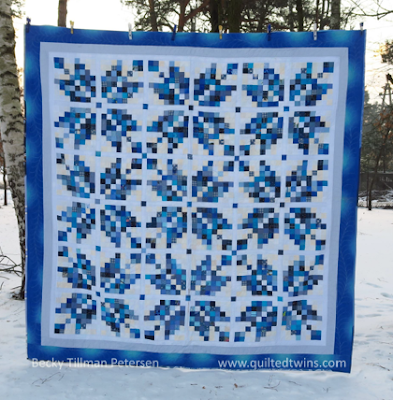
That’s how I felt when I laid eyes on the Norwegian Snowflakes quilt pattern for the first time.
The way those blues danced together reminded me of a snowy mountain backdrop, and I was instantly captivated!
As I embarked on my own journey to create this stunning quilt, I felt like I was bringing a piece of winter into my home.
It’s quite therapeutic to sit with fabric and a sewing machine, totally zoned in on the project.
As I stitched away, crafting each breathtaking snowflake block, the vibe was downright magical.
What’s more, I even had a cup of hot cocoa beside me to keep the inspiration flowing!
If you’re ready to step into the world of quilting with the Norwegian Snowflakes pattern, let me tell you—you’re about to make something gorgeous.
This project will not just give you a beautiful quilt, but also an exhilarating sense of accomplishment!
Exploring Color Palettes and Patterns
The Norwegian Snowflakes quilt is undeniably a feast for the eyes.
With a beautiful medley of medium to dark blues along with crisp white accents, this quilt just sings winter vibes.
The contrast of the bold blues against the bright whites gives a rhythmic feel to the design, almost like snowflakes cascading down from a sky filled with shimmering stars.
Each square is like a tiny masterpiece that prepares you for the impending chill of winter.
But what’s even more fascinating is the way you can play with the shades!
The various blues not only add depth but also give character to your quilt.
You might surprise yourself by coming up with some unexpected combinations that personalize the Norwegian Snowflakes quilt pattern even further.
So grab those fabric swatches and start imagining the harmonious blend you’ll create!
The Significance of Block Construction
The construction of blocks in the Norwegian Snowflakes quilt is where the magic truly happens.
The quilt is designed in an 8×8 grid, where each of those tiny two-inch squares transforms into a striking snowflake!
Each block measures 12.5 inches square before assembly, and I assure you, it’s going to be so satisfying to see your individual creations come together.
While piecing your blocks, don’t forget to take advantage of strip piecing!
This technique speeds up the process and helps create that unique interlocking look.
Make your preparations in advance, and try to keep various combinations of fabric strips ready next to your sewing station.
That way, you’ll have everything you need at your fingertips.
Talk about a fun time quilt-making!
Materials
- About 4 3/4 yards of various medium to dark blues for the 2” squares.
- About 4 5/8 yards of white scraps for 2” squares, sashing, and border.
- 7/8 yard of light blue for the first thin border.
- 1 5/8 yards of medium blue for the outer thicker border.
- ½ – 5/8 yard of fabric for binding (I used scrappy 2.5” strips).
- Rotary cutter, mat, and ruler for efficient cutting.
- Thread matching your fabric for seamless seams.
- A sewing machine (get ready for some fun stitching!).
Preparation Tips to Get Started
Before diving in, here’s a little prep advice: organize your work area!
Gather your materials and cut your fabric into the necessary sizes ahead of time.
Lay out your measurements and remember that the magic is in the details.
Having everything ready will save you time and lots of frustration during the quilting process.
Another crucial step is to familiarize yourself with the quilt assembly diagram.
This will guide you in arranging your blocks correctly, so you create that amazing snowflake effect you’re aiming for.
Take your time with the initial preparation; a bit of organization now can set the tone for a smooth and enjoyable quilting experience!
Step-by-Step Instructions:
The moment you’ve been waiting for—let’s delve into the step-by-step instructions for crafting your stunning Norwegian Snowflakes quilt!
Remember, I’ll provide you with the link for the full pattern access below.
Full Pattern: Click Here
Additional Tips for a Successful Quilt
Here’s a little golden nugget: don’t rush the pressing stage!
Get your seams nice and flat for that polished finish.
It makes a world of difference when you assemble the quilt top.
Also, if you find yourself hitting a rough patch, take a break.
Step back, sip some tea, and come back to your project refreshed.
Trust me; your quilting efforts will benefit from it!
Another cool trick is to experiment with quilting styles when you reach that stage.
From free-motion to straight-line quilting, the options are endless!
Each style can dramatically change the look of your Norwegian Snowflakes quilt.
Dive in and try different techniques to find what resonates with you the most!
The Joy of Finishing Touches
As you complete the final steps of the Norwegian Snowflakes quilt—binding, and finishing—take a moment to appreciate your hard work!
There’s something truly fulfilling about seeing all those little pieces come together into a cohesive, breathtaking work of art.
Celebrate each stitch, every color selection, and all the delightful challenges along the way!
If you’re looking for more inspiration post-project, we’ve got plenty of content just waiting for you.
Dive deeper into our treasure trove of fabulous quilting articles and techniques.
Can’t resist that creative urge?
You can explore another stunning project by clicking here!
Now, go ahead and revel in the beauty of your newly finished Norwegian Snowflakes quilt!
As the snowflakes swirl around outside, know that you’ve captured their elegance in fabric form.
I hope your quilting journey is as colorful and inspiring as the quilt itself!


