Hey, fellow quilters!
Julie here, and today I’m bubbling with excitement to share with you the wonderful world of the Peppermint quilt pattern.
Let’s just say, I’m a sucker for all things festive and colorful, and nothing gets me quite as giddy as creating a quilt that celebrates the sweet essence of the holiday season.
The Peppermint quilt is one of those delightful projects that can fill your heart with joy as you stitch each piece together, knowing that it will bring warmth and cheer during the chilly months ahead.
As I sat down to embark on this crafting adventure, I remembered that feeling of anticipation you get when you unwrap a special gift.
The colors, the textures, and just the thought of snuggling under something you created with your own hands gives you an amusing thrill!
Today’s project is not only great for getting your festive vibes flowing but is also a perfect way to enjoy some quality time with your fabrics.
So grab your scissors, and let’s dive into the Peppermint quilt pattern!
Adding a Dash of Color: Celebrating Fabrics and Creativity
When it comes to the Peppermint quilt pattern, choosing the right fabrics is just as important as the stitching itself.
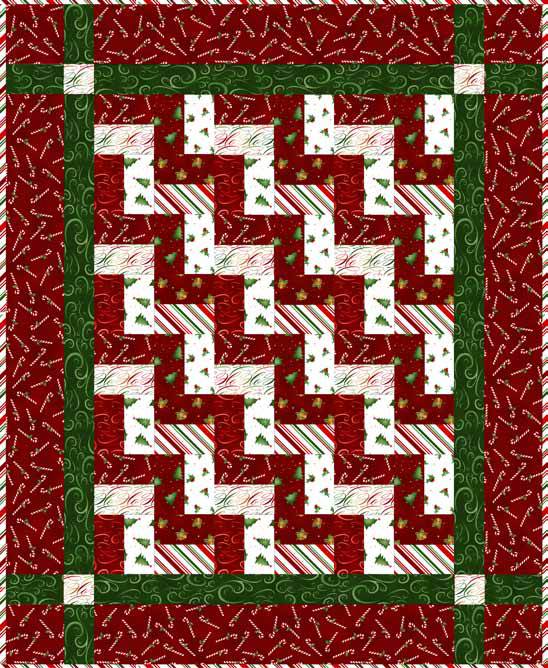
The pattern makes use of adorable prints from Maywood Studio’s Christmas Classics 2013 collection.
I absolutely love how the rich reds, whites, and greens come together, creating a visual feast for the eyes and a must-have addition to any holiday decor.
In this pattern, classically festive prints like candy canes, holly, and trees come to life, making it easy to decorate your home with a personal touch.
Selecting each piece of fabric is not merely about aesthetics; it’s also about creating a quilt that embodies the spirit of the holidays, evoking memories of joy and celebration.
Trust me, every stitch makes it feel like a cozy hug!
Getting Started: Essential Materials
- Fabric A: 3/4 yards of Red Candy Canes (MAS621-R)
- Fabric B: FQ of White Holly (MAS622-W)
- Fabric C: FQ of Red Trees (MAS620-R)
- Fabric D: FQ of Red Jingle Bells (MAS619-R)
- Fabric E: FQ of Red Chilly Wind (MAS624-R)
- Fabric F: FQ of Multi Ho Ho Ho (MAS627-Z)
- Fabric G: 2/3 yards of Candy Cane Stripe (MAS625-W)
- Fabric H: FQ of White Trees (MAS620-W)
- Fabric I: 1/2 yard of Green Chilly Wind (MAS624-G)
- Backing: 1-1/2 yards (Your choice)
Preparing Your Workspace for Success
Before I jump into sewing my Peppermint quilt pattern, I always take a moment to tidy my workspace.
First things first, having your fabric neatly organized will not only lighten your mood but will enhance your creativity and efficiency.
Lay out all the fabrics you’ll be using, and perhaps even group them based on their uses—this often gives me a clearer vision of how they will come together!
Next, I highly recommend having all your cutting tools and sewing materials close at hand.
You’ll want your rotary cutter, ruler, pins, and any other necessary tools so you can easily transition between cutting and stitching.
And don’t forget that cup of joy—aka your favorite snack or beverage—to keep your energy up while getting into the crafting groove!
Step-by-Step Instructions:
Now, it’s time to get down to the nitty-gritty.
Below are the step-by-step instructions to guide you through the Peppermint quilt pattern.
The full pattern can be accessed via the link provided just after the image.
Let’s stitch our way to something beautiful!
Full Pattern: Click Here
Additional Tips for Your Quilting Adventure
To ensure a fantastic outcome, always remember to press your seams!
This is one of those steps that makes a world of difference, helping your quilt lie flat and look neat and professional.
And here’s a pro tip: press towards the darker fabric to help the seams blend in seamlessly.
If you’re new to quilting or the Peppermint quilt pattern seems a bit complex, take your time!
Don’t rush.
Enjoy the process as you weave your unique story into this creation.
Each stitch is a little piece of yourself, and it should be celebrated!
Exploring Design Considerations and Advanced Techniques
As you venture into deeper stages of the Peppermint quilt, don’t hesitate to express your creativity.
Customizing the quilt’s dimensions or altering a few blocks can help you develop your own signature style.
For instance, some quilters add their own embroidery or even personalized labels for that special touch.
For those of you who are already seasoned quilters, consider exploring the idea of enhancing your quilt with additional quilting techniques, such as free-motion quilting or adding embellishments.
These techniques can add those magical finishing touches that will have everyone admiring your work!
Celebrate Your Creative Journey!
As you step back to admire the Peppermint quilt that you’ve so lovingly crafted, take a moment to appreciate all the time, effort, and creativity you poured into it.
Each quilt is a testimony to your artistic journey, and it’s worth celebrating!
So, whether you keep it for yourself or gift it to a loved one, know that this quilt will bring warmth and smiles to whoever experiences its cozy embrace.
If you’re eager to keep the creativity flowing, our blog has an incredible treasure trove of articles!
Dive into the delightful universe of quilting inspiration by discovering tons of amazing content, including another piece I’ve prepared that you can check out by clicking here.
Remember, crafting is all about joy and expression, so never stop exploring!
In conclusion, my friends, the journey of creating your Peppermint quilt pattern is not only a fun project, but it is also filled with meaning, memories, and a sprinkle of holiday magic.
May every stitch remind you of the joy of creation and the love of family and friends!


