When I first embarked on my quilting journey, I was drawn to the simplicity and beauty of traditional quilt blocks.
The Sawtooth Star, with its crisp lines and classic design, captured my imagination from the start.
This block reminded me of the starry skies I used to gaze at as a child, and it felt like a perfect representation of my love for patterns and symmetry. I was determined to master it and incorporate its timeless elegance into my quilts.
The Sawtooth Star is more than just a design—it’s a gateway to creativity. Whether you choose bold, vibrant colors or soft, muted hues, this block allows for endless experimentation with fabrics, textures, and patterns.
Its versatility makes it a favorite among quilters of all skill levels, from beginners looking for a manageable project to seasoned quilters seeking a classic addition to their repertoire.
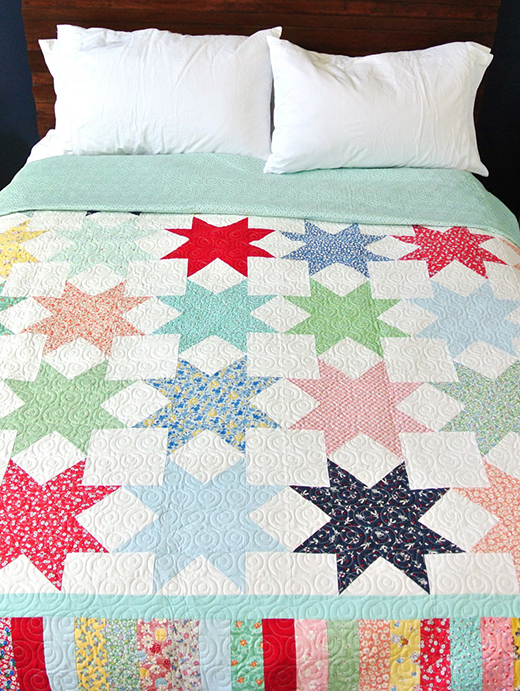
The Allure of the Sawtooth Star: A Quilter’s Essential
The Sawtooth Star quilt block is a staple in the quilting community, known for its simplicity and versatility. Featuring a central square surrounded by “flying geese” units, the design offers a perfect canvas for showcasing beautiful fabrics.
The appeal of the Sawtooth Star lies in its ability to adapt to various styles and preferences. It can be the centerpiece of a quilt or one of many stars in a galaxy of designs. This block’s clean lines and symmetry provide a harmonious balance that enhances any quilt’s aesthetic.
Full Pattern: Click Here
Mastering the Flying Geese Technique
The “flying geese” units are a defining feature of the Sawtooth Star, giving the block its distinctive star-like points. Learning to make these units accurately is crucial for achieving the desired look.
The technique involves sewing smaller triangles to create a rectangular unit, which is then arranged around the center square to form the star’s points. Precision in cutting and stitching these units is key to maintaining the block’s overall sharpness and symmetry. By mastering the “flying geese” technique, quilters can expand their skill set and add a dynamic element to their designs.
Materials
- Gold floral fabric: Scraps
- Cream print fabric: Scraps
- Cutting Instructions:
- From gold floral fabric:
- 1 piece 4½” square
- 8 pieces 2½” squares
- From cream print fabric:
- 4 pieces 2½” x 4½” rectangles
- 4 pieces 2½” squares
- From gold floral fabric:
Getting Started: Preparing Your Workspace
Before you dive into making your Sawtooth Star quilt block, it’s essential to set up your workspace for success. Make sure your sewing area is clean and organized, with all your tools within easy reach.
A well-lit space will help you see your stitches clearly, and having a dedicated area for pressing your seams will ensure that each piece lays flat and neat. Gather all your materials, double-check your measurements, and prepare to start with confidence.
Step-by-Step Instructions
- Mark the Sewing Lines: Begin by marking a diagonal line on the wrong side of each of the 2½” gold floral squares using a quilting pencil or a fabric marker. This line will guide your stitching and help ensure accurate seams.
- Make the Flying Geese Units: Take one marked gold floral square and align it with one end of a cream print 2½” x 4½” rectangle, ensuring that the diagonal line is oriented from the corner to the center of the rectangle. Sew directly on the line. Trim the excess fabric ¼” away from the seam, then press the remaining triangle open. Repeat on the opposite end of the rectangle to complete one flying geese unit. Repeat this process to make a total of four flying geese units.
- Assemble the Star Points: Next, align two of the flying geese units on opposite sides of the 4½” gold floral square, matching the edges. Sew them together with a ¼” seam allowance, pressing the seams toward the center square. This forms the top and bottom of the star block.
- Complete the Sawtooth Star Block: To finish, attach a 2½” cream print square to each end of the remaining two flying geese units. Press the seams towards the cream print squares to reduce bulk. Sew these units to the left and right sides of the center assembly, carefully aligning the edges and points to ensure a perfect square. Press all seams flat, and your Sawtooth Star block is complete!
Additional Tips
- Use a ¼” Foot: A ¼” sewing foot can help maintain a consistent seam allowance, which is crucial for piecing quilt blocks accurately.
- Chain Piecing for Efficiency: If making multiple blocks, consider chain piecing to save time and keep your sewing organized. Chain piecing involves sewing multiple pieces in a continuous line without cutting the thread between each one.
- Pressing Tips: Press seams to the darker fabric side whenever possible to prevent fabric from showing through and to reduce bulk at intersecting seams. Use a pressing cloth to protect delicate fabrics.
Completing a Sawtooth Star quilt block is both a satisfying and educational experience, providing valuable practice in precision cutting, piecing, and pressing. As you step back and admire your finished block, remember that each one is a reflection of your growing skills and creativity.
Embrace the process, enjoy the journey, and take pride in every step toward creating your unique quilt masterpiece. The Sawtooth Star, with its classic charm and endless possibilities, is a wonderful addition to any quilter’s collection. Happy quilting!


