Hello, my fellow quilting enthusiasts!
Today, I’m excited to share with you a captivating quilting project—the stunning Amish Star Quilt Block!
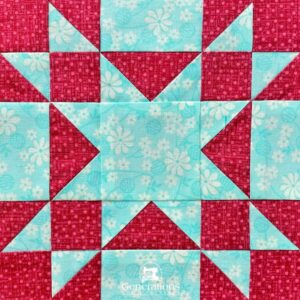
This mesmerizing block may appear intricate, but fear not, it’s just a simple 9-patch with some clever techniques.
As we embark on this quilting journey together, let me take a moment to reminisce about a cherished memory—a visit to an Amish community, where the art of quilting is a beloved tradition.
Surrounded by warmth and creativity, I was deeply inspired by the Amish quilts, especially the mesmerizing Amish Star.
Now, I’m delighted to guide you through the process of crafting your very own Amish Star quilt block!
Unraveling the Amish Star Quilt Block
The Amish Star quilt block, with all its patches, might seem more complex than it truly is. In reality, it’s just a simple 9-patch, making it an accessible project for quilters of all levels. We’ll use the 8-at-a-time method to create our half square triangles, while paper piecing the Flying Geese ensures perfect units every time. However, if paper piecing isn’t your thing, fret not!
A connector corners method is also provided, so you have options to suit your preference. The rest of the block is made up of cut squares and rectangles, making this project achievable and enjoyable for everyone.
Materials Needed
Before we get started, gather all the materials required for this project:
- Fabric in two contrasting colors (refer to the cutting chart for quantities and sizes).
- Sewing machine and thread.
- Pins.
- Ruler and rotary cutter.
- Paper for printing paper piecing patterns (if using paper piecing).
- Iron (optional, for pressing).
Step-by-Step Tutorial:
Step 1: Cut Patches for the Amish Star Quilt Block
To begin, we’ll cut the fabric patches needed for the Amish Star quilt block. The cutting chart provides the patch dimensions for three finished block sizes: 6″, 9″, and 12″. The block is a perfect 9-patch design, and you’ll need just two fabrics to create this beautiful masterpiece.
Cutting Chart for an Amish Star Quilt Block (Traditional Piecing w/Connector Corners): (Patch – Fabric – Quantity – Finished Block Sizes)
- Patch 1: Light – 1 square – 4¼” x 4¼”, 5¼” x 5¼”, 6¼” x 6¼”
- Patch 2: Dark – 1 square – 4¼” x 4¼”, 5¼” x 5¼”, 6¼” x 6¼”
- Patch 3: Dark – 8 squares – 1½” x 1½”, 2″ x 2″, 2½” x 2½”
- Patch 4: Light – 4 rectangles – 1½” x 2½”, 2″ x 3½”, 2½” x 4½”
- Patch 5: Dark – 4 rectangles – 1½” x 2½”, 2″ x 3½”, 2½” x 4½”
- Patch 6: Light – 8 squares – 1½” x 1½”, 2″ x 2″, 2½” x 2½”
- Patch 7: Light – 1 square – 2½” x 2½”, 3½” x 3½”, 4½” x 4½”
- Unfinished Block Sizes: 6½”, 9½”, 12½”
- Grid Sizes: 1″, 1½”, 2″
Step 2: Assemble the Units for the Amish Star Quilt Block
Now that the patches are cut, let’s move on to assembling the units for the Amish Star quilt block. We’ll create two types of units—the corners and the sides.
Corners:
- To make the corners, we’ll use the 8-at-a-time method for half square triangles (HSTs).
- Mark diagonal lines on the back of each #1 square and layer it with a #2 square with right sides together (RST).
- Stitch 1/4″ from both sides of the marked lines.
- Cut the sewn unit into four equal squares using the measurements provided in the chart.
- Add a #3 square to one side of each HST and press the seam allowance (SA) towards #3.
- Join two units together, ensuring the seams nest for easier matching.
Sides:
- For the sides, we’ll use paper piecing or the connector corners method (depending on your preference).
- If using paper piecing, print the provided patterns and sew Flying Geese units.
- For the connector corners method, follow the provided tutorial for step-by-step instructions.
- Press the seam allowances in the indicated directions.
Step 3: Assemble the Amish Star Quilt Block
With all units ready, it’s time to arrange them into the mesmerizing Amish Star design. Stitch the rows together, pinning as needed to ensure accuracy. Press the seam allowances in the direction indicated for each row. Stitch the rows together, ensuring the seam allowances nest for easier matching. And voilà! Your Amish Star quilt block is complete and ready to be part of a quilt top!
Full Pattern: Click Here
Congratulations on creating the striking Amish Star Quilt Block! This beautiful block, with its intriguing design, is a testament to your creativity and love for quilting. Whether you choose traditional piecing or paper piecing, the Amish Star’s allure shines through. I hope you had an enjoyable and rewarding experience crafting this masterpiece.
As you continue your quilting journey, remember that each block is a reflection of your unique style and passion for this timeless art. Embrace the creative process and cherish the joy of quilting with every stitch.


