On low tide days, I always end up reading the shoreline like a quilt map, and this one follows those little tide-pool shapes.
I started Sea Glass Ledger with a handful of deep cobalt and teal scraps, thinking they’d make a calm ocean—but the uneven pool edges had their own voice.
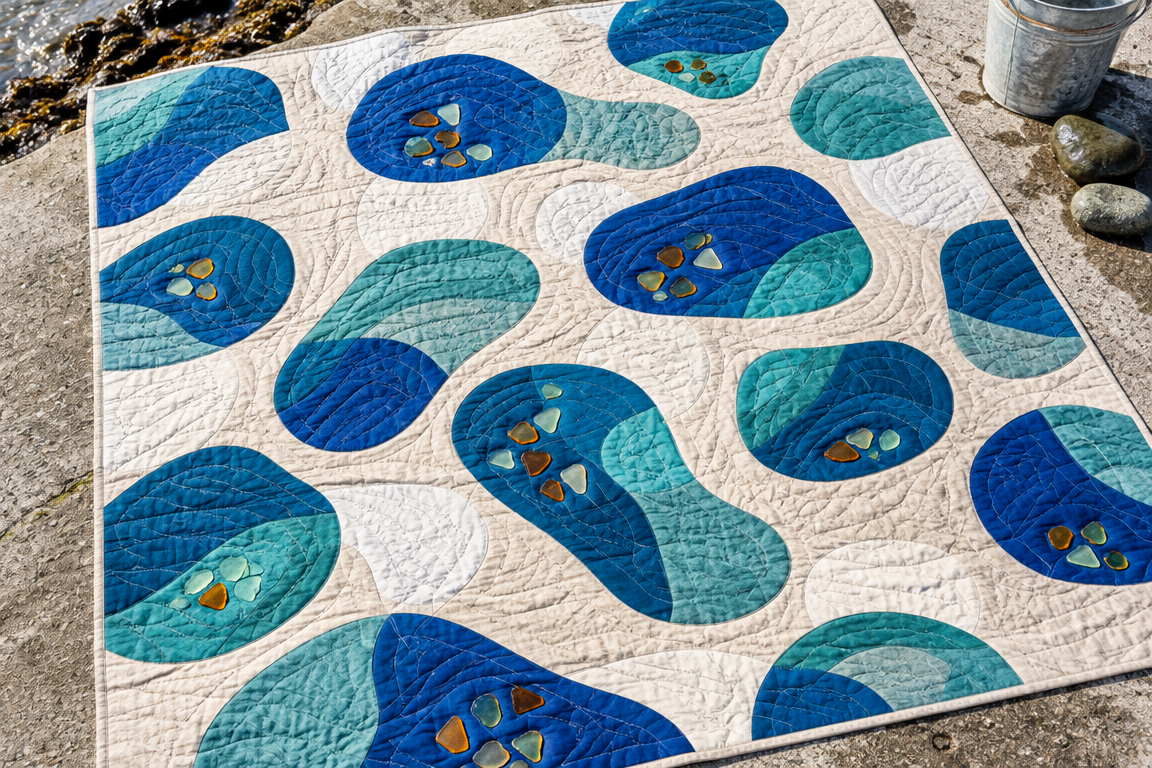
Once I hand-pieced the drunkard’s-path blocks, the foam-white curves landed exactly like sea-glass bubbles resting in sand.
Between those pools, narrow striped sashing feels like the shoreline’s quiet “grid,” holding the whole story together.
For the photo, I laid the quilt flat on a sunlit concrete boat ramp, letting the light highlight the curves the way wet pebbles do.
A zinc bucket and two wet stones sat just at the corner of the frame, because this quilt is meant to look a little like it came straight from the shore.
I’m Julie, and today I’m sharing the pattern and the little finishing secrets that make the tide-pool shapes look alive.
Why Sea Glass Ledger Feels Like Shoreline Foam
This quilt’s charm comes from the way each drunkard’s-path block builds an uneven pool—some edges feel rounded, others slightly jagged like real tide pools.
The deep cobalt and teal fabric reads as the cool water layer, while foam white makes the “bubbles” and soft highlights you’d notice at the very edge of the surf.
Inside every pool, I tuck in small amber and sea-glass-green shard appliqués so each shape has a bright glint, like bits of glass waiting under the sand.
The narrow striped sashing frames the layout without stealing the show, so the center story stays sculptural and dimensional.
Hand-Pieced Curves and Color Play That Looks Like Glass
I love drunkard’s-path because it’s forgiving in the places that matter and dramatic in the places that don’t.
To get that tide-pool feel, I intentionally vary where the curve falls from block to block, letting the seam lines create natural irregularity.
For color, I use a pale sand-toned ground as the calm background, then layer in cobalt, teal, and foam white for the water-and-foam contrast.
The shard appliqués are the “spark,” and I place them so they echo the direction of the curve, like tiny reflections inside each pool.
Materials for Sea Glass Ledger
- Fat quarters and half-yard cuts for pools: plan about 10 to 12 fat quarters total in deep cobalt, teal, foam white, and the pale sand ground
- Background sand-toned fabric (if using a yardage yard): about 2 yards for blocks and sashing foundation
- Narrow striped sashing: about 1 yard (or enough to cut your required sashing strips across the width)
- Appliqué shards (amber and sea-glass green): 1/4 yard each, or scrap amounts totaling about 1/2 yard
- Backing: about 5 1/2 yards (directional fabric optional, but matching seams helps)
- Batting: about 5 1/2 yards of queen-size or the size that matches your planned layout
- Binding: about 1 1/4 to 1 1/2 yards of fabric (or 2 1/4 yards if you prefer wider strips)
If you like to piece everything from scraps, you can treat the pool fabrics as “your shoreline stash” and just keep a close eye on contrast so the curves read clearly from a few feet away.
For thread, choose a matching thread color for the piecing and a matching thread for the quilting so the curves look like they were drawn in light and shadow.
Prep and Workspace Tips Before You Sew
Before I touch a needle, I press everything and sort fabrics by value—cobalt and teal together, foam highlights together, and shards separate so they don’t get lost.
I also draw a quick layout map on paper so I can play with pool-to-pool rhythm before I commit to sewing.
Then I set up my workspace with good lighting and a small pressing station, because curved seams reward consistent heat and gentle handling.
Once the drunkard’s-path units are pieced, I press them in a way that supports clean nesting at assembly, so the curves line up like tide pools meeting at the shoreline.
Download the Sea Glass Ledger Pattern
The full step-by-step instructions for Sea Glass Ledger are below the photo in the link, including how to place the shard appliqués and assemble the layout into the final quilt top.
Extra Tips for a Cleaner, Sharper Finish
When you sew curved seams, take your time and let the fabric do the walking, keeping the seam allowances consistent so your pool edges stay crisp.
For appliqué, I use small, secure placement and stitch close enough to feel polished but not so close that the shards look bulky.
Pressing matters most at the sashing intersections, so check alignment after every couple of rows and adjust before continuing.
A Slightly Advanced Touch: Ripple Echo Quilting
To make the quilt feel like it’s breathing, I echo-quilt a few ripple lines that radiate outward from the pools.
If you’d like to level up further, you can add a very subtle free-motion swirl inside one or two foam-white areas, keeping it light so the overall curves still lead the eye.
Borders are optional, but if you want them, a narrow frame in a calm sand tone helps the shoreline palette stay cohesive without overpowering the glassy sparkle.
Celebrating the Finished Sea Glass Ledger
When you step back from Sea Glass Ledger, the uneven tide-pool shapes and shard highlights settle into a single shoreline scene.
I love how the quilting follows every curve, because it turns the piecing into movement, like foam edges softly rewriting themselves with each wave.
If you’re ready to keep creating, choose your next project from Quilt Dreams and bring another small piece of your shoreline story into fabric.