Creating quilts has always been more than just a hobby for me—it’s a way to bring a bit of color and creativity into the world, one stitch at a time.
I remember the first quilt I ever made; it was a patchwork of mismatched fabrics, a chaotic burst of colors. It wasn’t perfect, but it was mine, a tangible expression of joy.
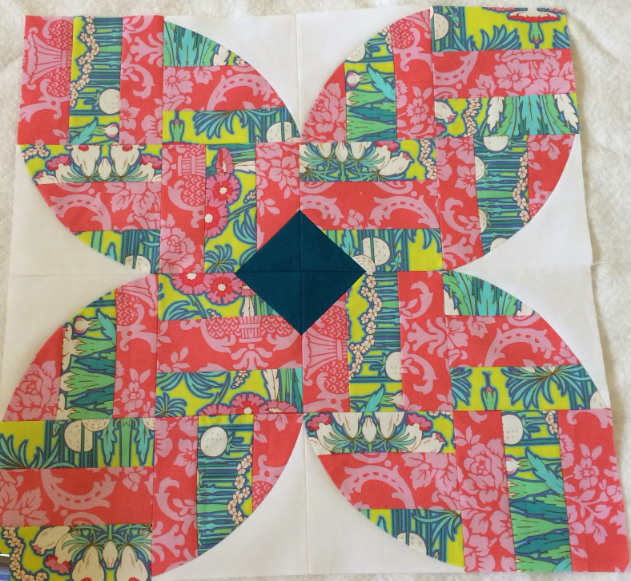
The quilt block I’m sharing with you today, the “Spring Fling,” takes me back to that initial thrill of creation. Its vibrant colors and playful curves are reminiscent of a garden in full bloom, capturing the essence of spring in every stitch.
The “Spring Fling” block is a delightful exploration of color and form, a journey into the whimsical world of quilting. With its bold prints and dynamic curves, this block is perfect for those looking to add a splash of springtime energy to their quilt projects.
It may seem intricate at first glance, but with a little patience and guidance, you’ll find that it’s a joyful, achievable project for quilters of all levels. Let’s dive into this colorful adventure together!
The Art of Curves: Embracing the Fluidity in Quilting
The “Spring Fling” block is particularly special because it incorporates curved piecing, a technique that adds a new level of fluidity and movement to the quilt. Unlike traditional straight-line piecing, curves allow for more organic and dynamic designs. Mastering curves can be a bit daunting, but it’s incredibly rewarding.
Each curve sewn is like turning a corner into a new realm of creativity. In this project, the curves create a petal-like effect, bringing to life the natural, flowing beauty of spring flowers.
Finding Harmony in Contrasting Fabrics
Another unique aspect of the “Spring Fling” block is its use of contrasting fabrics to create visual interest and depth. The block uses a combination of bold prints and solid background fabrics to create a striking contrast that highlights the design’s intricate curves and shapes.
Whether you choose to go with a range of assorted prints or opt for a more controlled palette with two coordinating prints, the result is a stunning interplay of color and pattern. This balance of boldness and simplicity makes “Spring Fling” an excellent project for experimenting with fabric choices and developing a keen eye for design.
Materials and Preparation
Materials Needed for the “Spring Fling” Block
Before we start piecing our “Spring Fling” block, let’s gather all the necessary materials. Here’s what you’ll need for one block:
- Fabric Strips: (9) 2 1/2″ x width of fabric (WOF) assorted strips or
- (4) 2 1/2″ x WOF blue/green print
- (4) 2 1/2″ x WOF pink print
- Background Fabric: (4) 7 1/2″ x 7 1/2″ squares (white)
- Flower Centers: (4) 3″ x 3″ squares for flower centers (teal), with a diagonal line drawn on the wrong side of each
- Quick Curve Ruler (QCR): For precise cutting of curved pieces
Getting Ready: Preparing Your Fabric and Tools
Before diving into the cutting and piecing, it’s important to prepare your fabric and tools. Start by pressing all your fabrics to remove any creases, ensuring smooth, precise cuts.
If you’re using two coordinating prints, take a moment to lay them out side-by-side to visualize the color flow and contrast. This step helps ensure your final block will have a balanced and harmonious look.
Additionally, ensure your cutting tools are sharp, especially when working with curves, as a clean cut makes a significant difference in ease of piecing. The Quick Curve Ruler is an essential tool for this project, so familiarize yourself with it by practicing a few test cuts on scrap fabric. This will help you feel more comfortable when cutting the actual pieces for your block.
Full Pattern: Click Here
Step-by-Step Instructions
Step 1: Preparing the Fabric Strips
Option 1: Using Assorted Prints
- Sew Strips Together: Select three assorted fabric strips and sew them together lengthwise. Repeat this process to create three sets. Ensure all seams are pressed in the same direction.
- Cut Strips into Rectangles: From each 3-strip set, cut (4) 6 1/2″ x 11″ rectangles. You should end up with a total of (12) rectangles from the three sets.
Option 2: Using Two Coordinating Prints
- Layout and Sew: Arrange three strips, alternating colors (e.g., blue, pink, blue). Sew these together. Repeat this process to make three sets.
- Cut Additional Strips: From the remaining two strips of each color, cut (3) 2 1/2″ x 6″ pieces. Alternate the colors again and sew to create smaller blocks.
- Cut Rectangles: From the strip sets, cut (2) 6 1/2″ x 11″ rectangles from each color layout. This results in four rectangles, two in each color layout.
Step 2: Cutting with the Quick Curve Ruler (QCR)
- Mark and Cut Curves: Take each 6 1/2″ x 11″ rectangle and mark 6 1/2″ from each long side at opposite ends. Position the Quick Curve Ruler’s curve cut-out over these marks, aligning it with the opposite corner. Cut along the curve.
- Repeat for All Rectangles: Continue this process for all the 6 1/2″ x 11″ rectangles to create a total of (8) curved pieces (referred to as “A curves”). Discard the small center pieces.
Step 3: Cutting the Background Fabric
- Prepare Background Squares: Cut each 7 1/2″ x 7 1/2″ white background square in half diagonally to form triangles.
- Trim Triangle Tips: Measure 1/2″ from each tip of the triangle and cut off the excess to create straight edges.
- Cut Curved Background Pieces: Using the QCR, position it over the points indicated and cut out the curve. Repeat for all background squares to create (8) curved pieces (referred to as “B shapes”).
Step 4: Piecing the Curves
- Match Curves: Lay out the (8) “A curves” with the (8) “B shapes.” Place each “A curve” on a “B shape,” leaving a 1/4″ to 1/2″ tail of “B” visible.
- Sew Curves Together: Holding one piece in each hand, gently align the curved edges as you feed them under the presser foot. Sew slowly, maintaining a consistent seam allowance. Repeat for all “A” and “B” pairs.
- Press Seams: Once sewn, press all seams towards the print fabric to ensure a smooth finish.
Step 5: Squaring Up the Curved Blocks
- Square Each Block: Use the QCR to square up each curved set to 6″ x 6″. Align the curved seam at the 1/8″ mark on opposite ends. Trim the right and top edges.
- Rotate and Trim: Lift the ruler, rotate the block 90 degrees, and line up the previously cut sides with the 6″ marks on the ruler. Trim the right and top edges again to ensure perfect squares. Repeat for all curved sets.
Step 6: Adding the Flower Centers
- Position Center Squares: Take the 3″ x 3″ teal squares and position them on the corners of the 6″ x 6″ strip set blocks, aligning them as shown in the image.
- Sew on the Diagonal: Sew each teal square along the drawn diagonal line to attach it to the strip set block.
- Trim and Press: Trim the excess fabric 1/4″ from the stitched seam. Press the seams open for a neat finish.
Step 7: Assembling the “Spring Fling” Block
- Layout Blocks: Arrange all your blocks as shown in the photo, alternating the directions of the pieced strips for visual interest.
- Sew Rows: Sew the blocks together to form rows, taking care to match seams and maintain a consistent seam allowance. Press the seams of each row.
- Join Rows: Sew the rows together to complete the “Spring Fling” block. Press the final seams to ensure your block lies flat.
Additional Tips for a Perfect Finish
- Practice Curves: If you’re new to sewing curves, practice on scrap fabric first. This will help build confidence and refine your technique before working on your actual quilt pieces.
- Use a Stiletto: A stiletto or awl can be helpful when guiding fabric under the presser foot, especially for maintaining alignment along curved seams.
- Press Carefully: When pressing seams, use a gentle hand and avoid distorting the fabric. Curved seams especially benefit from careful pressing to maintain their shape.
- Check Measurements: Frequently check the dimensions of your blocks throughout the process. Accurate measurements ensure all pieces fit together perfectly in the final assembly.
Congratulations! You’ve completed the “Spring Fling” block, a vibrant and dynamic addition to your quilt collection. By mastering curved piecing and experimenting with color contrasts, you’ve not only created a beautiful quilt block but also expanded your quilting skills. Each step taken in this project is a step towards honing your craft, blending creativity with precision.
As you admire your finished block, take a moment to appreciate the journey—from cutting and sewing to assembling and pressing. Quilting is more than just creating a product; it’s about the joy of the process and the satisfaction of bringing your artistic vision to life. Happy quilting!


