Growing up, I was enchanted by the vibrant colors and intricate patterns of quilts. Each stitch seemed to tell a story, and now, as I sit surrounded by fabric scraps, I’m reminded of those mesmerizing designs. This is the inspiration behind my latest project: the Spinning Star Quilt Block.
SEE A NEW PATTERN HEREUnderstanding the Spinning Star Pattern
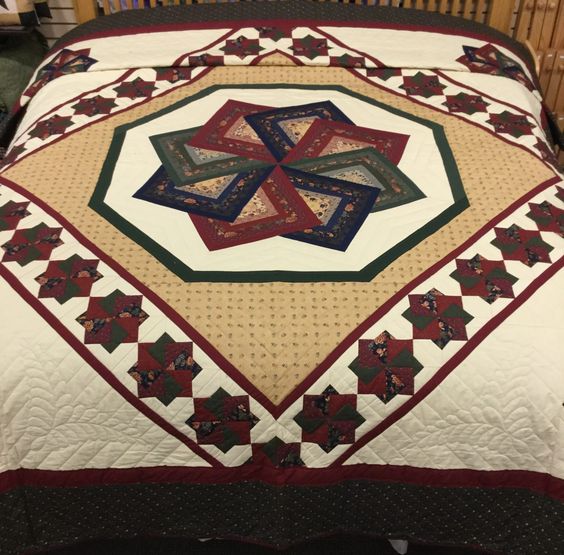
The Spinning Star quilt block is a beautiful blend of tradition and innovation. It’s characterized by its ability to create a dynamic, 3D effect, making the stars seem like they’re in motion. This pattern is not just visually appealing but also versatile, suitable for various quilting projects.
The allure of the Spinning Star quilt block lies in its intricate design that masterfully marries classic quilting techniques with a contemporary twist. Each element of the pattern works harmoniously to create an optical illusion of movement – the stars appear as if they are spinning, bringing a dynamic energy to the fabric.
This mesmerizing effect is achieved through careful placement of triangles and color play, showcasing the quilter’s skill and creativity. Its adaptability is another key feature, making it an excellent choice for a wide range of projects, from cozy bed quilts to decorative wall hangings. This pattern, with its blend of artistry and technical precision, is a testament to the evolving art of quilting, bridging the past and present in a beautiful, tangible form.
SEE A NEW PATTERN HEREMaterials Needed
- Assorted fabric pieces
- Quilting ruler
- Rotary cutter
- Cutting mat
- Thread
- Sewing machine
- Iron and ironing board
Step-by-Step Instructions
- In-Depth Fabric Selection: Begin by immersing yourself in the creative process of selecting fabrics. This step is about more than just picking colors; it’s about understanding how different textures and patterns interact. Consider the overall theme of your quilt and how each fabric contributes to the story you’re telling. Remember, the fabrics you choose will set the tone for your Spinning Star block.
- Precision Cutting: Cutting your fabric accurately is the foundation of your quilt block. Spend time ensuring your quarter-square and half-square triangles are cut to perfection. Use a rotary cutter for clean, straight lines, and always double-check measurements. This meticulous approach will pay off when your pieces fit together seamlessly.
- Thoughtful Arrangement: This step is where your quilt begins to come to life. Place your cut pieces on a flat surface, experimenting with different layouts. The arrangement isn’t just about the pattern; it’s about how the colors and textures play off each other. Take a step back, squint your eyes, and see how the overall design is shaping up. Sometimes, what looks good up close might need adjustment from a distance.
- Sewing with Care: As you start to sew your pieces together, focus on precision. The beauty of the Spinning Star pattern lies in its crisp points and clean lines. Take your time with each seam, ensuring that every piece aligns correctly. This step is not just about joining fabric; it’s about crafting a cohesive piece of art.
- Seam Pressing Technique: Properly pressed seams can make a significant difference in the final appearance of your quilt block. Each seam should be pressed with intention, thinking about how it affects the overall flatness and alignment of the block. This step might seem small, but it contributes greatly to the quality of your work.
- Block Squaring: Once your block is assembled, it’s crucial to square it up accurately. This step ensures that your block will fit perfectly with others in a larger quilt. Use a ruler and rotary cutter for precision, and don’t rush. The accuracy you achieve here sets the stage for a beautifully finished project.
- Consistency Across Blocks: If you’re creating multiple Spinning Star blocks, consistency is key. Pay attention to the size, shape, and color placement in each block. This uniformity will create a harmonious final quilt, where each block complements the others.
- Assembling the Quilt Top: Laying out and sewing together your quilt top is a rewarding process. As you arrange your blocks, consider the balance and flow of the overall design. Sewing the blocks together requires a steady hand and an eye for detail, ensuring that each seam aligns perfectly with its neighbor.
- Final Embellishments and Quilting: The final step is about bringing your quilt to life. Choose a backing that complements your quilt top and consider the batting that best suits your project. The quilting process itself is where you can get creative, adding texture and depth to your design. Finally, bind the edges for a polished, professional look.
Full Pattern: Click Here
Tips for Success
- Precision in cutting and piecing is key.
- Experiment with different color schemes for unique results.
- Beginners should start with larger blocks for easier handling.
Expanding the Pattern
This block can be the building block for various projects. From a stunning table topper to a full-sized quilt, the possibilities are endless. Combine this block with others for a sampler quilt, or repeat it to create a cohesive design.
Conclusion: A Starry Revelation
Every quilt tells a story, and the Spinning Star block is no different. It’s a testament to creativity, precision, and the joy of quilting. Whether you’re gifting it or adding it to your collection, this pattern is sure to bring a sense of achievement and beauty.


