Hello and a hearty welcome to all my dear readers! I’m Julie, and as some of you might have noticed, I often start my posts with a familiar warmth – it’s like opening the door to friends with a constant smile. Recently, I found myself flooded with your kind comments, over sixty of them, waiting like unopened letters.
SEE A NEW PATTERN HEREAfter a hiatus that left my website untouched for a year, returning to such engagement was a heartfelt surprise that reignited my passion for quilting and sharing with you all.
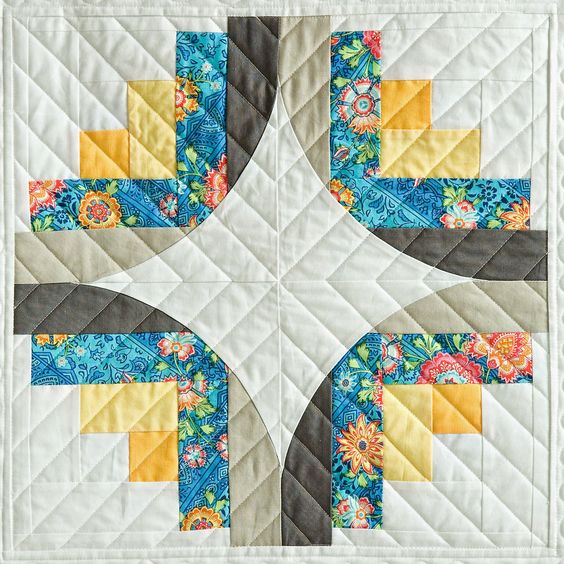
The Curve it Up Log Cabin: A Tapestry of Memories
As I dive back into the quilting world, I’m eager to embrace the patterns that speak to me, and today, it’s the Curve it Up Log Cabin that has captured my imagination. This pattern is a modern twist on the traditional Log Cabin quilt, incorporating gentle curves that challenge and invigorate my creative spirit. Each small fabric piece sewn into blocks represents a step in my journey, a patch in the quilt of my life.
A Patchwork of Progress
The Curve it Up Log Cabin is more than a pattern; it’s a metaphor for the pieces of our lives that we stitch together, day by day. Each block, whether destined to be part of a bedspread, a cozy rug, or a snug sofa blanket, is a testament to the joys of creation. This pattern, with its playful curves and comforting familiarity, is a delightful dance of fabric and thread that takes little time to learn but gives back a lifetime of warmth and beauty.
SEE A NEW PATTERN HERECrafting the Curve
Embarking on the creation of the Curve it Up Log Cabin quilt is a journey back to the essence of craft. It begins with the careful selection of fabrics, washing, and ironing each piece before cutting them into shapes that will soon form the foundation of our quilt. This process, though meticulous, is a meditative prelude to the symphony of sewing that follows
Step-by-Step
- Curating Your Fabrics: Begin your quilting journey by selecting fabrics that resonate with your aesthetic. Consider the traditional significance of the Log Cabin pattern; the center square often represents the hearth of the home. Choose colors and prints that reflect your personal story or the ambiance you wish to create. Wash and iron all fabric to ensure size consistency and ease of sewing.
- Cutting with Precision: For the “Curve it Up” variation, you’ll need to cut fabric for the curved log cabin blocks. Prepare by cutting small strips of varying widths that will spiral outward from a central square. The precise measurements will depend on the finished size of the block you desire.
- Sewing the Center Square: The center square is traditionally red, representing the heart of the home. Choose a fabric that stands out and cut a square to start your block. This will be the focal point around which your ‘logs’, or fabric strips, will be added.
- Adding the Logs: Begin adding strips around your center square, starting with the lighter strips and progressing to darker ones to give the effect of shadows in the cabin. Unlike the traditional Log Cabin block, you’ll be sewing curved strips to add a modern twist to your block.
- Creating the Curve: To sew the curves, pin your strips carefully, easing the fabric as you sew. Go slowly, ensuring the fabric doesn’t bunch up, and use a shorter stitch length for more control.
- Pressing Your Seams: As each ‘log’ is added, press the seams away from the center. This will help your block lay flat and ensure the curves are smooth. Pressing is just as important as sewing in quilting – it affects the final look of your quilt.
- Trimming for Perfection: After adding a few logs, stop and trim your block. This will keep your block square and ensure that your quilt top comes together cleanly. Use a square quilting ruler for this step to maintain the correct size and angles.
- Completing the Block: Continue adding and pressing logs until your block reaches the desired size. Each addition should contrast with the previous log to emphasize the curving effect. The last logs will be the darkest, giving your block a sense of depth.
- Assembling the Quilt Top: Once you have enough blocks for your quilt, arrange them on a flat surface to decide on the layout. Play with the direction of the curves to create movement in your quilt top. Sew the blocks together, matching up seams and points, to form rows, then sew the rows together, pressing seams as you go for a smooth finish.
Follow these steps with attention and care, and the “Curve it Up” Log Cabin quilt will come together as a beautiful testament to your skill and creativity. Each block will curve uniquely, just like the moments in our lives, making this quilt a deeply personal and striking work of art.
A Renewed Perspective
Personal reasons may have pulled me away from the internet, but my hands never stopped creating. Now, I return with a renewed perspective, ready to share and inspire with free content that I hope will uplift and aid many. Your messages of encouragement have been the wind beneath my wings, and for that, I am eternally grateful.
Full Pattern: Click Here
The Road We’ve Stitched Together
As we draw the fabric under our final stitches, we close not just the seams of our quilt but also this chapter of our creative journey. The “Curve it Up” Log Cabin quilt, now a tangible testament to our shared dedication, stands as a beacon of warmth, comfort, and the unwavering spirit of innovation that quilting embodies. Through each slice of the rotary cutter and each curve pieced together, we’ve not only shaped fabric but also fortified the very essence of what makes our craft so enduring.
As you drape the fruits of your labor over a chair or lay it across your bed, know that it is far more than a quilt; it’s a mosaic of memories, a canvas of courage, and a comfort in the continuity of tradition. Thank you for joining me in this quilting quest, infusing life into the curves and corners of the Log Cabin pattern. May your quilts hug you on chilly evenings and your heart swell with pride at every compliment they receive.
Until our next quilting adventure, cherish the quilt you’ve brought into being with your hands, heart, and story. Keep your quilting spirit vibrant, your stitches confident, and your passion for crafting alive.


