Hello, quilting enthusiasts! It’s Julie here, and today I’m thrilled to invite you into the world of the Lone Star quilt block, a design that’s as rich in history as it is in complexity.
Renowned for its stunning visual impact and symmetrical beauty, the Lone Star quilt block is a quintessential pattern in the quilting community, embodying a perfect blend of tradition and meticulous craftsmanship.
As we embark on this journey together, we’re not just piecing together fabrics; we’re weaving a narrative that ties us to generations of quilters before us.
The Lone Star quilt block is more than a project; it’s a passage into the heart of quilting heritage, a celebration of the art that has brought together communities and families for centuries. Join me in embracing this timeless tradition, as we step into the intricate and rewarding process of creating your very own Lone Star quilt block.
Why Choose the Lone Star Quilt Block?
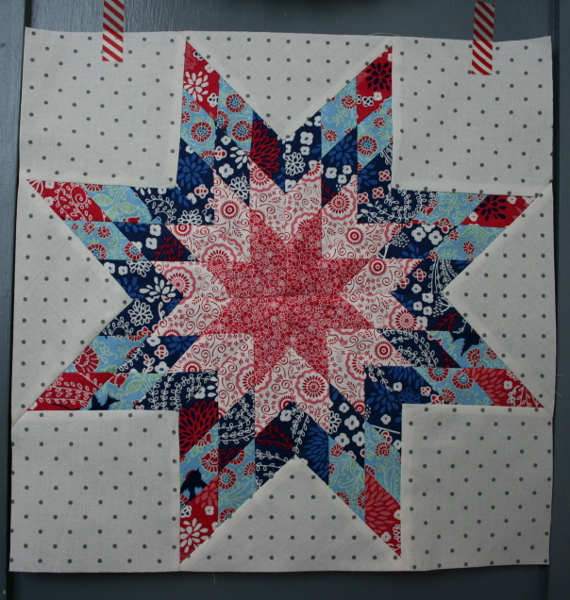
The Lone Star quilt block is more than a pattern; it’s a statement. Its captivating symmetry and radiant design have made it a beloved choice among quilters for generations.
Choosing to create a Lone Star is choosing to challenge oneself, to dive into a project that requires careful planning and meticulous execution.
Each fabric selection, each strip pieced together, contributes to a striking visual effect that is both bold and harmonious. The Lone Star is not just a quilt block; it’s a centerpiece, a focal point that draws the eye and captivates the viewer.
Materials and Preparation
In this creative journey, the selection of your fabrics marks the first step towards bringing your Lone Star quilt block to life. This stage is not just about picking colors; it’s about envisioning the final harmony of your masterpiece.
You’ll need to choose five fabrics that not only complement each other but also have their unique stand-out qualities. Think of each fabric as an actor playing a crucial role in your starry ensemble. The most critical fabric will be the star of the show, forming the center and the radiating points of your Lone Star.
As you transition into cutting your fabrics, remember that precision is key. This process lays the groundwork for your entire project. You will cut strips from your chosen fabrics, each strip becoming a building block for your quilt.
The width and length of these strips are essential, as they determine the size and overall look of your star. Handle your fabrics with care and attention, ensuring each strip is uniform and clean-cut.
Once your strips are ready, the magic of strip piecing begins. This technique involves sewing the strips together in a specific order, gradually building the structure of your Lone Star. As you join each strip, you’re not just creating the framework of your quilt block; you’re bringing your vision to life, strip by strip.
The way these fabrics intertwine and interact will define the rays of your star, creating a dance of colors and patterns that will captivate and charm.
Piecing Together the Star
As you assemble your diamonds and piece together the half stars, you’ll witness the magic of the Lone Star taking shape. This is where your precision in cutting and sewing comes to fruition. The process, although intricate, is incredibly gratifying.
Cutting Strips:
- Cut 1.5-inch wide strips from Fabrics 1, 2, 4, and 5.
- Cut two strips of Fabric #3.
- You’ll end up with 12 strips that are 1.5 inches wide and 21 inches long.
Creating Strip Sets:
- Make three sets: Fabrics 1, 2, 3; 2, 3, 4; and 3, 4, 5.
- Starch fabrics for consistency.
- Set aside extra strips of Fabrics 1, 3, and 5.
Sewing Strips:
- Sew the strips in each set together, offsetting each by about 1 inch.
- Press seams open.
Cutting Strips for Diamonds:
- Use a 45-degree angle on the cutting mat to cut the strip sets.
- Cut 8 strips from each set.
Piecing Diamonds:
- From each set, create 8 small diamonds.
- Focus on aligning seams and points.
Assembling Half Stars:
- Sew four diamonds to create a half-star.
- Repeat to make two halves.
Preparing Background Fabric:
- Cut six 5.5-inch squares.
- Cut two squares diagonally to get 4 squares and 4 triangles.
Sewing Y Seams:
- Place a square at the top left of the star.
- Pin and sew, pivoting at a marked 1/4 inch point.
- Incorporate background triangles and squares.
Completing the Star:
- Pin at each seam intersection.
- Sew carefully and press seams open.
- Add the last two triangles.
Finishing:
- Trim the block to 15 inches, ensuring a 1/4 inch seam allowance at the star points.
Background and Final Assembly
Choosing the right background fabric is crucial as it frames and enhances your star. The technique of sewing Y seams, while challenging, adds depth and dimension to your block. Finally, careful pressing and trimming will reveal the full beauty of your work.
Full Pattern: Click Here
As you put the final stitches into your Lone Star quilt block, you stand at the culmination of a journey that’s tested and showcased your skill, patience, and artistic vision. This block, with its captivating symmetry and complex design, transcends being merely a piece of fabric; it’s a tangible representation of your creative spirit and dedication.
For both beginners and experienced quilters, the Lone Star quilt block is more than just a project. It’s a connection to the rich, vibrant history of quilting, a tradition passed down through generations. Each point and seam you’ve created weaves you into this enduring tapestry, linking you to countless artisans who have found joy, solace, and expression in the art of quilting.
Your completed Lone Star block is not just an accomplishment; it’s a continuation of a story as old as quilting itself, and a personal milestone in your own quilting journey.


