Ever since I first discovered the world of quilting, I’ve been fascinated by the incredible versatility of simple geometric shapes. Growing up, my grandmother would weave intricate patterns out of tiny fabric scraps, transforming what seemed like mere leftovers into beautiful, cohesive works of art. One shape that particularly captivated me was the humble square. It’s amazing how one small unit can be used to create so many different quilt designs, each with its own unique character and story.
The Incredible Scrappy Bargello: A Symphony of Colors and Patterns
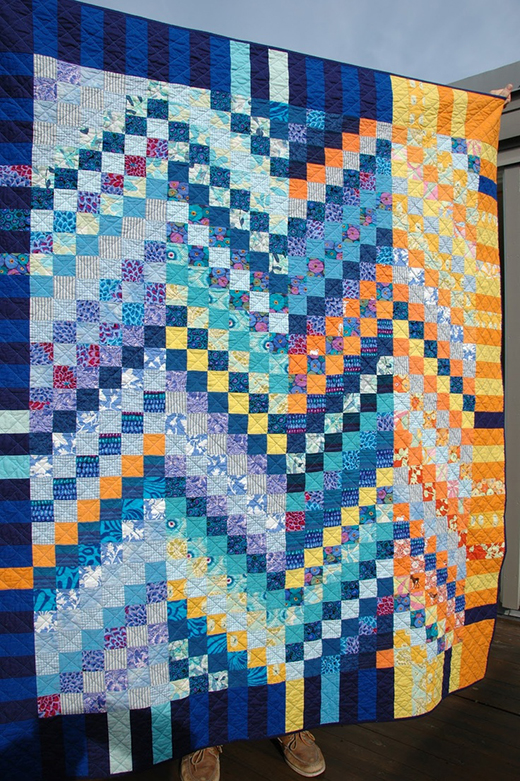
Quilts made from a single shape, like squares, have been cherished for centuries. From classic designs like One Patch and Trip Around the World to more complex patterns like the Boston Commons and Postage Stamp, these quilts hold a timeless appeal. Today, I want to share with you one of my favorite projects that epitomizes the essence of quilting: the Scrappy Bargello quilt. This quilt not only celebrates the beauty of simplicity but also offers a fantastic way to make a significant dent in your scrap fabric stash.
The Scrappy Bargello quilt is a true testament to the magic of quilting. Using a seemingly random assortment of fabric strips, this pattern weaves together a vibrant tapestry where every piece finds its place. The beauty of this project lies in its unpredictability—no matter how disparate your scraps might seem, they all come together harmoniously. This quilt is perfect for quilters looking to use up those odd pieces of fabric that have been collecting dust in their stash. So, gather your scraps and get ready for a delightful quilting adventure!
Full Pattern: Click Here
Materials: What You’ll Need for Your Scrappy Bargello Quilt
Before diving into the creation process, let’s ensure you have all the necessary materials for this project. Here’s what you’ll need to craft your Scrappy Bargello quilt:
- 128 Fabric Strips (2 1/2″ x 16″): These can be cut from fat quarters, leftover scraps, or any fabric you have on hand.
- Sewing Machine and Thread: Use a quality thread that matches your fabric choices.
- Scissors and Rotary Cutter: For precise cutting.
- Cutting Mat and Ruler: To ensure straight, accurate cuts.
- Iron and Ironing Board: To press your fabrics and seams.
- Pins or Clips: To hold your fabric pieces in place as you sew.
Preparing to Create: Tips and Considerations
Before starting your quilt, take a moment to prepare your workspace and gather your thoughts. Here are a few initial tips to help you get started:
- Organize Your Scraps: Sort your fabric strips by color, pattern, or any other criteria you prefer. This will make it easier to create a balanced and harmonious design.
- Set Up Your Sewing Space: Ensure your sewing area is well-lit and organized, with all your materials within reach.
- Plan Your Panels: Visualize how you want your quilt to look. Consider alternating light and dark strips to create a dynamic pattern.
Step-by-Step Instructions: Crafting Your Scrappy Bargello Quilt
Now that you’re all set, let’s dive into the step-by-step process of creating your Scrappy Bargello quilt:
- Assemble the Strips: Start by stitching 32 strips together randomly to create one long panel. Align the edges as best as you can, focusing on keeping at least one edge even.
- Form a Tube: Sew the bottom of the panel to the top, right sides together, forming a tube. This step is crucial for the Bargello effect. If you’re new to this, trust the process!
- Cut the Tube into Sections: Carefully fold your tube so it lays flat and trim the edges to make them straight. Cut the tube into six 2 1/2″ sections. If the tube is too unwieldy, leave the last seam undone for now and cut the panel into sections first, then complete the tube seam afterward.
- Create the Panels: For each strip, decide which square will be the top left corner of your panel. Open the strip at the chosen seam, creating a long strip. For the first panel, this is an “uphill” panel, where you move the second square up into the top position of the next strip. Repeat this for all six strips, then sew them together, carefully matching the seams and pressing well.
- Reverse for Downhill Panels: For the “downhill” panels, reverse the process. Move the top square of the first strip down to the position of the second square in the next strip. Repeat this for all six strips and sew them together.
- Combine the Panels: Arrange your four panels—two uphill and two downhill—and sew them together. Press all seams carefully.
- Add Borders: To finish your quilt top, add borders. For a lap-sized quilt, consider adding 4″ borders for a polished look.
Additional Tips: Enhancing Your Quilting Experience
- Mix and Match: Don’t be afraid to use “ugly” or unconventional fabrics. The random placement often results in surprisingly beautiful combinations.
- Press as You Go: Keep your blocks flat and precise by pressing each seam as you sew.
- Use a Short Stitch Length: This makes your seams stronger and the fabric easier to handle.
Celebrate Your Quilting Achievement
Creating a Scrappy Bargello quilt is a joyful and rewarding experience. As you piece together your quilt, you’re not just creating a beautiful textile—you’re also making memories and continuing a cherished tradition. Take a moment to admire your work, reflect on the journey, and appreciate the vibrant tapestry you’ve created from simple fabric scraps. Whether it’s a gift for someone special or a new addition to your home, your Scrappy Bargello quilt will be a testament to your creativity and dedication.


