As a young girl, I often found solace and inspiration in my grandmother’s sewing room.
She had an extraordinary talent for creating intricate quilt patterns, each one a tapestry of stories and memories.
One of my fondest recollections is sitting beside her, captivated by the colorful array of fabrics and the rhythmic hum of her sewing machine.
It was in this nurturing environment that I developed my love for quilting and learned the foundational skills that have shaped my own creative journey.
This particular quilt, featuring the charming Paper Pieced Pompom blocks, is a nod to those early days of discovery and the timeless beauty of traditional quilting techniques.
Now, decades later, I find myself drawing from those precious memories as I share this tutorial with you.
The Paper Pieced Pompom quilt is not just a project; it’s a tribute to the legacy of quilting that has been passed down through generations.
Whether you’re a seasoned quilter or a beginner looking to try something new, this tutorial will guide you through each step, ensuring that you can create a quilt that is as meaningful as it is beautiful.
The Art of Paper Pieced Pompoms: Combining Tradition with Modern Flair
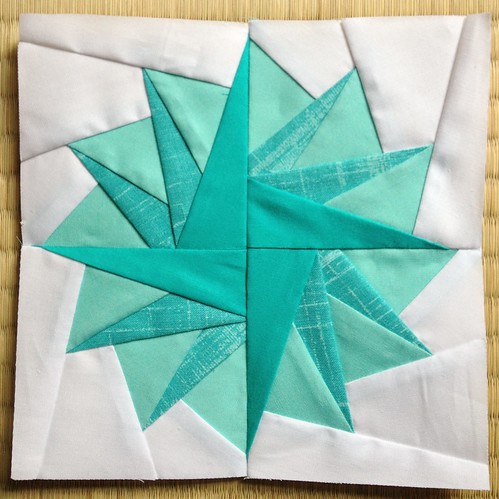
The Paper Pieced Pompom blocks are a delightful fusion of classic quilting techniques and contemporary design. Inspired by the popular flying geese pattern, this project adds a playful twist with the pompom motif, creating a quilt that is both timeless and unique.
By carefully selecting a palette of coordinating fabrics and mastering the art of paper piecing, you can craft a quilt that showcases your personal style while honoring quilting traditions.
Full Pattern: Click Here
Selecting the Perfect Palette: The Key to Stunning Pompom Blocks
One of the most delightful aspects of creating the Paper Pieced Pompom quilt is selecting the fabric. The charm of this design lies in its ability to play with colors and textures, transforming simple pieces of fabric into a vibrant and cohesive work of art. When choosing your fabrics, consider the mood you want to evoke with your quilt. Do you prefer a calm, pastel palette, or are you drawn to bold, contrasting colors? The choice is yours, and it will significantly impact the final look of your quilt.
Materials: Gathering Your Essentials
Before we dive into the step-by-step process, let’s ensure you have all the necessary materials. Here’s what you’ll need to create your own Paper Pieced Pompom quilt:
- The Circle of Geese Pattern: This is the foundation of our design. You can download and print this pattern from a reliable source.
- Assorted Fabric Scraps: Choose scraps in one color family. You’ll need:
- Light solid fabric
- Matching textured solid in a mid-range shade
- Dark solid fabric
- Neutral Fabric Scraps: These will be used for the background sections.
- Printer and Paper: To print your pattern. Normal computer printer paper will suffice.
- Textas/Pencils/Crayons: For marking the pattern segments and planning your color placements.
- Sewing Machine and Thread: Ensure you have a good quality thread that matches your fabric choices.
- Scissors and Rotary Cutter: For precise cutting.
- Cutting Mat and Ruler: To ensure straight, accurate cuts.
- Iron and Ironing Board: To press your fabrics and seams.
Getting Started: Preparing for the Journey Ahead
Before you begin piecing your quilt, take some time to prepare. Here are a few initial steps and tips to set you up for success:
- Print and Prepare the Pattern: Download the Circle of Geese pattern and print it at half size (50%). Each block section should finish at 3 inches, resulting in a pompom block that finishes at 6 inches. Print four copies of the clockwise pattern. When cutting out the template, leave a 1/4 inch seam allowance around the outside. Since you’ve reduced the pattern size, the provided 1/4 inch seam allowance will now be 1/8 inch.
- Plan Your Colors: Using three different colored markers, plan your block. This will help you visualize the final design and ensure accurate color placement. Segments 1, 4, and 7 should be your lighter solid fabric, segments 3 and 6 your textured solid, and segment 9 your dark solid. Use a light neutral fabric for segments 2, 5, and 8.
- Prepare Your Fabric Pieces: Cut your fabric scraps slightly larger than each segment to ensure you have a 1/4 inch seam allowance around each section. This extra allowance will make piecing the block easier and more precise.
- Set Up Your Sewing Space: Make sure your sewing area is well-lit and organized. Have all your materials within reach, and ensure your sewing machine is threaded and ready to go.
With these preparations in place, you’re now ready to embark on the creative journey of making your Paper Pieced Pompom quilt. In the next section, we’ll walk through the step-by-step instructions to bring your quilt to life.
Step-by-Step Instructions: Crafting Your Paper Pieced Pompom Blocks
Now that you have all your materials ready and your workspace prepared, it’s time to start creating your Paper Pieced Pompom blocks. Follow these detailed steps to piece together your quilt blocks:
- Print and Cut the Pattern: Begin by printing the Circle of Geese pattern at half size (50%), ensuring that each block section finishes at 3 inches. You will need four copies of the clockwise pattern for each pompom block. Carefully cut out each template, leaving a 1/4 inch seam allowance around the edges. Remember, since the pattern is reduced, the seam allowance provided will now be 1/8 inch.
- Mark the Pattern: Using your colored markers, plan your block colors. Mark segments 1, 4, and 7 for the lighter solid fabric, segments 3 and 6 for the textured solid, and segment 9 for the dark solid. Use a light neutral fabric for segments 2, 5, and 8. This step helps you visualize the final design and ensures accurate placement of each fabric piece.
- Cut the Fabric Pieces: Cut your fabric scraps slightly larger than each segment of the pattern. Ensure each piece of fabric extends beyond the edges of its corresponding segment by at least 1/4 inch. This extra fabric allowance will make the piecing process easier and more accurate.
- Start Paper Piecing: Place the first fabric piece for segment 1 on the back of the paper pattern, ensuring it covers the entire segment with at least 1/4 inch of extra fabric around the edges. Pin or hold the fabric in place.
- Sew the Pieces: Place the second fabric piece for segment 2 over the first piece, right sides together. Sew along the line between segments 1 and 2 using a shortened stitch length. This will make the paper easier to remove later. Press the seam with your iron, then fold the fabric back to cover segment 2 completely.
- Continue Piecing: Repeat the process for each segment, sewing the fabric pieces in numerical order. Always ensure that each piece covers its corresponding segment fully, including a seam allowance. Trim the excess fabric to maintain a neat 1/4 inch seam allowance around each segment.
- Trim the Block: Once all the segments are pieced, trim the block to its final size, leaving a 1/4 inch seam allowance around the edges. This ensures that each block will fit together perfectly when assembling the quilt.
- Assemble the Blocks: Arrange your four completed blocks to form a larger pompom design. Sew the blocks together along the solid lines, carefully aligning the seams for a precise finish.
- Remove the Paper: After piecing the blocks together, carefully tear off the paper templates. Be gentle to avoid distorting the seams.
Additional Tips: Perfecting Your Pompom Quilt
- Use Quality Thread: High-quality thread reduces breakage and ensures your seams are strong and durable.
- Iron as You Go: Pressing each seam as you sew keeps your blocks flat and precise.
- Shorten Stitch Length: A shorter stitch length (about 1.5-2.0) makes it easier to tear off the paper without pulling on the seams.
- Trim Excess Fabric: Trimming excess fabric as you go reduces bulk and makes your blocks easier to handle.
Creating a Paper Pieced Pompom quilt is a rewarding experience that combines precision, creativity, and a touch of nostalgia. As you stitch each block together, you’re not just making a quilt—you’re continuing a tradition that connects the past to the present. Take a moment to admire your work, reflect on the skills you’ve honed, and appreciate the beauty of your finished quilt. Whether it’s a gift for a loved one or a cherished addition to your home, your Paper Pieced Pompom quilt is a testament to your dedication and artistry.


