Have you ever found yourself staring at a beautifully crafted quilt and wondering how you could create something just as stunning?
That’s exactly where I was when I decided to embark on the adventure of making a candle mat using the Stained Glass Flowers pattern.
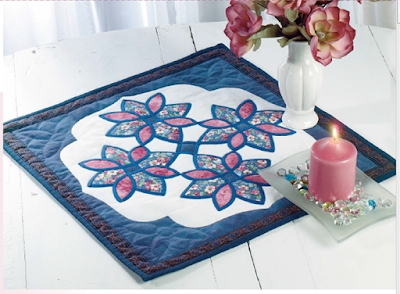
I remember the excitement bubbling within me as I imagined vibrant floral prints set against a deep navy backdrop.
The thought of creating something so enchanting brought a smile to my face and got my crafting spirit fired up!
The Stained Glass Flowers pattern isn’t just your ordinary candle mat pattern; it’s like bringing a small garden into your home.
The first time I successfully completed the mat, I couldn’t help but admire how the colors intertwined, creating an eye-catching centerpiece.
It sparked a sense of accomplishment that turned my hobby into an absolute passion.
Trust me; if you’ve been contemplating starting your quilting journey, this pattern is where the magic begins!
A Creative Escape into Floral Fantasy
The Stained Glass Flowers pattern is perfect for those looking to dip their toes into the world of quilting.
What makes this candle mat stand out is its unique use of color and design.
Each petal of fabric tells a story, merging together to form a harmonious piece of art.
When completed, the mat not only serves a practical purpose but doubles as decor that brightens up any space!
As I prepared to dive into this beautiful project, I couldn’t help but marvel at how quilting has evolved.
This particular pattern utilizes fusible appliqué techniques, which simplify the process and allow for detailed designs without added stress.
It’s a wonderful gateway for beginners wanting to express their creativity while learning fundamental skills in quilting.
Designing the Canvas for Your Creation
Let’s chat about the details!
When using the Stained Glass Flowers pattern, you’ll quickly realize that the fabric choices really influence the final look of your mat.
The blend of colors and prints is what makes this project so lively!
I suggest selecting a navy solid with glitter for the backdrop to add a pinch of glam to your creation.
But wait, there’s more!
The border print can enhance your design, seamlessly blending with the floral appliqués.
My personal favorite is using a bold floral print that adds a pop of color!
Mixing different textures and hues keeps the creative juices flowing as you prepare to layer your materials.
Materials
- 19″ x 19″ square of navy solid with glitter
- 17″ x 17″ square white-on-white print
- 1 yard border stripe
- 1/8 yard floral print
- 1/8 yard rose print
- 2 3/4 yards navy binding (purchased or self-made)
- Backing 24″ x 24″
- Thin batting 24″ x 24″
- 1/4 yard fusible web
- 1/4 yard fabric stabilizer
- 1 roll navy quick-bias
- Machine-embroidery thread to match appliqué fabrics
- Clear nylon monofilament
- All-purpose thread to blend with fabrics
- Natural quilting thread
Getting Ready for Your Flower Adventure
Before jumping into the Stained Glass Flowers project, it’s essential to prepare your workspace and materials.
I often find that clearing space and having everything organized saves me time and helps keep up the momentum as I quilt.
Lay out all the materials and tools needed—this small step reduces confusion later on.
Don’t forget to prewash your fabrics!
This is crucial, as fabrics can shrink when washed, and you want your finished candle mat to maintain its size and shape.
Plus, removing any sizing will help with the fuse and help the appliqués adhere properly!
Step-by-Step Instructions:
Now, let’s dive into the juicy part—creating your candle mat!
Below, I share the steps to guide you through crafting your beautiful Stained Glass Flowers candle mat.
Follow along closely and enjoy the process—it’s about more than just the end result!
Full Pattern: Click Here
Additional Tips
When working through the Stained Glass Flowers pattern, don’t hesitate to take breaks and step back to admire your progress!
Letting your work breathe can spark ideas for future projects or enhancements to your current work.
Also, keep a handy notebook nearby to jot down any tips that come to mind as you work through the project.
Lastly, don’t rush through the appliqué!
This is where you get to really showcase your creativity.
The little details make all the difference, so enjoy the process of hand-appliqué and let that design shine!
The Joy of Blossoming Creativity
As you finish your Stained Glass Flowers candle mat, take a moment to appreciate the time and effort you’ve dedicated to creating something truly unique.
There’s something incredibly rewarding about completing a project that was birthed from your imagination.
Each stitch and fabric selection reflects your artistic journey—and that’s an achievement worth celebrating!
If you’re feeling inspired, I encourage you to dive into more projects around the blog.
There are tons of amazing pieces waiting for you to explore!
I’ve got a delightful surprise prepared just for you that you can check out by embarking on a curious adventure here.
Happy quilting, and let your creativity flourish!


