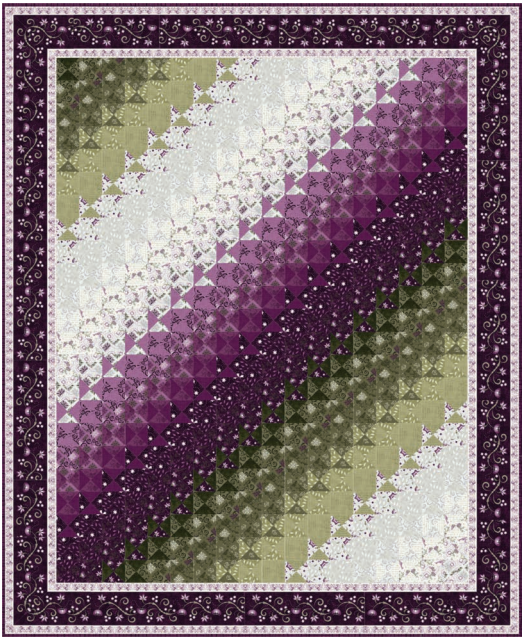
I remember the days spent in my grandmother’s cozy living room, enveloped in the warmth of her quilts.
Each stitch seemed to tell a story, a memory, a piece of advice. Among her creations, the Amour Quilt always stood out, with its intricate patterns and a harmonious blend of colors.
As a child, I would trace the patterns, listening to her tales of past loves and life lessons. Now, as I guide my hands along similar patterns, I feel a connection to those cherished moments. Crafting the Amour Quilt isn’t just about creating a blanket; it’s about weaving a tapestry of stories and memories, much like my grandmother did.
Gathering Threads of the Past
To embark on this quilting journey, you’ll need more than just fabric and tools; you need an array of memories and stories to weave into each piece.
Of course, the physical materials are essential too: an assortment of fabrics in soft hues, quality batting, backing fabric, and your trusty quilting tools. This section will detail everything you need to start your quilt, each item a thread in the tapestry of your creation.
Choosing Fabrics: More Than Just Color
Selecting fabrics for the Amour Quilt is like choosing the colors for a canvas. Each hue and texture brings its own emotion, its own story.
This quilt demands a careful balance of light and dark, a metaphor for the balance in our lives. Here, I’ll guide you through selecting fabrics that not just meet the pattern’s requirements but also resonate with the stories you want to tell through your quilt.
Weaving Memories: The Art of Piecing
As I lay out the cut pieces of the Amour Quilt, I’m reminded of how life’s moments, both big and small, come together to create a beautiful tapestry. This section is not just about aligning edges and sewing seams; it’s about piecing together memories.
Each square, each triangle, represents a cherished moment or a lesson learned. I’ll guide you through arranging and piecing your quilt, showing you how each stitch can symbolize the connections we make in life.
Stitching with Heart: Quilting as an Act of Love
Quilting the layers of the Amour Quilt is akin to stitching the chapters of a story together. In this part, we delve into the process of quilting, which for me is an act of love – a tribute to my grandmother and the stories she shared.
Whether you choose to quilt by hand or machine, remember that each stitch is a reflection of your dedication and care. I’ll provide tips and techniques to help you imbue your quilt with the same warmth and affection.

Full Pattern: Click Here
Materials List for the Amour Quilt
- Assorted Fabrics: A selection of fabrics as per the pattern, symbolizing different hues of life.
- Batting: Quality batting to provide warmth and comfort.
- Backing Fabric: A piece of fabric for the back, representing the support in our stories.
- Sewing Machine: A tool for bringing the pieces together, much like the bonding moments in life.
- Rotary Cutter and Mat: For precise cutting, akin to making deliberate life choices.
- Quilting Ruler: To ensure accuracy and balance in your quilt and in your narrative.
- Threads: Durable threads in colors that blend with your fabrics, like the intertwined stories of life.
- Pins and Needles: Essential for holding the pieces together as you sew.
- Binding Fabric: To frame your quilt and give it a finished look.
12-Step Guide for Crafting the Amour Quilt
- Reflect on Your Journey: As you prepare your fabrics, think of the stories they represent.
- Cutting with Intention: Measure and cut your fabrics, each piece a fragment of a larger story.
- Arranging with Purpose: Lay out your pieces, considering how each part contributes to the overall story.
- Piecing Together Life’s Puzzle: Sew your pieces into blocks, reflecting on how life’s moments come together.
- Assembling Your Story: Join the blocks to create the quilt top, seeing your narrative take shape.
- Creating the Quilt Sandwich: Layer the backing, batting, and quilt top, each layer a different aspect of your story.
- Quilting Your Memories: Stitch through the layers, binding your experiences together.
- Trimming the Edges: After quilting, trim the edges to prepare for binding, symbolizing life’s refinements.
- Binding Your Experiences: Attach the binding, encompassing the quilt with a sense of completeness.
- Reflecting on the Journey: Inspect your quilt, admiring the work and love woven into it.
- Sharing Your Story: Introduce your quilt to the world, each use a continuation of its story.
- Caring for Your Narrative: Provide care instructions, ensuring your quilt’s story endures.
As I fold the completed Amour Quilt, I’m filled with a sense of nostalgia and accomplishment. This quilt, much like the tapestry of our lives, is a collection of stories, emotions, and memories, stitched together with love and care.
It serves as a reminder that our experiences, both joyful and challenging, are what make the fabric of our lives rich and beautiful. As you wrap yourself in this quilt, may you feel the warmth of your own story and the stories of those who influenced your journey.


