When I first began quilting, the thought of tackling intricate patterns like the “Circle of Geese” block seemed daunting.
I recall a time when paper piecing was an intimidating mystery, a technique that required precision and patience.
However, as I grew more confident in my quilting journey, I decided to challenge myself.
The Circle of Geese block, with its mesmerizing symmetry and dynamic design, became a symbol of mastering a new skill.
Today, I want to share this journey with you, breaking down this beautiful block into simple, manageable steps.
A Unique Twist on the Flying Geese Tradition
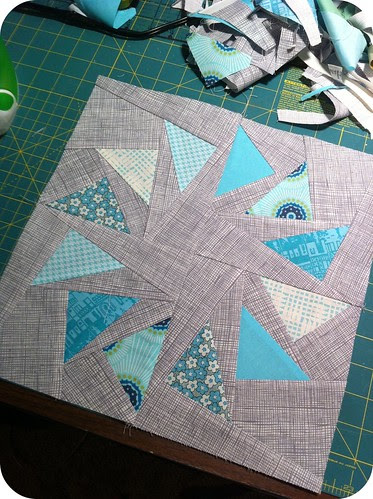
The “Circle of Geese” block is a stunning variation on the classic Flying Geese pattern, a staple in quilting that dates back centuries.
This design, arranged in a circular formation, creates a dynamic, rotating effect that draws the eye inward.
It’s a favorite among quilters looking to add movement and complexity to their quilts. This block is traditionally made using paper piecing, a method that allows for precise piecing and sharp points, essential for the design’s striking visual impact.
Let’s explore how to create this captivating quilt block with confidence!
Understanding the Paper-Piecing Technique
The Art of Precision: Why Paper Piecing?
Paper piecing is a quilting technique that allows for precise piecing, ensuring all the points and angles of a quilt block are sharp and accurate.
For the Circle of Geese block, paper piecing is particularly advantageous because of the intricate angles and small pieces involved.
By sewing fabric directly onto a paper template, quilters can achieve perfect accuracy, avoiding the pitfalls of traditional piecing methods. This tutorial will guide you through the process, providing step-by-step instructions and tips to help you avoid common mistakes.
Full Pattern: Click Here
Materials Needed
To create the Circle of Geese block, you’ll need the following materials:
- Paper Template: A printable Circle of Geese template, available from quilting websites.
- Fabric: Assorted fabrics for the geese (triangles) and background. Choose colors that contrast well to highlight the pattern.
- Rotary Cutter and Mat: For precise fabric cutting.
- Ruler: To ensure accurate measurements and straight cuts.
- Sewing Machine: Set up with a small stitch length for perforating the paper.
- Pins: For holding fabric in place.
- Iron and Ironing Board: To press seams as you sew.
- Scissors: For trimming threads and fabric.
- Paper Scissors: For cutting the paper template.
- Glue Stick or Fabric Glue: Optional, to temporarily hold fabric pieces in place.
Preparing to Quilt: Essential Tips
Before diving into the construction, it’s important to prepare your materials and workspace. Begin by printing your paper template at full scale; ensure your printer settings are correct to avoid scaling issues.
Perforating the template along the sewing lines with your machine (without thread) can help in accurate folding and tearing later. Select fabrics with high contrast for the geese and background to enhance the visual appeal of your block.
A clean, organized workspace with all materials at hand will make the process smoother and more enjoyable.
Step-by-Step Instructions
Step 1: Prepare Your Template and Fabrics
Begin by printing the Circle of Geese paper template at 100% scale to ensure accurate sizing. Cut out the template sections carefully with paper scissors. Choose four different fabrics for your geese and a contrasting fabric for the background.
Cut the fabrics into squares slightly larger than the template pieces to allow for seam allowances. Press your fabrics well to remove any wrinkles.
Step 2: Start with the First Section
Place the first fabric piece (for the background) behind the first section on the paper template. Make sure it covers the entire area with at least a quarter-inch seam allowance around the edges.
You can use a glue stick to hold the fabric in place temporarily. Position the fabric for your first goose over the background piece, right sides facing. The fabric should cover the corresponding area and overlap into the seam allowance.
Step 3: Sew Along the Line
Set your sewing machine to a short stitch length—this makes it easier to tear the paper away later. Sew along the line between sections 1 and 2, starting a few stitches before the line and ending a few stitches after.
This ensures the seam is secure. Open the fabrics and press them with your iron, being careful not to distort the seams. Trim any excess fabric, maintaining a quarter-inch seam allowance.
Step 4: Continue Paper Piecing
Repeat the process for each section, adding each new piece of fabric in sequence. Always place your fabrics right sides together and align them to cover the designated areas. Sew along the next line, press, and trim.
Work your way around the template until all sections are complete. Take your time with each step to ensure precision; this will pay off in the final appearance of your block.
Step 5: Complete and Assemble
Once all sections of the template are sewn and pressed, trim the excess fabric along the template edges, leaving a quarter-inch seam allowance around the outer edge of the block.
Carefully remove the paper template from the back of the fabric by gently tearing it along the perforated lines. Press your block once more, ensuring all seams are flat and the block lies perfectly square.
Additional Tips
- Fabric Selection: Use high-contrast colors for the geese and background to make the design stand out. Solids or small prints work best to showcase the geometric pattern.
- Perforation: Perforate the paper templates using a needle (without thread) on your sewing machine to make them easier to tear away after sewing.
- Seam Allowance: Always check that your fabric pieces cover the seam allowance to avoid gaps in your block.
- Stitch Length: A shorter stitch length helps with the paper removal process and keeps seams secure.
- Ironing: Pressing after each seam is essential for achieving crisp, clean lines in your quilt block.
Creating a “Circle of Geese” block can be a rewarding challenge, combining precision with creativity. As you follow these steps, you’ll not only master the art of paper piecing but also gain confidence in handling more intricate quilt designs.
The final block, with its dynamic, swirling pattern, is a testament to the beauty and skill involved in quilting. Embrace the process, enjoy the journey, and soon you’ll have a stunning block that adds movement and vibrancy to your quilt projects.


