Have you ever felt that tingle of excitement when you see a project just waiting to be brought to life?
That’s how I felt when I stumbled upon the Sweet Tessellation quilt pattern.
I was casually browsing through my favorite quilting site when the vivid colors and geometric arrangement of this pattern caught my eye.
As I began to visualize the process, my mind flooded with ideas and fabric selections.
It was love at first sight!
The Sweet Tessellation is not just a quilt; it’s an experience!
I loved that this pattern, designed by Jackie Robinson, offers a fusion of tradition and modernity.
Whether you’re a seasoned quilter or just stepping into the colorful world of quilting, this project promises joy and a bit of challenge.
So, grab your fabric stash because we’re about to dive into a colorful journey of creating the Sweet Tessellation quilt!
Crafting with Purpose
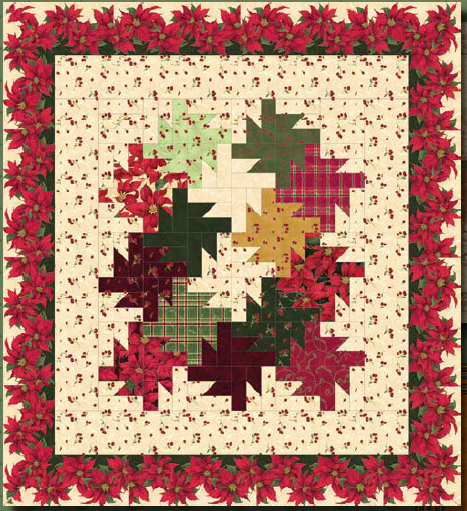
The appeal of the Sweet Tessellation quilt lies in its unique design that marries traditional charm with fresh flair.
Using fabrics from the Poinsettia collection and the whimsical Spellbound series, each block brings a story to life.
You can play around with colorways to express your style, making each quilt a personal masterpiece.
The beauty of this quilt is that it can serve as a festive decoration for your home or even a heartfelt gift!
When embarking on a quilting journey like this, it’s important to remember that each fabric you select tells a part of your narrative.
The Sweet Tessellation invites you to express your creativity and lets your personality shine through in each fabric choice.
With every stitch, you’re not just crafting a quilt; you’re weaving memories and emotions into every patch.
How exciting is that?
Essentials for Your Sweet Tessellation Quilt
- Fabric for background: 1 yard of Poinsettia 1933-E or equivalent
- Border Stripe: 1.5 yards of Poinsettia 1934-G
- Binding: 3/8 yard of Poinsettia 1932-E
- Backing: 3 yards of Poinsettia 1931-E
- 15 Charm Squares from Sweet Sixteens™ collection (non-stripe)
- Rotary cutter & mat
- Quilting ruler
- Sewing machine with a quarter-inch foot
- Iron and pressing surface
Gathering these materials is a vital first step in making your Sweet Tessellation quilt.
Choose fabrics that resonate with you, whether they are cheerful patterns or calming neutrals.
I always say to trust your instincts because this project is meant to be fun!
Consider how each fabric will create movement and visual interest in your final quilt design.
Before you dive into the sewing, make sure your workspace is organized.
It can be overwhelming to see piles of fabric, so having everything laid out will make the process smoother.
Be sure to take inventory of your supplies and have your tools within reach.
You’ll thank yourself later as you won’t have to interrupt your flow!
Ready, Set, Sew!
Alright, it’s time to get into the nitty-gritty!
Below, I’ll provide the step-by-step instructions to create your Sweet Tessellation quilt.
This process will guide you on your way to crafting a beautiful patchwork masterpiece!
Remember, you can access the full pattern details via the link provided right below.
Full Pattern: Click Here
Pro Tips for Success
As with any craft, practice makes perfect.
With your Sweet Tessellation quilt, I suggest taking the time to practice your quarter-inch seams before you start piecing the blocks.
Remember to measure your seams—keeping them consistent will ensure everything lines up perfectly when you stitch the quilt together.
It’s a small step that will save you a lot of trouble later!
Don’t hesitate to adjust your fabric selection as you go along!
Sometimes a fabric may not work as planned, and that’s absolutely okay.
The Sweet Tessellation quilt allows you to be flexible and creative, so embrace those changes and trust your gut!
Exploring Advanced Techniques
If you’re feeling adventurous, why not explore some advanced techniques to enhance your Sweet Tessellation design?
Consider adding free-motion quilting or experimenting with different stitch patterns once you’ve pieced your quilt top.
This is where you can really let your personality shine through, and trust me, it adds that special touch!
Mitered corners can be a game-changer for your quilt’s appearance.
Using proper tools like the Binding Miter Tool can make the process so much simpler.
I highly advise practicing this technique before jumping into your Sweet Tessellation quilt so you’ll be more confident during the final assembly!
Celebrate Your Crafting Journey!
As we wrap up our journey of creating the Sweet Tessellation quilt, it’s essential to take a moment to celebrate your accomplishments.
Whether it’s piecing your blocks together, mastering a new technique, or simply exploring the world of quilting, each step is a victory!
I can’t wait for you to see your finished quilt; it’s truly a testament to your creativity and determination.
If you’re eager to discover more about quilting, you’re in luck!
This blog is filled with tons of amazing content designed to inspire you.
I’ve prepared another incredible piece you can check out by exploring more delightful articles for your next project just by clicking here.
Happy quilting, my friends!


