Hey there, fellow quilting enthusiasts!
Today, I’m busting out a project that will make you smile and snuggle up with a cup of hot cocoa by the fire.
I recently took a stroll down memory lane while flipping through my fabric stash, and guess what I found?
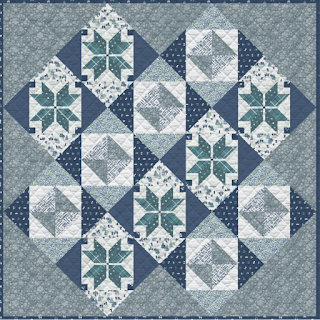
The cheerful Snow Day Quilt pattern just waiting to be brought to life!
I can already envision how cozy my living room will look with this quilt displayed.
Using vibrant fabrics from the Snow Day Collection, I’m excited to show you how to create this whimsical masterpiece.
Everyone deserves a little joy during winter, and crafting this quilt made me think of all those days spent watching snowflakes dance outside.
If you’re ready to get crafty, grab your supplies, and let’s dive into the world of quilting with the Snow Day quilt pattern!
Unleashing Creativity With Snow Day Inspirations
The Snow Day quilt pattern isn’t just any ordinary quilt.
It’s a delightful celebration of wintry weather, designed by Mister Domestic.
Each fabric is a splash of color that brings cheer to your crafting corner.
The collection features playful prints including ice crystals, snowflakes, and building snowmen, perfectly encapsulating a snow day filled with fun and cozy warmth.
While piecing together this quilt, I also felt a wave of inspiration to include little personalized touches, like sewing on tiny snowflake appliqués or using special threads that glimmer like fresh snow.
This quilt isn’t just about keeping warm; it’s about expressing joy and creating memories with every cut and stitch!
The Importance of Following the Right Cutting Directions
A key to making the Snow Day quilt successful is meticulously following the cutting instructions.
Each fabric piece is specifically sized to ensure everything fits snugly together, and accurately cutting your pieces helps prevent delays in the piecing process.
It’s like laying a solid foundation for a beautiful house where all elements fit harmoniously.
So, when you gather your materials, pay extra attention to those cutting directions.
Trust me, it will save you from possible frustrations later.
Taking the time now will allow you to create a quilt that keeps your spirits high while you whip it up!
Materials Needed for the Snow Day Quilt
- Fabric A (Building A Snowman) – ⅝ yd.
- Fabric B (Cuddled Up) – ⅝ yd.
- Fabric C (Winter Frost) – ⅝ yd.
- Fabric D (Bundled Up Dim) – 1 yd.
- Fabric E (Ice Crystals) – 2 yd.
- Fabric F (Let It Snow) – ¾ yd.
- Fabric G (Drink It Up) – ⅜ yd.
- Fabric H (Snowbound) – ⅜ yd.
- Fabric I (Wintry Check Soft) – ½ yd.
- Fabric J (Snow) – ¾ yd.
- Backing Fabric (Suggested) – 5 yds
- Binding Fabric (Included) – Fabric D
Top Preparation Tips Before You Start
Before you jump into sewing the Snow Day quilt, I’ve got a few pre-project tips to get you set for success.
First, pre-wash all your fabrics to prevent shrinking later on.
You don’t want your masterpiece to end up looking unusual after its first wash!
Plus, pre-washing helps remove any fabric finishes that might affect your stitching.
Next, organize your fabric pieces.
Lay everything out in front of you, and categorically separate them according to the sections of the quilt.
This will minimize confusion later on and ignite your excitement when envisioning the beautiful quilt you’re about to create!
Step-by-Step Instructions:
Buckle up, friends!
Below are the step-by-step instructions for creating the magical Snow Day quilt.
You can find the complete pattern via the link after the image.
Full Pattern: Click Here
Additional Tips for Quilting Success
As you stitch together your Snow Day quilt, don’t forget to enjoy the process.
Play with colors, try varying quilting motifs, and let your creativity shine!
One of my favorite touches was adding an extra layer of warmth by using a soft batting.
This makes such a difference when you wrap yourself up in it!
Also, consider using decorative stitches when attaching your binding as it adds a charming detail to the finished product.
It’s a small thing, but remember, it’s those little personal touches that make your quilt uniquely yours!
Perfecting Your Quilting Techniques
For those looking to elevate their quilting skills, let’s discuss the half-square triangle (HST) method that features prominently in the Snow Day quilt pattern.
This technique might seem daunting at first, but with a bit of practice, you’ll be whipping up HSTs like a pro!
The key to mastering HSTs is accurate measurements and cutting.
If you can measure twice and cut once, you’ll have clean lines and perfect triangles every time.
It’s all about those sharp rotary cutter skills, my friends!
Celebrate Your Quilting Journey!
As we wrap up our journey into the whimsical world of the Snow Day quilt pattern, I hope you’re feeling motivated and excited to create something marvelous.
Every stitch is a piece of your story, and I can’t wait for all of you to wrap yourselves in a quilt that brings joy and warmth to chilly days.
And hey, if you’re ever looking for more inspiration, trust me when I say the blog is overflowing with incredible content just waiting for you to explore!
Go treat yourself to another delightful read by checking it out here.
Let’s keep these creative juices flowing together!


