When I first started quilting, I was captivated by patterns that seemed to dance across the fabric.
One day, while experimenting with different shapes, I stumbled upon the “Twisted Path” design.
The playful twists and turns reminded me of life’s unpredictable journey, where each step reveals something new. I knew immediately that this quilt would become one of my favorites.
The Unique Charm of the Twisted Path Quilt
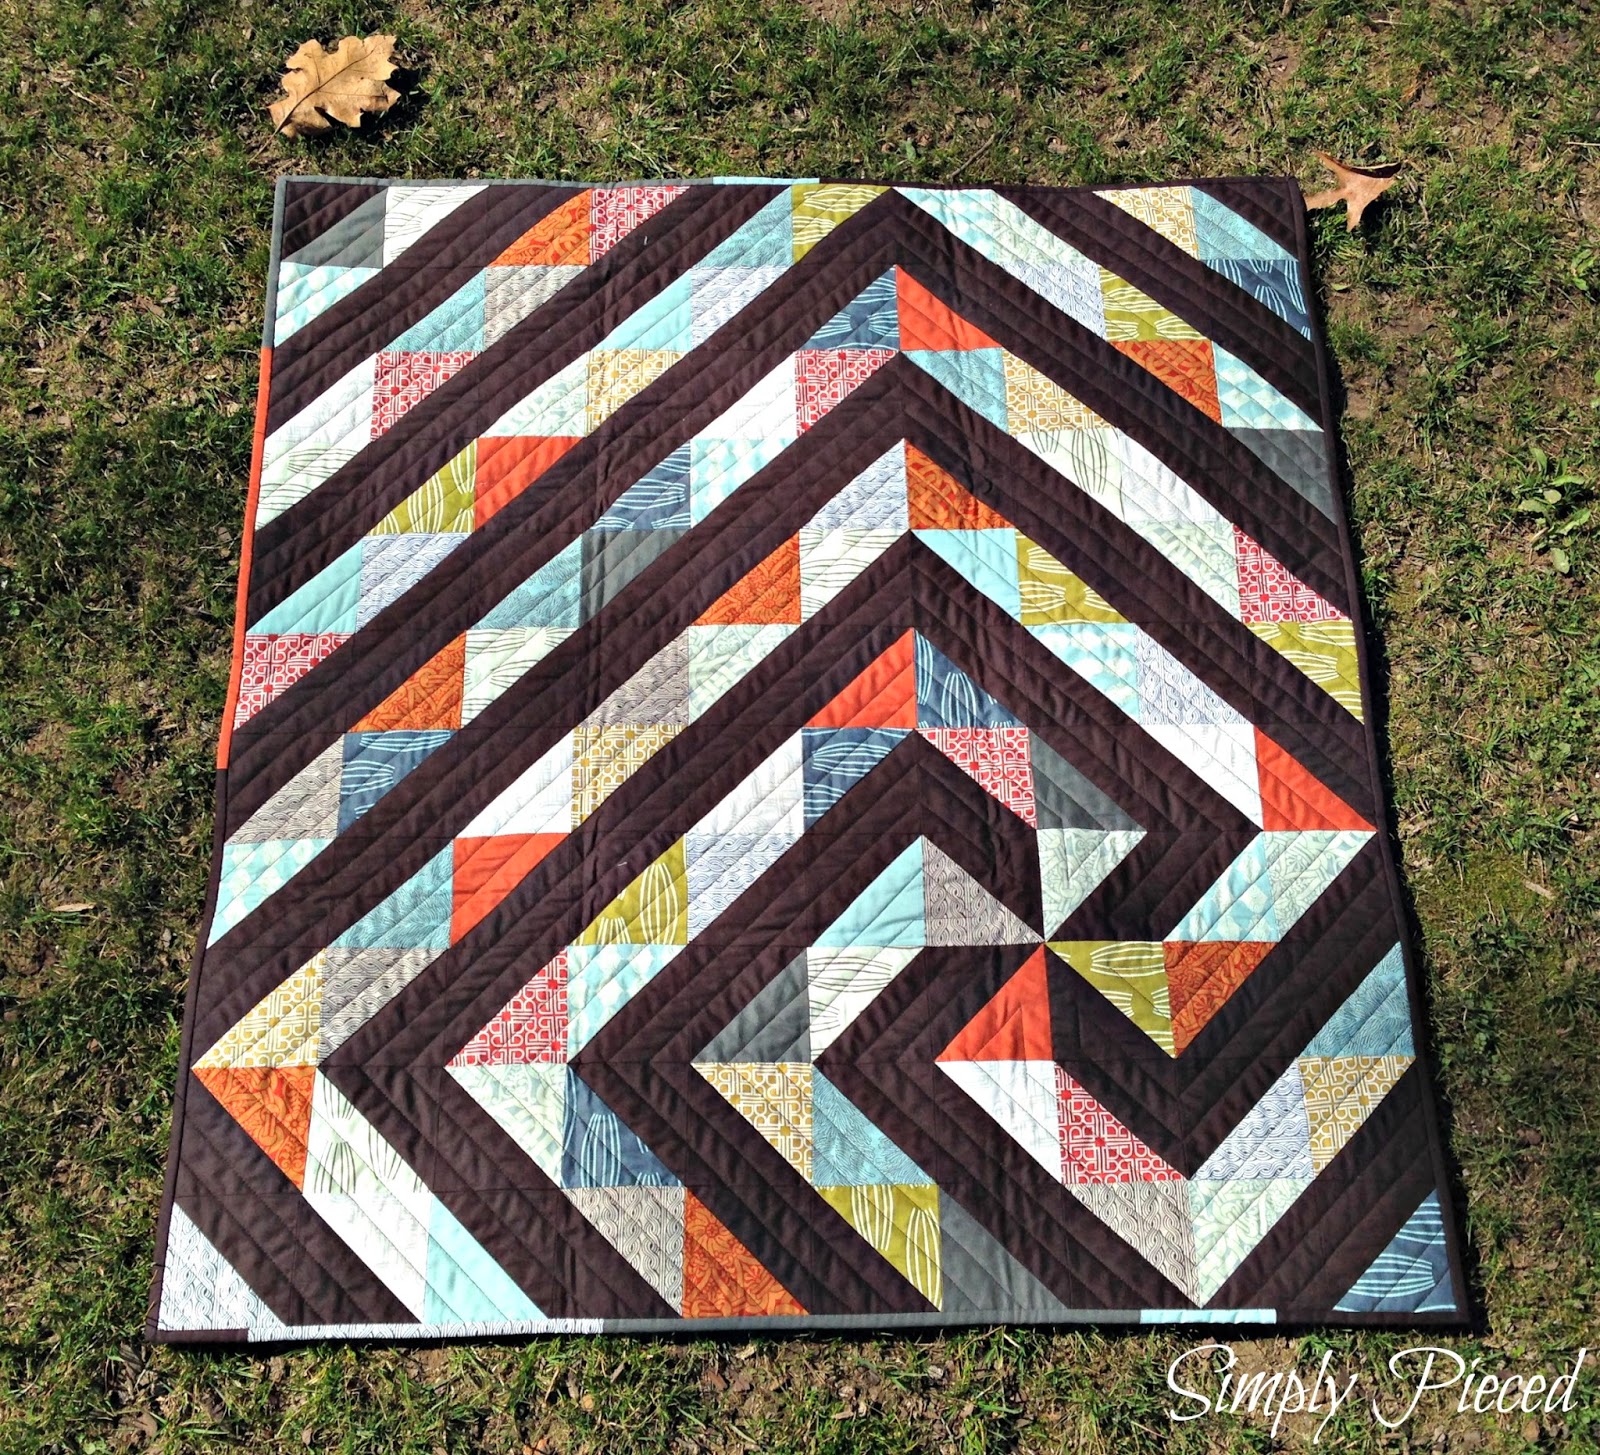
The Twisted Path Quilt is a vibrant dance of half-square triangles (HSTs) that creates a mesmerizing pattern. This project not only challenges your piecing skills but also allows for a burst of creativity in fabric selection.
The magic of this quilt lies in its twisting motion, which emerges as you carefully arrange each block, making it a delightful project for both beginner and seasoned quilters.
Understanding the Design Elements
The Art of Twisting: Creating the Illusion
The illusion of twisting paths is achieved by strategically placing half-square triangles. By alternating colors and rotating the blocks, a dynamic motion is created, which draws the eye across the quilt. This technique not only adds visual interest but also a sense of movement and fluidity to the quilt, making it feel alive and engaging.
Full Pattern: Click Here
Materials Needed
To create the Twisted Path Quilt, you will need:
- 14 fat quarters of various colors (choose a mix of prints and solids for a dynamic effect)
- 1 yard of a neutral solid fabric (used for background and contrast)
- Rotary cutter and cutting mat
- Quilting ruler
- Sewing machine and matching thread
- Iron and ironing board
- Pins or clips for holding pieces together
Preparing to Begin: Tips for Success
Before starting, ensure all your fabrics are pre-washed and ironed to prevent shrinkage and color bleeding. Choose colors that contrast well with your neutral solid to enhance the twisting effect. Lay out your design on a flat surface or design wall to visualize the final look before sewing. This preparation will save time and reduce errors during assembly.
Step-by-Step Instructions
- Cutting the Fabric:
- Begin by cutting 4 five-inch squares from each of your 14 fat quarters. These will be used to create the colorful twists.
- From the neutral solid fabric, cut 56 five-inch squares. These neutral pieces will be paired with the colored squares to create the half-square triangles (HSTs).
- Creating the Half-Square Triangles (HSTs):
- Take each colored square and pair it with a neutral square, right sides together.
- Use a pencil or a fabric marker to draw a diagonal line from one corner to the opposite corner on the back of the neutral square.
- Sew a seam 1/4 inch away from both sides of the drawn line.
- Cut along the line using your rotary cutter to separate the two pieces. This step will yield two HSTs.
- Open each HST, press the seams to the darker fabric or open them flat, depending on your preference for less bulk, and trim them down to measure exactly 4.5 inches square.
- Laying Out the Design:
- Start assembling your quilt top by arranging the HSTs into a pinwheel pattern in the bottom right corner of your layout space.
- Gradually add more HSTs around this central pinwheel, following the “Twisted Path” pattern to build outward.
- Continue arranging the HSTs in a clockwise or counterclockwise direction, ensuring the colors alternate properly to create the desired twist effect.
- As you add rows, adjust the placement of the HSTs to maintain the twisting illusion. Stand back frequently to view the quilt as a whole, ensuring the pattern is emerging correctly.
- Assembling the Quilt Top:
- Begin sewing the HSTs together row by row. Be meticulous about matching points and keeping seams straight.
- Once all rows are sewn, press the seams of each row in alternating directions to reduce bulk and make nesting seams easier.
- Join the rows together, pinning carefully at each intersection to ensure all seams align properly and the twisting path remains smooth and uninterrupted.
- Finishing the Quilt:
- After completing the quilt top, layer it with batting and a backing fabric of your choice.
- Baste the layers together using your preferred method (pins, spray, or thread basting).
- Quilt as desired, following the lines of the twisting path or using a free-motion quilting technique that complements the design.
- Finish by trimming the edges, adding a binding, and sewing it securely to complete your Twisted Path Quilt.
Additional Tips
- Use a Design Wall: A design wall is a fantastic tool for visualizing the quilt layout before sewing. You can rearrange the HSTs easily until you’re satisfied with the look.
- Chain Piecing for Efficiency: When creating your HSTs, use chain piecing to speed up the process. Sew all pieces in a continuous line without cutting the thread between them, then snip them apart afterward.
- Pressing Matters: Proper pressing is crucial for crisp, flat seams that lie smoothly. Press seams as you go to avoid unnecessary bulk and to ensure a neat finish.
The Twisted Path Quilt is more than just a sewing project—it’s a journey of artistic expression, technical skill, and personal growth. Each step of this project, from selecting vibrant fabrics to carefully crafting half-square triangles, offers a chance to explore your creativity and hone your quilting techniques. As you follow each twist and turn of the design, you become part of a larger narrative, one that reflects both the complexities and the beauty of life’s journey.
Completing this quilt is not just about producing a stunning piece of art; it’s about the sense of accomplishment and joy that comes from creating something unique with your hands. Every twist and seam represents a decision, a creative choice, and an opportunity to learn and grow. Whether you’re a beginner taking your first steps into the world of quilting or an experienced quilter looking to challenge yourself with a new design, the Twisted Path Quilt invites you to embark on a path of discovery.
Remember, the beauty of quilting lies not just in the final product, but in the process itself. Each stitch is a testament to patience, each block a celebration of creativity. As you lay out your quilt and see the twisting paths come to life, take a moment to reflect on the journey you’ve taken—both in your quilting adventure and in life. The twists and turns of this quilt are a reminder that, with every challenge, there is an opportunity for growth and a chance to create something beautiful. So, embrace the process, enjoy the journey, and let the Twisted Path Quilt be a vibrant reflection of your creative spirit.


