I remember the first time I stumbled upon a vibrant fabric collection called Kimono Garden.
The colors sang to me, pulling me into a world of creative possibilities.
I was instantly inspired to bring the breathtaking patterns to life in a quilt.
The moment I began working on the Kimono Garden quilt, I knew this project was special.
From the rich textures to the way the colors blended harmoniously, every piece of fabric felt like a stroke of genius.
I couldn’t wait to see how all these elements would come together to create something magnificent.
With each stitch, I could feel my excitement build as I thought about how this Kimono Garden quilt would transform my space and warm my heart.
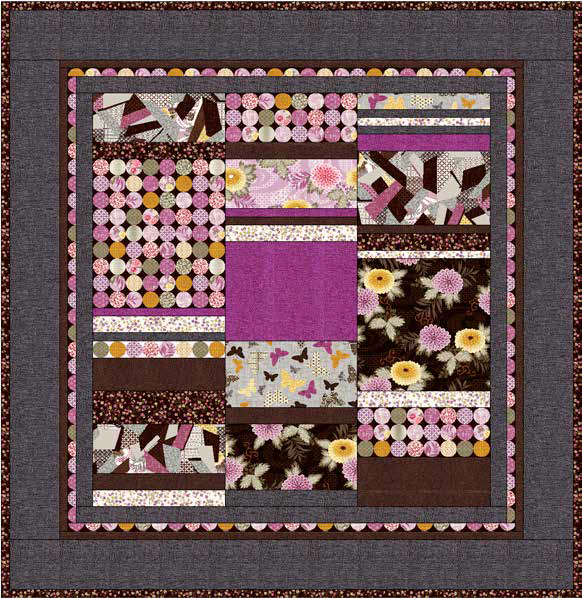
Color Harmony in Kimono Garden
The Kimono Garden quilt embraces a color palette that is both calming and invigorating.
This balance makes it a perfect choice for any room, whether you’re looking to add a splash of color or create a serene ambiance.
The fabrics, featuring vibrant florals and textured patterns, serve as a great reminder of nature’s beauty.
When I first started working on the Kimono Garden quilt, I focused on how the colors interacted, allowing different shades to play off each other, creating a stunning quilt top that told a visual story.
Not only does it delight the eye, but each piece is a small testament to the creative journey you embark upon as you assemble the quilt.
Take Note of These Details
Planning is vital for the success of the Kimono Garden quilt project.
From selecting materials to understanding the cutting instructions, careful preparation pays off.
You’ll need to gather your supplies first, so you won’t have to pause midway through your creative flow.
Trust me, I’ve learned this the hard way!
Another important detail centers around cutting.
All your strips will need to be cut across the width of the fabric (WOF).
This ensures uniformity in size, which is crucial when piecing together your quilt top.
Be sure to follow the guidelines closely; it makes all the difference in achieving that polished look!
Materials Needed for the Kimono Garden Quilt
- Batting: 76″ x 78″ (for that perfect puffy finish)
- Piecing and sewing thread: Your chosen color will help the seams blend beautifully.
- Quilting and sewing supplies: This includes pins, scissors, and a rotary cutter.
- Various fabrics as outlined in the quilt pattern, including:
- Fabric A (3101-33): ½ yard of Crazy Patch – Dark Brown
- Fabric B (3104-33): 1 yard of Mini Floral – Dark Brown
- Fabric C (3100-33): ½ yard of Floral – Dark Brown
- Fabric D (Magenta-42): ½ yard of Magenta
- Fabric E (3104-05): ¼ yard of Mini Floral – White
- Fabric F (Charcoal-14): 2 yards of Charcoal
- Fabric G (3102-05): ¼ yard of Yo Yo’s – White
- Fabric H (Coffee Bean-50): ¾ yard of Coffee Bean
- Fabric I (3103-90): ⅓ yard of Butterflies – Dove Gray
- Fabric J (3102-33): 1 ⅝ yards of Yo Yo’s – Dark Brown
- Fabric K (3104-52): ¼ yard of Mini Floral – Lavender
- Backing: 4 ⅓ yards of Floral – Lavender
Prepare Your Space
Before you start your Kimono Garden quilt, it’s essential to prepare your sewing space.
Having a clutter-free area makes a huge difference and can help keep your mind clear while you work.
A dedicated surface with good lighting will allow you to see the fabric colors and patterns accurately.
I also recommend organizing your materials based on the cutting layout.
This not only speeds up the process but also reduces the risk of making mistakes while you’re in the zone sewing your quilt top together.
Ready to Create!
Step-by-Step
Alright, excited quilters!
Begin your journey of creating the Kimono Garden quilt.
Below is where I’ll provide step-by-step instructions to lead you through the process.
For the full pattern, make sure to check out the link below after the image!
Full Pattern: Click Here
Finishing Touches Tips
Once your quilt top is assembled and you’ve quilted it to your liking, the finishing touches are crucial.
It’s all about binding!
Cut your binding strips at a 45-degree angle and sew them end to end.
This creates a smooth, continuous piece that will make your quilt look extra professional.
Don’t skimp on this part!
Binding may seem tedious, but it’s what gives the quilt its final, polished look.
Remember to fold the binding over before hand-stitching to the back.
This will result in a beautifully finished edge that will showcase your hard work on the Kimono Garden quilt.
Advanced Techniques to Explore
Once you gain confidence with the traditional techniques in the Kimono Garden quilt, you might want to explore advanced techniques like adding texture with different quilting patterns or even experimenting with asymmetrical layouts.
This quilt design lends itself beautifully to creative innovation, allowing you to express yourself.
Try using decorative stitches to add intricate details to your quilt.
Incorporating textured threads can also create a stunning visual effect!
Celebrate Your Quilt-Making Journey!
As you wrap up your Kimono Garden quilt, take a moment to celebrate the creative journey you’ve embarked upon.
Each stitch tells a story and represents the dedication and love poured into your project.
Display your finished quilt proudly, knowing it is not just a blanket; it’s a unique piece of your artistic expression.
I encourage you to keep exploring and diving deeper into other projects.
This blog is filled with incredible content just waiting to inspire you.
If you’re eager for more, I have an amazing piece ready for you to check out by clicking here.
You’ll love what you discover!


