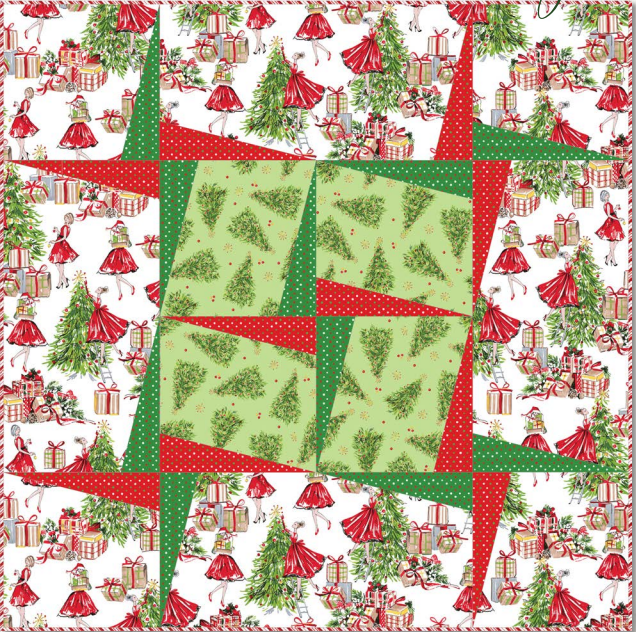
Quilting is an art form that combines creativity with precision, and the “All the Trimmings Quilt” is a perfect project to showcase these qualities.
Designed by Debbie Beaves for Maywood Studio, this quilt is an intermediate-level project that results in a stunning 32″ x 32″ finished piece.
In this guide, we will walk you through the process of creating your own “All the Trimmings Quilt,” ensuring that each step is clear and manageable.
Exploring the Charm of All the Trimmings Quilt
Quilting is more than just a craft; it’s a way to connect with history and tradition.
The “All the Trimmings Quilt,” with its classic design, offers a window into the timeless appeal of quilting.
As you embark on this project, you’re not just creating a quilt; you’re weaving a piece of art steeped in heritage.
Materials Needed
Before diving into the quilt-making process, it’s essential to gather all necessary materials. For the “All the Trimmings Quilt,” you will need various fabrics as specified in Debbie Beaves’ design, including specific measurements for squares, triangles, and binding strips.
Additionally, ensure you have a quality sewing machine, cutting tools, a ruler, pins, and other quilting essentials at hand.
Design Inspiration: The Beauty of Seasonal Quilting
The “All the Trimmings Quilt” draws its inspiration from the rich colors and textures of the holiday season. Its design is a reminder of how quilts can capture the essence of different times of the year, making this project not just a quilt, but a seasonal celebration in fabric.
Preparing for Perfection
The success of your quilting project lies in the preparation. This section covers the importance of precise measurements, fabric selection, and the right tools, setting the stage for a flawless quilting experience.
Preparing Your Fabric
Preparation is key in quilting. Start by washing, drying, and ironing your fabric to prevent any shrinkage or color bleeding after the quilt is complete. Next, using your cutting tools and ruler, carefully cut the fabric pieces according to the dimensions provided in the “All the Trimmings Quilt” pattern. Precision in cutting ensures that your quilt pieces will fit together seamlessly.
Step-by-Step Guide
- Assembling the Center: Begin by piecing together the center of the quilt. This involves sewing the smaller squares and triangles into a larger square. Pay close attention to the pattern’s color scheme to achieve the desired aesthetic.
- Adding Borders: Once the center is complete, add the inner and outer borders. The borders give the quilt its final size and add to its visual appeal. Ensure the borders are even and aligned with the quilt’s center.
- Quilting: After piecing your quilt top, it’s time to quilt. This can be done by hand or with a machine. Quilting adds texture and depth to your project, and it’s where your creativity can shine.
- Binding: The final step is to bind the edges of your quilt. This involves attaching a strip of fabric around the quilt’s perimeter, giving it a neat, finished look.
Additional Tips
- Precision: Always aim for precision in your cutting and sewing. This will make the assembling process smoother and result in a more professional-looking quilt.
- Creativity: Feel free to add your personal touch. Whether it’s through fabric choice or quilting style, your “All the Trimmings Quilt” can reflect your unique taste and creativity.
The Joy of Piecing Together
Piecing together your quilt is more than aligning fabrics; it’s about bringing the design to life. This section will delve into the joys and challenges of piecing, providing insights and tips for an enjoyable quilting journey.
Here, we explore various quilting techniques that can be employed to give your “All the Trimmings Quilt” a unique touch. Whether you’re a fan of hand-quilting or machine quilting, this section will guide you through methods to enhance your quilt’s texture and depth.
Wrapping Up Your Quilting Project
In the concluding section, we’ll reflect on the journey of creating the “All the Trimmings Quilt.” We’ll discuss how this project not only results in a beautiful quilt but also contributes to the growth of your skills and the deepening of your appreciation for the art of quilting.
Choosing the right colors and patterns is crucial in quilting. This section discusses how to select fabrics that complement each other and align with the “All the Trimmings Quilt” design. We’ll offer tips on balancing colors and patterns to create a visually appealing quilt.
Sewing is at the heart of quilting. This part of the guide focuses on sewing techniques specific to the “All the Trimmings Quilt.” We’ll cover everything from basic stitches to more complex techniques, ensuring your sewing process is both enjoyable and effective.
Full Pattern: Click Here
Detailing the Inner and Outer Borders
Borders are not just functional; they’re a design element. In this section, we delve deeper into the creation of the inner and outer borders, discussing techniques for perfect alignment and aesthetic balance.
Every quilter has a unique style. Here, we encourage you to personalize your “All the Trimmings Quilt.” Whether it’s through innovative stitching patterns or the addition of embellishments, this section provides ideas for making your quilt truly your own.
Final Review and Adjustments
Before the final binding, it’s important to review your quilt. This section discusses how to inspect your quilt for any needed adjustments, ensuring that your finished product is of the highest quality.


