Growing up in a small town nestled in the heart of Scotland, I was always enchanted by the rich tapestry of our local history and the vibrant quilt of cultures it represented.
My grandmother, a skilled quilter, would often share stories of our ancestors as she pieced together fabrics, her hands weaving not just materials but generations of family lore into her creations.
It was from her that I inherited my passion for quilting, a tradition that has become a bridge connecting my past with my present.
The Edinburgh Square quilt project holds a special place in my heart, as it reminds me of the cobblestone streets of Edinburgh, where history and modernity blend seamlessly.
A Stitch in Time: The Edinburgh Square Quilt
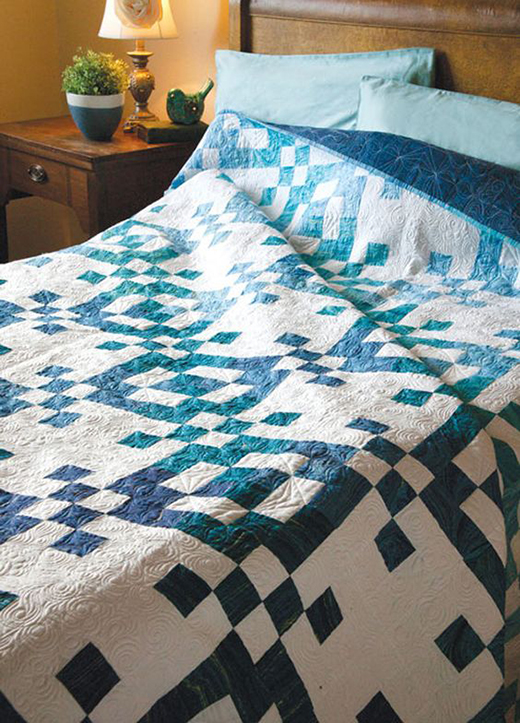
Embarking on the Edinburgh Square quilt project feels like taking a step back in time, to a place where every stone and stitch has a story to tell. This quilt, with its intricate patterns and rich history, is more than just a craft; it’s a journey through time.
The design reflects the resilience and beauty of Edinburgh, a city that has stood strong through centuries of change.
As I select each piece of fabric, I imagine the hands that built the city’s iconic structures, and I feel connected to the countless artisans whose creativity and hard work have inspired this project.
Gathering the Threads of History: Materials for Your Edinburgh Square Quilt
To bring the Edinburgh Square quilt to life, you’ll need a carefully selected array of materials that not only pay homage to the quilt’s design but also ensure its longevity and beauty. Here’s what you’ll need:
- Assorted Print Fabrics: Choose prints that resonate with the historical essence of Edinburgh. Think of patterns that mimic the textures of cobblestone streets, the hues of the city at dusk, or the floral beauty of its gardens. You’ll need enough to cut 16 sets of 8 2½” strips (22″ long) and 16 sets of 4 4½” strips (20″ long).
- White Solid Fabric: This will serve as the backdrop of your quilt, highlighting the prints and patterns you’ve chosen. Make sure you have enough to match the print fabric measurements.
- Lime Solid Fabric: For the binding, select a lime solid fabric that brings a pop of color, mirroring the vibrant life of Edinburgh’s streets and parks.
- Batting and Backing Fabric: Choose quality materials that will complement your quilt top and withstand the test of time.
Full Pattern: Click Here
Preparing the Palette: Setting the Stage for Your Quilt
Before diving into the construction of your quilt, take a moment to reflect on the design and the stories you want it to tell. Lay out your fabrics, and imagine how each piece contributes to the overall narrative of your quilt. Consider the placement of colors and patterns, ensuring they harmonize to create a visual representation of Edinburgh that is uniquely yours.
As you prepare to cut and assemble your fabrics, remember that quilting is not just about following steps but about infusing your work with intention and emotion. Each cut, each stitch, is a reflection of your connection to the craft and to the city that inspired this project.
Embarking on the Journey: Step-by-Step Construction
With your materials ready and your design in mind, you are now set to embark on the quilting journey. The Edinburgh Square quilt, with its intricate design and rich symbolism, awaits your creativity and skill. Let’s begin stitching together not just fabrics, but memories and dreams.
Step-by-Step Instructions: Crafting Your Edinburgh Square Quilt
1. Creating Strip Sets
- Begin by sewing your assorted print 22″ strips to the white solid 22″ strips side by side to form strip sets (Diagram I-A). Use a ¼” seam allowance for a precise fit. Make 16 of these in total. After sewing, press the seams in the direction of the arrow, usually towards the darker fabric to prevent the seam from showing through on the lighter side.
- Next, construct 16 strip sets using the assorted print and white solid 2½” x 20″ strips following the same technique. Press these as well, and cut them into 16 sets of 4 matching 4½” segments (Diagram I-B). These segments will be used in Step 4, so set them aside for now.
2. Assembling 4-Patch Units
- Refer to Diagram II for visual guidance. Join 2 matching 2½” segments (from the strip sets you made in Step 1) to form a 4-patch unit. You’ll need to create 16 sets of 3 matching 4-patches. This will give your quilt a cohesive look while adding a touch of variety through the different prints.
3. Making Corner Units
- Sew together one assorted print 2½” segment with one white solid 2½” x 4½” rectangle to create a corner unit as shown in Diagram III. You’ll need to make 16 sets of 2 matching corner units. These will frame your 4-patch units beautifully, adding structure and contrast to your quilt design.
4. Constructing Edinburgh Square Blocks
- With your 4-patch and corner units ready, arrange them with the 4½” segments you set aside earlier to form the Edinburgh Square block (Diagram IV). This step involves sewing 3 rows using the matching units and segments, then sewing these rows together. You should end up with 16 Edinburgh Square blocks in total, each telling a part of the quilt’s overall story.
5. Quilt Assembly
- Lay out your completed blocks according to the Assembly Diagram, paying attention to their placement and orientation. This layout is crucial for achieving the desired effect of the Edinburgh Square design. Sew the blocks into 4 rows of 4 blocks each, then stitch these rows together to form the quilt top.
6. Finishing Touches
- Once your quilt top is assembled, layer it with the batting and backing fabric. Baste the layers together and quilt as desired. Rachel machine quilted an allover floral motif on our sample, but feel free to choose a design that resonates with you. Finally, bind the edges of your quilt with the lime solid fabric to frame your masterpiece.
Additional Tips: Enhancing Your Quilting Experience
- Precision is Key: Take your time with cutting and piecing to ensure your blocks align beautifully.
- Pressing Matters: Regularly pressing your pieces can significantly improve the overall look of your quilt. Remember to press, not iron, to avoid stretching the fabric.
- Quilting Design: Choose a quilting motif that complements the theme of your quilt. The allover floral motif used in this project echoes the gardens of Edinburgh, but the choice is yours.
Reflections on Your Journey
Completing the Edinburgh Square quilt is not just an achievement in quilting; it’s a passage through time and tradition. As you hold your finished quilt, remember the stories of Edinburgh that inspired each stitch, the history woven into its fabric, and the personal journey you embarked on to create it.
This quilt is a testament to your creativity, skill, and connection to a culture rich in history and beauty. May it inspire you to explore further, craft more, and share your stories through the timeless art of quilting.


