In 2018, during my journey as a passionate quilter, I had an exciting experience that inspired me to create something unique.
While admiring a quilt I had just finished, an exciting idea emerged: to develop a quilt block that would represent my own adventures in the world of quilting.
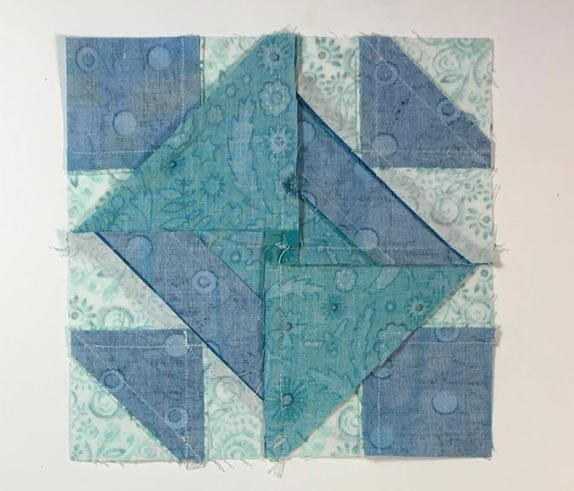
And so, the Anvil Quilt Block was born – a block filled with intriguing and challenging points.
In this tutorial, I share with you the journey to create this special block, providing detailed instructions for both paper piecing and traditional piecing methods.
Come with me and explore the enchanting universe of the Anvil Quilt Block!
Materials You’ll Need:
Before we begin, let’s gather the materials required to create the Anvil quilt block.
For Paper Piecing Method:
- Adobe installed on your computer to download the pattern
- Printer to print the paper piecing patterns
- 1⅞” x 1⅞” square of Dark fabric
- 2⅜” x 2⅜” square of Light fabric
- 3⅜” x 3⅜” square of Dark fabric
- 2⅜” x 2⅜” square of Medium fabric
- 1¾” x 1¾” square of Dark fabric
- 3⅜” x 3⅜” square of Medium fabric
For Traditional Piecing Method:
- Printer to print the traditional piecing patterns
- 1½” x 1½” square of Dark fabric
- 1 7/8″ x 1 7/8″ square of Light fabric
- 2 7/8″ x 2 7/8″ square of Dark fabric
- 1 7/8″ x 1 7/8″ square of Medium fabric
- 1½” x 1½” square of Dark fabric
- 2 7/8″ x 2 7/8″ square of Medium fabric
Step-by-Step Instructions:
Paper Piecing Method:
- Download and Print the Patterns: First, download and print the paper piecing patterns for the Birds in the Air VAR and Brave World units in your desired finished block size.
- Birds in the Air VAR Units:
- 4″ finished block: 1 copy
- 5″ finished block: 1 copy
- 6″ finished block: 1 copy
- 8″ finished block: 1 copy
- Brave World Units:
- 4″ finished block: 1 copy
- 5″ finished block: 1 copy
- 6″ finished block: 1 copy
- 8″ finished block: 1 copy
- Birds in the Air VAR Units:
- Assemble the Units for the Anvil Block:
- Begin with the Brave World units: a. Position BW-1 on the pattern and secure with a tiny dab of Elmer’s Washable Glue stick. b. Align a short edge of BW-2 with #1, and stitch starting and stopping a generous 1/4″ before and after the solid line between BW-1 and BW-2. Repeat for BW-3. c. Trim the seam allowance of BW-2/#3 to 1/4″. d. With RST, align the long edges of BW-2/#3 and BW-4, and stitch. Make a total of two Brave World units.
- Now, let’s create the Birds in the Air VAR (BITA) units: a. Adhere the wrong side of #1 with the unprinted side of your pattern using a small dot of Elmer’s Washable Glue stick or pins. b. With RST, match the long bias edges of #1 and #2, and stitch on the line between them, starting and stopping past the outside dashed line of the unit. c. Repeat the stitching process for patches #3 and #4, adding them with their short, straight grain edge in the seam. d. Add patch #5 to #1/#2/#3/#4, and stitch. Press and trim #5 to a 1/4″ seam allowance. e. With RST, add the medium #6, and stitch. Press and trim the unit to its final size.
- Assemble the Anvil Quilt Block:
- Arrange the stitched BITA and BW units to create the Anvil design. Match the points of the larger half-square triangles (HSTs) at the outside edge of the block.
- With RST, sew the units in each row together, focusing on matching the points of the HSTs. Use pins to achieve precise points.
- Press the seam allowances toward the BWs to reduce bulk.
- Completion:
- Your Anvil quilt block is now complete—a masterpiece of craftsmanship and creativity. You’ve conquered the points with grace and precision, just like the brave quilter, Amelia.
- You can now use this stunning Anvil block in your quilting projects or explore other captivating variations with the same name but different designs.
Full Pattern: Click Here
In this quilting journey, we’ve learned to conquer the points and create a dazzling Anvil quilt block. The combination of Brave World and Birds in the Air variations has resulted in a masterpiece that showcases your quilting skills and creativity.
Just like the adventurous quilter Amelia, embrace the challenges and rewards that quilting offers. Whether you choose paper piecing or traditional piecing, remember that the journey is just as important as the destination. Each quilt block, like the Anvil, tells a unique story—a story of perseverance, creativity, and the joy of quilting.
So, gather your fabrics, unleash your creativity, and continue to explore the enchanting world of quilting. And whenever you face a pointy challenge, remember the words of Amelia, the fearless quilter of Quiltville: “Don’t let the points scare you, for with each stitch, you create a masterpiece.”
Happy quilting, and may the Anvil quilt block’s allure enhance your quilting adventures!


