Allow me to take you on a journey through time, back to a moment that forever changed my quilting world. It was a few years ago, on a crisp autumn day, when I found myself wandering through a quaint little town in search of inspiration for my next quilting project.
SEE A NEW PATTERN HEREAs I strolled through the town’s cozy streets, I stumbled upon a charming little quilt shop that beckoned me inside with its colorful displays.
Intrigued by the vibrant fabrics and mesmerized by the exquisite quilts adorning the walls, I felt a spark of creativity ignite within me. The warm and friendly shop owner, Martha, greeted me with a smile and introduced me to a collection of stunning quilt blocks, each more captivating than the last.
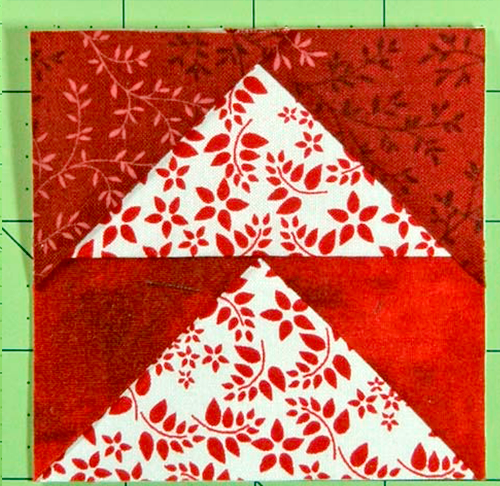
Among them was a beautiful Arrowhead quilt block, its intricate design resembling the majestic arrowhead-shaped rock formation I had once encountered during a leisurely park stroll.
As Martha shared the story behind the block’s creation, I couldn’t help but feel a surge of excitement and inspiration. I knew right then and there that this Arrowhead quilt block was destined to be my next quilting adventure. With Martha’s guidance and the newfound enthusiasm bubbling inside me, I set out on a creative journey that would forever etch this experience into the fabric of my life.
SEE A NEW PATTERN HEREArrowhead Quilt Block Pattern: A Guide for Beginners
Fast forward to today, and I am thrilled to share with you the magic of the Arrowhead quilt block pattern. Just like that fateful day when I discovered its beauty, I want to ignite the same spark of creativity in you.
Whether you’re a seasoned quilter or just starting on your quilting journey, this pattern is perfect for everyone, thanks to the efficient and accurate paper piecing technique we’ll be using.
Before we delve into the step-by-step instructions, let’s gather the materials needed and ensure we have our sewing machines and tools prepped for a successful quilting experience.
Materials Needed:
- Arrowhead Quilt Block Pattern (available in 5 different sizes)
- Printer and Adobe software to download and print the pattern.
- Fabric in various colors for the quilt block.
- Sewing machine with an open toe applique foot for better visibility.
- 90/14 sewing machine needle for easier pattern removal.
- Elmer’s Glue Stick (the purple one that dries clear) to temporarily secure fabric.
- Rotary cutter and ruler for precise fabric cutting.
- Iron for pressing.
General Instructions: Achieving the Flattest Quilt Blocks
As we embark on our quilting adventure, let me share with you some general tips for achieving the flattest and most accurate results. These tips have been instrumental in perfecting my quilting craft, and I hope they help you as well:
- Install an open toe applique foot for better visibility while sewing.
- Shorten the stitch length to perforate the paper and stabilize the seams when removing the pattern.
- Sew at a comfortable speed to stay on the stitching lines accurately.
- Finger-press small triangles open to avoid curling the pattern with steam.
With our materials ready and these valuable tips in mind, we are ready to dive into the step-by-step process of creating the Arrowhead quilt block using the paper piecing technique.
Are you ready to unleash your creativity and embark on this delightful quilting journey with me? Let’s bring the Arrowhead quilt block to life, stitch by stitch, and create a beautiful quilt that will stand the test of time.
Step 1: Download the Paper Piecing Pattern
The first step is to download the Arrowhead quilt block pattern in your desired size. Ensure you have the most current version of Adobe installed on your computer for accurate printing. Set the ‘Custom Scale’ to 100% on the Print Menu page before printing. Once printed, confirm the accuracy using the 1″ square graphic on the printed pages.
Step 2: Cut the Fabric Patches for Your Arrowhead
Using the cutting chart provided, cut the fabric patches for your Arrowhead quilt block. Generously sized patches make patch placement foolproof. For example, cut one 4-5/8″ x 4-5/8″ square for the #1 and #3 patches, then subcut them diagonally twice. The block uses two different ‘sky’ fabrics (#2 and #4 patches), but using a single fabric is acceptable as well.
Step 3: Assemble the Arrowhead Quilt Block
Now that we have our fabric patches ready, let’s start assembling the Arrowhead quilt block using the paper piecing technique:
- Cut one unit from the downloaded pattern, cutting just outside the dotted line. Save the others for future projects.
- Use a dot of Elmer’s Glue Stick to hold #1 to the unprinted side of the pattern. Use the dashed placement lines to position it.
- With right sides together, align the long bias edge of a #2 triangle with one of the short sides of #1. Stitch the seam starting about a 1/4″ inch before the line begins and stopping about a 1/4″ after the line ends.
- Press the #2 triangle open to set the seam.
- Add the second #2 triangle in the same manner, matching the bias cut edges.
- To create the placement line for #3, line up the edge of your ruler with the solid line in the middle of the block. Use your thumbnail to crease the pattern along the ruler’s edge. Remove the ruler and fold the pattern back along the crease line.
- Align the ruler’s 1/4″ mark with the folded edge and cut off the excess fabric with your rotary cutter.
- Continue adding the #3 and #4 patches, trimming the excess fabric after each addition.
- Trim the block to the desired size using a rotary cutter and ruler.
- Remove the paper to reveal your finished Arrowhead quilt block.
As I look back on that unforgettable quilting epiphany, I am reminded of the joy and excitement that quilting has brought into my life. It’s incredible how a single moment of inspiration can spark an artistic journey that spans years, bringing with it new skills, cherished memories, and beautiful quilts.


