Have you ever stumbled upon a quilt pattern that instantly makes your heart flutter?
That’s exactly how I felt the first time I came across the Lend a Paw Quilt.
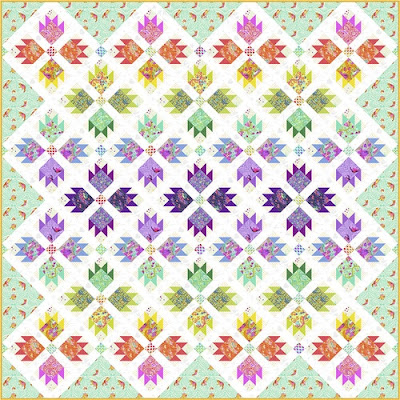
With its charming design featuring adorable prints from Tula Pink’s Tiny Beasts and True Colors collection, I knew I had to make this one!
There’s something about the whimsy of this quilt that brings back fond memories of cozy evenings spent with my favorite fabrics spread out across the floor, piecing together creations that bring warmth and color to my life.
As a confident beginner, I was excited to take on the challenge of the Lend a Paw Quilt.
Despite its intricate design, the step-by-step approach makes it remarkably achievable.
And let’s face it, there’s nothing more satisfying than seeing those blocks come together to create a stunning masterpiece that you can snuggle up with or gift to a loved one.
Crafting Joy: Why the Lend a Paw Quilt Stands Out
The Lend a Paw Quilt isn’t just a project; it’s a joyful journey through fabric and creativity.
This quilt features a delightful mix of playful elements and expert techniques that ensure your stitching will shine brightly.
Each paw-inspired block is not only visually appealing but a perfect way to express your personality and creativity with color choices.
Tula Pink’s vibrant designs stimulate creativity, making every stitch a celebration of fabric!
Working on the Lend a Paw Quilt allows you to hone your piecing skills while also indulging in your love for fabric patterning and color combo.
The vibrant prints from the Tiny Beasts collection can be mixed and matched in endless ways, leading to a quilt that’s uniquely yours.
It’s not just about completing a quilt but enjoying the process, which is truly what quilting is all about!
Getting Ready to Quilt: What You Need
- Fabric Requirements:
- (A) Deer John Glimmer: 3/8 yard
- (B) Deer John Glow: 1/4 yard
- (C) Oh Nuts!Glimmer: 1/4 yard
- (D) Oh Nuts!Glow: 1/4 yard
- (E) Bear With Me Glimmer: 1/4 yard
- (F) Bear With Me Glow: 1/3 yard
- (G) One Man’s Trash Glimmer: 1/4 yard
- (H) One Man’s Trash Glow: 2 yards
- (I) Who’s Your Dandy Glimmer: 1/4 yard
- (J) Who’s Your Dandy Glow: 3/8 yard
- (K) Painted Ladies Glimmer: 1/4 yard
- (L) Painted Ladies Glow: 1/4 yard
- (M) Out Foxed Glimmer: 1/4 yard
- (N) Out Foxed Glow: 1/4 yard
- (O) Tiny Dots Bluebell: 1/3 yard
- (P) Tiny Dots Cosmic: 2 1/4 yards
- (Q) Tiny Dots Flare: 1/4 yard
- (R) Tiny Dots Meadow: 1/4 yard
- (S) Tiny Dots Opal: 1/8 yard
- (T) Tiny Dots Peacock: 1/4 yard
- (U) Tiny Dots Thistle: 1/4 yard
- (V) Tiny Stripes Aster: 1/8 yard
- (W) Tiny Stripes Fern: 1/8 yard
- (X) Tiny Stripes Honesty: 1/4 yard
- (Y) Tiny Stripes Moonglow: 1/8 yard
- (Z) Tiny Stripes Wildfire: 1/3 yard
- (AA) Fairy Flakes Paper: 3 3/4 yards
- (AB) Tiny Stripes Sunrise: 3/4 yard (binding)
- Backing: 8 1/2 yards of One Man’s Trash Glimmer
- 100% cotton thread
- 99″ x 99″ batting
Before You Begin: Preparation Tips
Preparation is half the battle!
Before diving into the Lend a Paw Quilt, take a moment to gather all your materials.
This not only saves time but ensures that you’re not scrambling midway through a project.
I always find it helpful to lay out all my fabric swatches and have my cutting tools ready to go!
Remember, a little planning goes a long way toward creating a smooth quilting experience.
Also, consider cutting your fabric pieces before you start assembling the blocks.
This will not only help you become more familiar with the pattern but will also make the assembly process feel quicker and less chaotic.
A well-organized workspace is vital for keeping your creative juices flowing!
Step-By-Step Instructions for the Lend a Paw Quilt
Now that you’re all set up with materials and preparation, I’m excited to share that the step-by-step instructions for the Lend a Paw Quilt follow below!
To explore the complete details of the pattern, please check out the link provided.
Full Pattern: Click Here
Pro Tips for a Flawless Finish
With any quilting project, there are a few tips and tricks that I’ve picked up along the way.
One of the best practices I’ve learned is to always press the seam allowances open after sewing.
This helps reduce bulk and creates a smoother finish in your blocks, especially important in detailed designs like the Lend a Paw Quilt.
Trust me, your hard work deserves the best finish!
As you piece the blocks together, don’t forget to keep the orientation of your prints in mind.
This quilt is all about playful patterns—positioning them correctly ensures that your finished quilt looks cohesive and polished.
Keep checking your seam allowances to stay aligned and keep your units square!
Exploring Advanced Techniques: HSTs Made Easy
Half-square triangles (HSTs) are a major component of the Lend a Paw Quilt, and mastering this technique will open up a world of possibilities in your quilting journey.
The pattern suggests cutting your HST units larger and trimming them down for precision—this is a really effective method that I recommend.
Precision in your cuts will help you achieve those sharp points that make your quilt shine!
If you’re a visual learner, I highly recommend checking out video tutorials on HST construction before you start.
Practicing will help you feel more comfortable when you sit down to work on the quilt itself.
Once you’ve got the hang of it, you’ll be whipping up HSTs like a pro!
Celebrate Your Accomplishments with the Lend a Paw Quilt
Completing the Lend a Paw Quilt is truly a reason to celebrate!
Not only will you have a beautiful addition to your home, but this quilt also represents the countless hours of creativity, patience, and love that you’ve poured into it.
Each block is a reminder of the patterns you’ve stitched, the colors you’ve chosen, and the joy of creating something uniquely yours.
As you wrap up this project, don’t forget that there are plenty of other creative articles and inspiring projects waiting for you.
Dive into our collection of amazing content and unlock even more crafting adventures.
You can discover something wonderful you might love by exploring more here.
I can’t wait to see what you create next with the magic of quilting!


