When I first laid eyes on the Forest Tracks quilt pattern, I felt an overwhelming urge to bring a piece of nature into my home.
It was the vibrant colors and the intricate design that caught my attention, and I knew that I had to give it a try.
I can still recall the excitement of selecting fabrics, imagining how all those delightful pieces would come together in perfect harmony to create a quilt that would not only keep me warm but also tell a story.
After successfully completing a few smaller quilting projects, I was eager to tackle something more substantial.
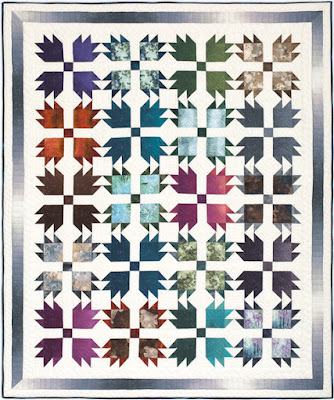
The Forest Tracks pattern seemed like the perfect challenge for me, with its stunning Bear Paw blocks and the ability to showcase multiple colors and fabrics.
So, armed with scissors, a sewing machine, and an unyielding sense of adventure, I embarked on this quilting journey.
Customizing Nature’s Palette
One of the most exciting aspects of the Forest Tracks quilt pattern is its array of fabric choices.
From the cool tones of azure and emerald to the warm shades of cocoa and plum, each fabric selection has the potential to create a different atmosphere in your quilt.
As I flipped through my fabric stash, I realized how crucial it is to choose colors that reflect both the wildness of a forest and your personal style.
Thinking about how I wanted my Forest Tracks quilt to feel, I decided to mix bright and muted colors.
After all, nature is a blend of vibrant splashes and soft earthy tones!
This variety in choices allowed me to express my creativity while staying true to the essence of the pattern, which showcases the beauty of the great outdoors.
Mastering the Techniques
Now let’s get into the nitty-gritty stuff!
The Forest Tracks quilt invites you to experiment with techniques like making Half-Square Triangles (HSTs) and composing Bear Paw blocks.
If you’re a beginner, fear not!
These techniques, though they may sound intimidating, are not too complex once you delve into them, and the satisfaction of mastering them is oh-so-rewarding.
Remember, practice makes perfect.
I started by making a few test HSTs to get a feel for the process before diving into my quilt.
This way, I was able to refine my skills, ensuring I would achieve the crisp, square points that truly elevate the quilt.
Besides, a little practice never hurt anyone!
Materials
- Fabric A (Snow) – 3-1/8 yards
- Fabric B (Purple) – 1/8 yard
- Fabric C (Plum) – 1/8 yard
- Fabric D (Grass) – 1/8 yard
- Fabric E (Azure) – 1/8 yard
- Fabric F (Midnight) – 1/8 yard
- Fabric G (Blossom) – 1/8 yard
- Fabric H (Cocoa) – 1/8 yard
- Fabric I (Pewter) – 1/8 yard
- Fabric J (Boysenberry) – 1/8 yard
- Fabric K (Winter) – 7/8 yard
- Backing Fabric – 5 yards
- Binding Fabric – 1/2 yard
- 69” X 81” Sized Quilt Batting
Preparing for Your Adventure
Before you jump into the stitching action, take a moment to prepare your workspace!
I always find it helpful to cut all my fabric pieces beforehand.
This minimizes the risk of losing track of my supplies and maximizes efficiency.
Plus, nothing beats the feeling of having everything neatly organized and ready to go.
Also, lay out your color scheme and consult the assembly guide to familiarize yourself with the construction process.
This will save you from potential headaches later.
Trust me, those pesky little details can sneak up on you!
Step-by-Step Instructions:
Now we’re getting to the juicy part!
Below, you’ll find the step-by-step instructions.
For this beautiful Forest Tracks quilt pattern, I recommend checking out the full pattern by following the link provided below the image.
Full Pattern: Click Here
Additional Tips for Success
As you sew your lovely Forest Tracks quilt, don’t forget to press your seams open as you go!
This will help yield a flatter quilt top, making your final product look more professional and polished.
A good pressing technique can really make a difference in the overall appearance of your quilt.
Also, don’t get discouraged during any difficult spots.
Each stitch brings you closer to your masterpiece, and let’s be honest, every creative endeavor has its hiccups.
Simply take a deep breath, maybe even a short break, and return to it with fresh eyes.
Creating Beautiful Borders
Once your quilt top is assembled, it’s time to attach the borders!
I absolutely love this part of the process as it gives the quilt a finished look.
For the Forest Tracks quilt, I chose a simple yet elegant border style to keep the focus on the blocks themselves.
When adding borders, make sure to keep your seams as straight as possible.
A tip I like to use is to measure from the center to the corners of the quilt to ensure everything stays aligned while you’re sewing.
Every detail counts, and it contributes to your quilt’s overall beauty.
Celebrate Your Quilting Journey!
As you finish your Forest Tracks quilt, take a moment to step back and admire your handiwork.
There’s something truly special about wrapping yourself in a quilt that represents your creativity, hard work, and love for quilting.
Each stitch tells a story, and this completed project is a testament to your journey as a quilter.
I encourage you to explore more articles filled with incredible quilting tips and techniques, perfect for enhancing your skills!
The blog is overflowing with amazing content just waiting for you to discover it.
For a real treat, you can check out an extraordinary piece I’ve prepared by clicking here.
So what are you waiting for?
Reflecting on my initial excitement when I first saw the Forest Tracks pattern, I’m thrilled that I took the leap to create it.
Your journey in quilting can be filled with wonder and delight if you embrace each step along the way.


