There’s a certain magic in the art of quilting. It’s a craft that weaves together not just fabrics, but also memories, creativity, and a sense of accomplishment.
I remember a time when I was traveling through the vibrant markets of Marrakech. The air was filled with the scent of spices, the sounds of haggling vendors, and the sight of a myriad of colors.
Amidst the hustle and bustle, my eyes were drawn to a stall filled with patchwork bags. Each bag was a unique piece of art, telling its own story through the combination of fabrics and patterns. I was so captivated by their beauty and the skill that went into creating each one that I decided to learn how to make my own.
The journey was filled with trials and errors, countless stitches, and an immeasurable amount of joy.
I discovered the therapeutic rhythm of the needle and thread, the satisfaction of seeing a design come to life, and the thrill of creating something beautiful and functional with my own hands. Today, I want to share with you the joy of creating your own patchwork quilted bag.
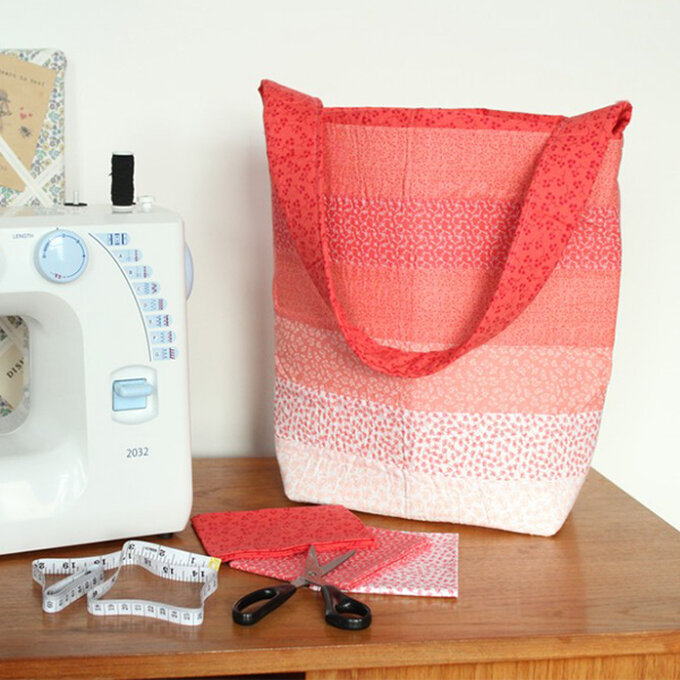
This bag is not only aesthetically pleasing but also incredibly practical. It’s the perfect size for carrying your craft projects, books, or even groceries. The ombre effect, achieved by the clever placement of different toned prints, gives it a modern edge.
Best of all, it’s quick to make and doesn’t require any complicated measuring or cutting. So, let’s embark on this journey together and create a patchwork quilted bag that you can call your own.
Materials Needed
- Sewing Machine
- Sewing Kit
- Patchwork Ruler
- Rotary Cutter/Fabric Scissors
- Single-Sided Fusible Foam Stabiliser
- Fat Quarters
- Iron
Step-by-Step Instructions
Step 1: Cutting the Fabric
Cut fourteen 3 inch by 17 inch strips of your Craft Cotton from your fat quarters. To create the ombre effect, cut 2 of each of your prints and 4 of your lightest print.
Step 2: Stitching the Strips
Press your strips then with right sides together, stitch them together along their long edges with a quarter-inch seam allowance. Start with the darkest working to the lightest (place your four lightest strips in the middle), then back up to the darkest.
Step 3: Pressing and Trimming
Press open your seams and trim the edges if needed to create a perfect rectangle.
Step 4: Fusing the Fabric
Lay out your In-R-Form with the fusible side facing up then place the wrong side of your strip piece on top. Iron over the top to fuse together.
Step 5: Trimming the Fused Fabric
Trim around to the edges of your strip piece.
Step 6: Stitching the Sides
Fold in half across the middle with right sides together then stitch up the two sides with a half-inch seam allowance.
Step 7: Creating the Bottom Corners
Pinch the two bottom corners together so the seam is in the middle, then mark 2.5 inches in from the point. Try to make sure your seams will match up on the inside. Pin together then stitch along these lines. Trim close to the seams.
Step 8: Preparing the Lining
Cut two 17 by 16 inch rectangles of your lining fabric. With right sides together, stitch around your two pieces with a quarter-inch seam allowance leaving one of the short sides open. Repeat step 6 for your lining.
Step 9: Joining the Outer Bag and Lining
With right sides together, match the top raw edges of your outer bag and lining. Stitch around the top with a half-inch seam allowance, leaving a gap of about 7 inches. Turn your bag right sides out through this gap then slip stitch the opening shut. Fold over 2 inches of the top of your bag.
Step 10: Preparing the Handles
Cut two 6 by 17 inch strips in your darkest fabric. Stitch two together along their short end (right sides together) with a quarter-inch seam allowance and repeat for the other two strips. Fold in half along the middle and press.
Step 11: Fusing the Handles
Cut one piece of In-R-Form 2.5 by 33 inches. Lay this on the wrong side of your strip with one raw edge matching up with the center fold. Iron to fuse together.
Step 12: Stitching the Handles
Fold in the two edges of your strip by a quarter inch and press. Fold your strip in half over the In-R-Form. All of the raw edges should now match. Stitch through all layers close to the edge.
Step 13: Attaching the Handles
Fold over half an inch at one end of your strap then pin in place on the inside of the bag so one of the center seams is in the middle of the strap. The bottom of your strap should match the bottom of your folded over darkest strip.
Step 14: Securing the Handles
Topstitch through all layers of your strap and bag to secure it down. Start with a square then make diagonal lines across to further strengthen your strap.
Step 15: Finishing Touches
Trim all loose threads then fill up your bag and start putting it to use!
Full Pattern: Click Here
And there you have it! You’ve just crafted your very own patchwork quilted bag. This project is a testament to the beauty of patchwork and the functionality of quilting. It’s a bag that carries more than just your belongings; it carries the story of your creativity, hard work, and the journey you embarked on to create it.
Whether you’re using it for your craft projects, as a stylish accessory, or gifting it to a loved one, this bag is a testament to your skills and creativity. It’s a tangible representation of the journey you’ve taken, the skills you’ve honed, and the creativity you’ve expressed.
Remember, the process of creating is just as important as the end product. Each stitch, each decision, each moment you’ve spent working on this bag has contributed to your growth as a crafter. So, take a moment to appreciate your work, your journey, and your achievement.
As you move forward, may this patchwork quilted bag serve as a reminder of what you can achieve with a bit of fabric, a lot of passion, and a dash of creativity. Keep exploring, keep creating, and most importantly, keep quilting. Happy quilting!


