Hello, everyone! This is Julie, and today I’m thrilled to take you on a special quilting journey.
I remember a time when I was just a little girl, and my grandmother would sit me down by her side, her hands guiding mine as we stitched together pieces of fabric.
She used to say, “Julie, every quilt tells a story.”
I didn’t quite understand what she meant back then, but as I grew older, I realized that every quilt indeed narrates a tale of patience, creativity, and love.
One day, I stumbled upon a quilt pattern that reminded me of my grandmother’s teachings. It was the Patchwork Storage Cube pattern, a design that combines functionality with the art of quilting.
I was immediately drawn to its practicality and elegance, and I knew I had to share it with you. So, let’s dive into this beautiful pattern and create our own quilting story.
Description of the Project
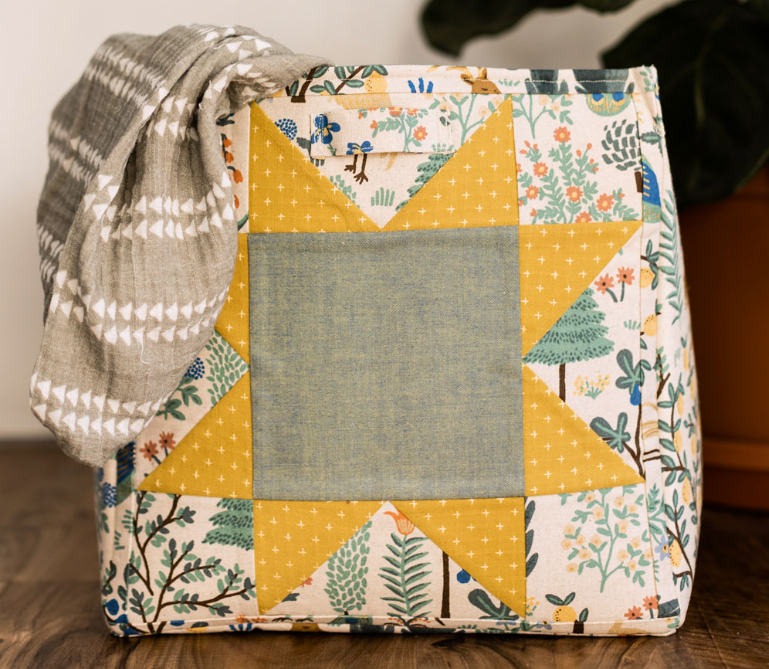
The Patchwork Storage Cube is a beginner-friendly project that allows you to create a beautiful and functional storage bin.
This pattern is perfect for those who want to combine their love for quilting with practical home solutions.
The cube features a classic sawtooth star block on the front, providing a perfect opportunity to showcase your favorite fabric or a fussy cut design.
The finished cube fits perfectly into 13″ cube storage systems, making it a stylish and practical addition to any room.
Materials Needed
To create your Patchwork Storage Cube, you will need the following materials:
- Exterior Fabric (canvas or home decor fabric recommended): 1 yard
- Lining: 1 yard
- Fabric for 12″ Sawtooth Star block
- Pellon Flex Foam 2-Sided Fusible Stabilizer (FF78F2) 20″ width of bolt: 2 yards (you can also use a similar fusible or sew-in stabilizer)
- Simple sewing machine
- Thread
- Cutting mat
- Ruler
- Rotary cutter
- Straight pins
- Iron & ironing board
Optional Supplies (that’ll make things easier):
- Wonder Clips
- Disappearing ink pen
- Best Press starch
- Wonder Clips
- Walking foot for sewing machine
Step-by-Step Instructions
Step 1: Cut Your Fabric
The first step in creating your Patchwork Storage Cube is to cut your fabric. You’ll need to cut your exterior fabric, lining, and fabric for the sawtooth star block according to the pattern’s instructions. Remember, precision is key in quilting! Take your time with this step, ensuring each piece is cut accurately. This will make the assembly process much smoother.
Step 2: Assemble the Block & Borders
Once your fabric is cut, it’s time to start sewing. You’ll begin by assembling your sawtooth star block. The pattern provides clear instructions on how to do this, including how to mark your fabric and where to sew. After you’ve assembled the block, it’s time to add the borders. Sew the strips onto the sides of the block, then trim the entire thing down to 14 x 14″, making sure the star is centered from all sides.
Step 3: Add the Stabilizer
With your block assembled, it’s time to add the stabilizer. Center your flex foam on the wrong side of each 14″ square of exterior fabric, including the square with the star block. Adhere by following the directions that came with the foam. This step will give your storage cube its shape and stability.
Step 4: Create and Attach the Handles
Next, you’ll create the handles for your storage cube. The pattern provides instructions on how to create these small loops, which are perfect for pulling the bin in and out of the cube organizer storage. Once your handles are created, attach them to the exterior pieces of fabric.
Step 5: Assemble the Exterior of the Bin
Now that your handles are attached, it’s time to start the actual assembly of the bin. Sew the exterior pieces together according to the pattern’s instructions, making sure to leave a 10″ gap in one of the side seams so that you can turn the bin right side out later.
Step 6: Assemble the Lining
Once the exterior of your bin is assembled, repeat the process with the lining pieces. Remember to leave a 10″ gap in one of the side seams so that you can turn the bin right side out later.
Step 7: Put It All Together
With your exterior and lining assembled, it’s time to put it all together. Turn your cube’s exterior right sides out, but leave the lining inside out. Place the exterior inside the lining, and align the lining and exterior corner seams. Sew around the circumference of the top of the cube bin.
Step 8: Topstitch
After turning the entire tote right side out through the gap in the lining, press the top seam flat so the lining lays nicely inside the exterior. Then, topstitch around the circumference of the bin. This will give your storage cube a professional finish.
Step 9: Darts (Optional)
For a more “boxy” look, you can add a small dart to each corner of your storage cube. This step is optional, but it can add a nice touch to the final product.
Full Pattern: Click Here
Creating a Patchwork Storage Cube is a wonderful way to blend the artistry of quilting with practical home solutions. This project is a fantastic opportunity for quilters of all skill levels, offering a unique platform to showcase your creativity and craftsmanship. Whether you’re a novice quilter embarking on your first functional project, or an experienced artisan seeking a fresh challenge, the Patchwork Storage Cube is an excellent choice.
Remember, every quilt tells a story. As you piece together your Patchwork Storage Cube, you’re not just crafting a storage bin—you’re weaving a tale of patience, creativity, and love. Each stitch is a testament to your dedication, each piece of fabric a chapter in your quilting journey.
Moreover, this project is more than just a practical item; it’s a symbol of the joy and fulfillment that comes from creating something with your own hands. It’s a reminder of the beauty that can be found in everyday objects, and the satisfaction of turning a simple piece of fabric into something extraordinary.
So, let’s continue to create, to quilt, and to tell our stories, one stitch at a time. Let’s fill our homes with items that are not only functional but also filled with meaning and personal touch. And as we do so, let’s remember to enjoy every moment of the process, from the first cut of the fabric to the final stitch.


