Let me take you on a vibrant journey through the magical world of quilting, specifically with the stunning Diamond Pendant Quilt.
I still remember the excitement I felt when I first saw this pattern—it was like a burst of colors that could light up any room!
The rich hues and intricate design caught my eye immediately, and I couldn’t resist the urge to dive into this amazing project.
It inspired me to explore the beauty of paper piecing in a way that I had never attempted before.
As I embarked on my quilting adventure, I discovered not only the pleasure of stitching but also the incredible joy of transforming beautiful fabrics into a masterpiece.
Many weekends were spent with my sewing machine humming softly in the background, surrounded by fabric scraps and the warmth of my cozy space filled with creativity.
Through my journey, I found that the Diamond Pendant quilt wasn’t just about the finished product; it was about the process of bringing this gorgeous design to life.
Bridging the Gap Between Art and Fabric
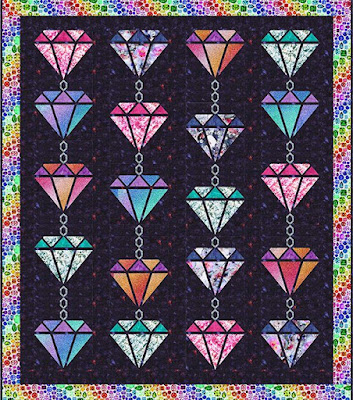
The Diamond Pendant Quilt is not just a beautiful piece; it’s a testament to the art of quilting.
Designed by the talented Marjorie Rhine, this quilt utilizes a unique paper piecing technique that helps create striking diamond shapes reminiscent of stained glass.
The quilts look intricate, but with patience and practice, you too can master the art!
Each piece is like a tiny diamond waiting to shine, and when stitched together, they create a stunning tapestry of color.
Each time I sit down to quilt with this pattern, I am reminded of the importance of artistic expression in our lives.
The Diamond Pendant Quilt represents the ability to turn simple fabrics into a cohesive work of art, which speaks volumes about your creativity and personal style.
Plus, with each stitch, we also weave our stories into our quilts.
Gathering Your Quilting Arsenal
- Fabric in chosen colors (see the fabric list below)
- Paper piecing foundation (printable templates)
- Sewing machine and thread (matching colors)
- Rotary cutter and cutting mat
- Iron and ironing board
- Scissors for trimming
- Quilt batting and backing fabric
Before you get started, take a moment to pull together all the materials you’ll need for your Diamond Pendant Quilt.
Having everything in one place will streamline your process and allow you to dive into the creative flow without interruptions.
And trust me, the last thing you want when you’re halfway through a cutting session is to realize you’ve forgotten a key tool!
Additionally, I highly recommend laying out your fabrics and choosing the perfect combinations that resonate with you.
This quilt pattern provides a beautiful opportunity for self-expression, so don’t be shy!
Choose fabrics you love and that reflect your unique aesthetic.
Pre-Quilting Preparations
Setting out on this quilting journey includes some essential prep work.
While it’s tempting to jump right into cutting, taking the time to carefully read through the entire Diamond Pendant Quilt pattern will make your experience smoother.
Knowing what to expect will efficiently alleviate any confusion during the sewing process!
Consider labeling your cut pieces as you go along.
It helps keep everything organized, ensuring that each piece finds its rightful place in your masterpiece.
Trust me; I’ve learned this the hard way!
Staying organized will help your diamond designs stand out beautifully.
Step-by-Step Instructions:
Get ready to unleash your creativity!
Below are the detailed instructions on how to assemble your Diamond Pendant Quilt.
Remember, the full pattern can be accessed here.
Let’s dive in!
Full Pattern: Click Here
Finishing Touches for a Flawless Quilt Finish
As you quilt your way through the Diamond Pendant pattern, make sure to pay special attention to your finishing touches.
Once you’ve completed sewing your blocks together, take the time to smooth out any seams, and don’t shy away from giving your quilt a good press.
Not only will this improve the look, but it will also support the overall structure of the quilt.
Add some personal flair with quilting stitches that highlight the diamond shapes!
With every stitch and seam, you breathe life into your project while enhancing its aesthetic qualities.
In the end, the beauty of your Diamond Pendant Quilt will shine bright!
Advanced Techniques to Elevate Your Creation
If you feel comfortable with the fundamentals of the Diamond Pendant Quilt and are eager to challenge yourself further, consider experimenting with color gradients or adding unique borders.
Summer shades, deep jewel tones, or even a monochromatic palette would all work beautifully with this design!
Also, explore alternate quilting techniques—perhaps something like free-motion quilting to create interesting texture within your finished piece.
Each layer of additional creativity not only enriches your quilt but also turns it into a one-of-a-kind masterpiece that truly represents your style.
Celebrate Your Quilt Journey!
Completing the Diamond Pendant Quilt is more than just finishing a craft project—it’s a celebration of your creativity and dedication.
Take a moment to appreciate each stitch you’ve sewn and all the love you’ve poured into your fabric.
Remember, every quilt tells a story, and yours is truly unique!
If you’re hungry for more amazing quilt content, my blog has tons of exciting projects waiting for your exploration!
You can uncover another fantastic article by clicking right here.
Your creative journey is just beginning!


