I remember the joy I felt when I finally finished my first quilt.
SEE A NEW PATTERN HERE
It was a simple patchwork that somehow managed to come together beautifully, but I will never forget the sense of accomplishment that washed over me.
It’s incredible how a few pieces of fabric can be transformed into something warm and comforting.
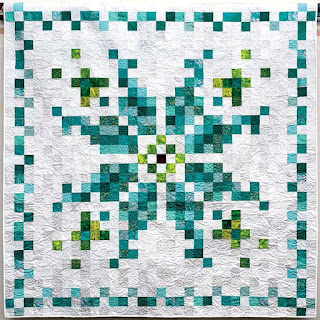
That’s why I’m excited to share my experience with the Pixelflake quilt—a whimsical pattern that brings cheer and vibrancy into any space.
Pixelflake, designed by the talented Stacey Day, is a fantastic quilt for both beginners and seasoned quilters alike.
The stunning interplay of colors and the innovative strip piecing method make this quilt not only a feast for the eyes but also a fun project to embark on.
I can assure you that once I started on the Pixelflake quilt, I simply couldn’t put it down!
So, let’s dive into this dazzling journey.
Data Dance: Embracing the Pixel Effect
The concept behind the Pixelflake quilt is inspired by pixel art, and it brings a refreshing modern twist to quilting traditions.
With a harmonious blend of cheerful hues, including teal, lime, and fuchsia, this quilt will brighten up your living space and can definitely serve as a delightful holiday gift.
I find that when I dive into colors like these, my mood just lifts—no rainy day can stand a chance against such vibrant fabric!
What makes the Pixelflake quilt particularly appealing is its easy-to-follow assembly process.
I remember feeling slightly intimidated when I started my first quilt, but the clever strip piecing method in Pixelflake allows for quick assembly without the headache of cutting a multitude of squares.
That ease of construction reminded me that quilting can be equally fun and practical!
Getting Your Gear: Materials List
- Assorted white blenders – 4 yards
- Assorted teal blenders – 1 ⅔ yards
- Assorted lime green blenders – ⅜ yard
- Fuchsia blender – scrap
- Binding – ⅝ yard
- Backing – 74″ x 74″ (choose something nice and cozy!)
- Batting – 74″ x 74″ (I recommend a fluffy one for extra comfort)
Before you start, make sure to gather everything you need!
I love collecting my materials and laying them out—it truly gets me prepared and motivated.
Trust me; having everything on hand makes the process so much smoother!
Also, don’t forget about your sewing supplies: a reliable rotary cutter, cutting mat, quilting ruler, and, of course, your sewing machine.
The best part is, once you have your materials ready for the Pixelflake quilt, you’re already halfway to a beautiful finish!
Let’s Get It Started: Preparation Tips
Before diving into the Pixelflake quilt, I always suggest organizing your fabric pieces.
Cut all necessary strips and squares ahead of time and label them accordingly.
This way, you won’t find yourself rummaging through piles of fabric mid-project.
I’ve found this particularly useful when working on larger quilts, where it’s easy to lose track!
Moreover, don’t skip the step of pressing your seams open as you go.
It not only helps avoid bulk but gives your quilt that lovely tailored finish.
Trust me; every little detail counts when you’re working on a masterpiece like the Pixelflake quilt!
Step-by-Step Instructions:
Now, let’s jump into the fun part!
Below, you’ll find a detailed approach to creating your very own Pixelflake quilt—let that creativity flow!
For the full pattern, just hit the link below!
Full Pattern: Click Here
Extra Tips for a Successful Project
One key tip I have for successfully completing your Pixelflake quilt is to take it one unit at a time.
Focus on mastering the strip piecing technique before assembling larger sections.
There’s no need to rush; with each completed unit, you’ll find motivation to keep going!
Additionally, experiment with different color combinations!
One of the best parts of making the Pixelflake quilt is seeing how your choices create unique effects.
Each quilt can tell a different story, so allow your creativity to shine through!
Giving It Your Personal Touch
Once you’re ready for finishing touches, think about incorporating additional textures through quilting patterns.
Whether it’s meandering or straight-line quilting, let your Pixelflake quilt reflect your personality and style.
I’ve found that this transforms a simple quilt into a cherished keepsake.
Also, consider binding techniques: whether you’re looking for a traditional double-fold binding or a fun contrasting fabric, make sure you feel proud of the finishing touch.
Trust me; that last bit will make all the difference!
Celebrate Your Creation and Keep Quilting
Once your Pixelflake quilt is complete, take a moment to appreciate your hard work!
Quilting is a journey filled with creativity and personal expression, and completing your quilt is an accomplishment worth celebrating.
Remember to share your masterpiece with friends and family; I love showing my finished projects to mine!
If you’re eager for more sewing inspirations, I’ve got a treasure trove of content waiting for you to explore!
If you’re curious to see what else I’ve been up to, you can check out an incredible piece I’ve prepared by clicking here.
There’s always something new and exciting in the world of quilting!
It’s time to wrap up this adventure and start another with your Pixelflake quilt.
I hope you find joy in every stitch, just like I did.
Happy quilting!


