Hey there, fellow quilters!
Today, I’ve got a fantastic and whimsical quilt block pattern to share with you—the 3D Bow Tie Quilt Block.
But before we dive into the quilting magic, let me tell you a little story.
A long time ago, in a small town, there lived a quirky quilter named Martha.
Martha was known for her playful approach to quilting and loved to create unique and adorable designs.
One day, as she was rummaging through her fabric stash, she stumbled upon a bunch of colorful bow tie patterns.
Inspired by the fun and charming look of the bow ties, she came up with a brilliant idea—to create a 3D version of the classic bow tie quilt block.
And that’s how the 3D Bow Tie Quilt Block came to be!
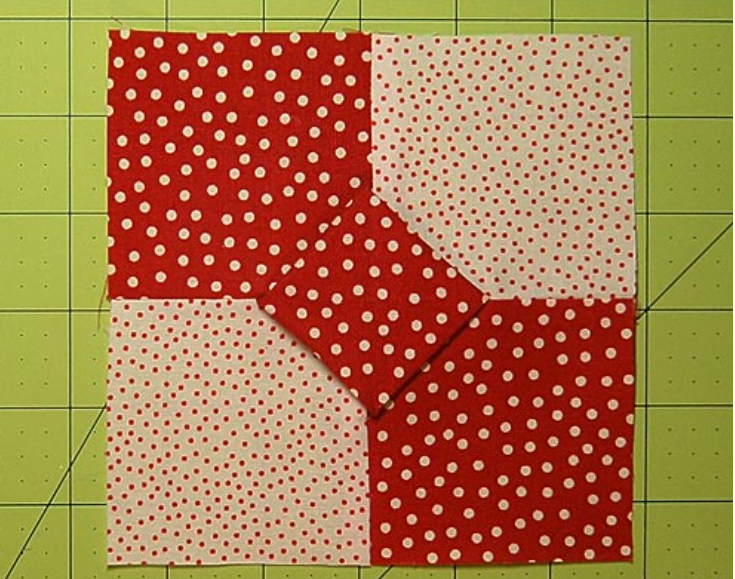
The 3D Bow Tie quilt block is as delightful as it sounds! This adorable design adds a touch of whimsy to your quilting projects and is perfect for beginner quilters.
With just five equal-sized squares and a simple twist, you can create this charming block and add a playful flair to your quilt.
Materials Needed
Before we get started, let’s gather the materials needed for this project:
- Bow Tie Fabric: Cut 3 squares (size determined by the finished block size ÷ 2 + 1/2″ for seam allowances).
- Background Fabric: Cut 2 squares (size determined by the finished block size ÷ 2 + 1/2″ for seam allowances).
- Sewing machine and thread.
- Pins.
- Iron (optional, for pressing).
Step-by-Step Tutorial:
Step 1: Cutting for a 3D Bow Tie Block
To begin, we’ll cut the fabric squares for our 3D Bow Tie Quilt Block. No need for a complicated cutting chart—just follow this simple formula:
Finished Block Size ÷ 2 + 1/2″ = Size of Fabric Squares
For example, if you want a 5″ finished block:
5″ ÷ 2 = 2-1/2″
2-1/2″ + 1/2″ = 3″
So, cut 3 squares from your chosen Bow Tie Fabric, and 2 squares from the Background Fabric, each measuring 3″.
Step 2: Assembling the 3D Bow Tie Quilt Block
- Begin by folding one Bow Tie fabric square in half, right sides together, and lightly finger pressing it. Be careful not to press a hard crease as it will show in the finished block.
- Align the cut edges of the folded Bow Tie square with those of a Background square and pin them together.
- Add another Bow Tie square on top of the pinned ones, right sides together, and pin to hold everything in place. The folded edge should be visible, and you’ll stitch the side that has the folded edge in the middle.
- Stitch the three patches together, finger pressing the seam allowance toward the darker fabric.
- Fold back the first two patches from the folded knot square, making space for the final patch.
- Layer the remaining short side of the folded knot between the second pair of squares. Remember that each pair of like-colored squares is diagonal to each other in the finished block.
- Add the final patch on top, right sides together, and pin it in place.
- Stitch the side with the folded edge, finger pressing the seam allowance toward the darker fabric.
- Now comes the twist! Pin the end of the two pairs of patches together, red to white. Distribute the pouch formed by the knot square evenly on both sides of the seam allowances, and pin, nesting the seam allowances of the pairs of patches.
- Stitch the final seam, making sure to line up all the cut edges as neatly as possible.
- Press the seam allowances of your 3D Bow Tie with your iron. You can also opt to steam the knot instead of pressing to avoid smushing and creasing.
- Congratulations! You’ve completed your adorable 3D Bow Tie Quilt Block! Easy peasy!
Full Pattern: Click Here
And there you have it, fellow quilters—a fun and quirky 3D Bow Tie Quilt Block that adds a touch of whimsy to your quilting projects.
Whether you’re a seasoned quilter or just starting, this delightful block is sure to bring a smile to your face.
So, grab your fabric, fire up your sewing machine, and enjoy the process of creating this adorkable quilt block!
Happy quilting!


