There’s something truly magical about transforming a bundle of fabric strips into a stunning quilt.
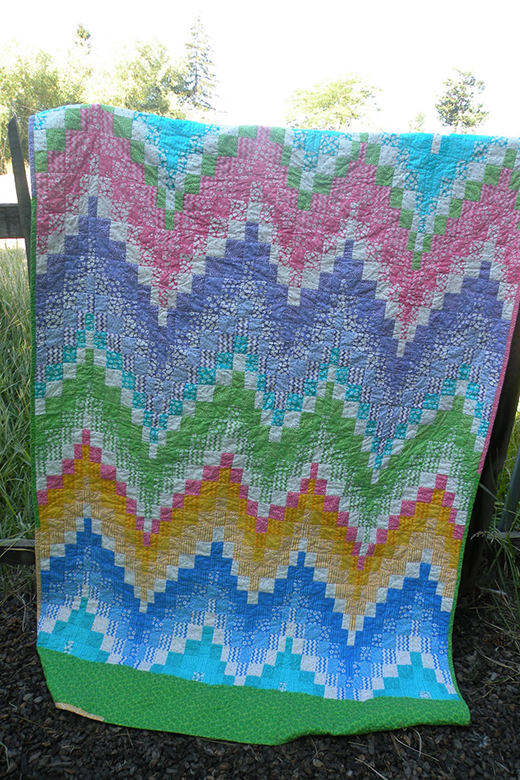
The Jelly Roll Bargello quilt is one such project that beautifully demonstrates this magic.
I’ve finally gotten around to writing a tutorial for this quilt, and I’m thrilled to share it with you. This pattern is based on the specific quilt I made, but feel free to use it as a guide to create your own version.
Please note that this pattern is for personal use only—perfect for making quilts for yourself or as gifts, but not for commercial purposes.
The beauty of the Jelly Roll Bargello quilt lies in its adaptability. By adding or deleting jelly roll strips, you can easily alter the size of your quilt. For my quilt, I used two jelly rolls to achieve a finished width of 54 inches. If you want a wider quilt, simply use more jelly rolls or add borders. The possibilities are endless, and the process is incredibly fun!
The Dynamic Dance of Colors: Jelly Roll Bargello Quilt
The Jelly Roll Bargello quilt is a delightful interplay of colors and patterns. Using pre-cut fabric strips known as jelly rolls, this project simplifies the process while still allowing for a vibrant, complex design.
Whether you’re a seasoned quilter or a beginner looking for a new challenge, this tutorial will guide you through each step, helping you create a quilt that is both visually stunning and deeply satisfying to make.
Materials: Gathering Your Supplies
To start your Jelly Roll Bargello quilt, you’ll need the following materials:
- 2 Jelly Rolls: Do not trim off the selvages.
- Fabric for Borders: 1 yard, cut into three strips of 8.5 inches wide. Make two pieces that are 8.5 x 54.5 inches long. Additionally, cut four strips, 2.5 inches wide for binding.
- Yardage for Backing: 6 yards (this is generous; feel free to piece together big scrap pieces).
- Batting: 58 x 92 inches.
- Binding: Use the four leftover jelly roll strips along with strips cut from the border fabric.
Preparing to Quilt: Tips and Initial Steps
Full Pattern: Click Here
Before diving into the quilting process, take some time to organize and prepare your materials. Here are a few tips:
- Choosing Your Fabric Order: This step might be the hardest for some. Most jelly rolls are already sorted from lightest to darkest. Arrange the strips in an order that pleases you. Consider grouping colors and adding contrast strips in between.
- Set Up Your Sewing Space: Ensure your sewing area is well-lit and organized. Have all your materials within reach and your sewing machine threaded and ready to go.
- Plan Your Panels: Instead of piecing all 36 strips together, create smaller sets that will then be cut and joined together. This makes the process more manageable.
Step-by-Step Instructions: Creating Your Jelly Roll Bargello Quilt
Follow these detailed steps to create your own Jelly Roll Bargello quilt:
- Pick Your Fabric Order: Arrange your jelly roll strips in a pleasing order. You might choose to alternate colors or create gradients. For instance, you might have two blue strips between green and purple strips in one set and a green strip between pink and blue strips in another set.
- Piece the Strip Sets:
- Sew the strips in pairs with selvages aligned at the same end.
- Sew the pairs together, starting at the lengthwise grain edge. Alternate starting edges to prevent fabric stretching.
- Once all strips are sewn, you’ll have sets with selvages at one end. Lay the sets down and make any final adjustments to the order.
- Press and Cut the Sets:
- Iron your sets and press seams open for better alignment.
- Trim off selvages to create a straight edge.
- Cut each set into the following strips:
- 4 strips, 2.5 inches wide
- 10 strips, 2 inches wide
- 6 strips, 1.5 inches wide
- Organize the strips into groups by size.
- Form the Bargello Strips:
- Sew the strips of the same width into one long strip, then join the ends to form a loop.
- To create the Bargello effect, carefully unpick a seam between the top and bottom fabrics of each loop based on the desired pattern. Number the top fabric as #1 and the bottom as #36.
- Follow the provided chart to ensure correct fabric positioning.
- Piece the Bargello Sections:
- Sew the strips together according to the chart, ensuring the pattern aligns correctly.
- Continue adding strips, checking the pattern frequently to avoid mistakes.
- Complete the Quilt:
- Assemble the quilt sections and sew them together.
- Add borders if desired, quilt as desired, and bind the edges using the leftover jelly roll strips and border fabric strips.
Additional Tips: Perfecting Your Jelly Roll Bargello Quilt
- Stay Organized: Keep your strips grouped by size and pattern to avoid confusion.
- Press Seams Open: This helps in matching seams accurately and achieving a flat quilt top.
- Take Your Time: Pay close attention when sewing the strips together to ensure the pattern remains consistent.
Conclusion: Enjoy Your Stunning Jelly Roll Bargello Quilt
Creating a Jelly Roll Bargello quilt is a rewarding experience that showcases the beauty of simple fabric strips arranged in a complex, captivating pattern. Take a moment to admire your handiwork and appreciate the time and effort you’ve invested. Whether you’re making this quilt for yourself or as a gift, it will surely be cherished for years to come. Happy quilting!


