Hey everyone, it’s Julie!
Today, I want to dive into creating an absolute stunner of a project—the Chromazone quilt.
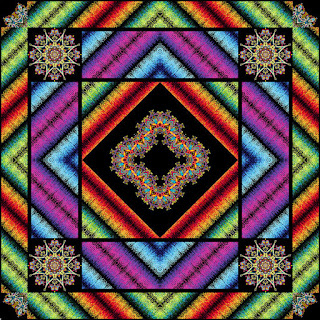
I remember the first time I laid eyes on this design; it was like a burst of color and creativity exploded right in front of me.
I was drawn to the dynamic kaleidoscope pattern and the color pops that spark joy!
There’s just something magical about immersing myself in fabric, colors, and stitches that brings out the artist in me.
It’s not just the finished product that excites me, it’s the entire process of bringing this beautiful Chromazone quilt to life!
I often find myself caught up in the meditative rhythm of cutting, sewing, and piecing fabric together.
So, grab your favorite fabric and let’s embark on this fun adventure together!
By the time we’re done, you’ll have a captivating quilt to showcase and cuddle under.
Color and Design: The Heart of Chromazone
The Chromazone quilt is a visual feast, standing tall at 61″ x 61″, with a layout that plays beautifully with colors and geometric designs.
The clever use of contrasting hues in the orange/green and blue/pink stripes complements the intricate kaleidoscope panels perfectly.
When you see how this pattern comes together, you’ll understand why it holds a special place in the hearts of many quilters, myself included.
This quilt is not just eye-catching; it also offers valuable lessons in quilt-making techniques!
You’ll get to fussy-cut fabrics, perfect your quarter-inch seams, and explore different seam allowances as you create those stunning Medallion blocks.
It’s all about channeling your energy into something that not only looks impressive but also gives you a sense of accomplishment.
Gathering Your Tools: Materials for Success
- 1 1/4 yards black solid fabric
- 2 3/4 yards orange/green stripe fabric
- 2 yards blue/pink stripe fabric
- 4 1/2 yards 42″ backing fabric (or 2 1/4 yards wide backing fabric)
- 1 piece 77″ x 77″ batting
- Scissors and rotary cutter
- 11″ clear template for Kaleidoscope panels
- 5 1/2″ x 26″ clear template for orange/green stripe
- 9 1/2″ x 15 1/2″ clear template for blue/pink stripe
- Measuring tape
- Iron and ironing board
- Spray starch
Make sure to double-check everything on this list before you get started!
Having all your materials ready can really set the tone for how smoothly your quilt-making experience goes.
Plus, it’s always exhilarating to watch your fabric pile transform into stunning blocks and an intricately designed quilt!
And hey, trust me—being well-prepared allows you to get in the zone and enjoy the creative process more.
Don’t forget to pre-wash your fabrics, as they can shrink and change in the wash.
However, for the Chromazone quilt, that step isn’t recommended.
Just ensure that you give them a proper press with a heavy coat of spray starch to tame those wrinkles and make cutting a breeze!
Get Ready, Get Set: Prepping for the Chromazone Quilt
Before diving into the quilting world, it’s always great to do a bit of visualizing your design and planning your colors.
Sit back with a cup of tea (or coffee—no judgment here!) and admire your fabric choices.
Think about how they interact and what emotional palette they evoke.
A well-thought-out placement will elevate your finished Chromazone quilt.
Additionally, take some time to familiarize yourself with your templates and the cutting techniques described in the pattern.
This quilt’s intricacy means precision is key, so practice makes perfect!
Get comfortable with fussy-cutting and measuring ahead of time, saving you from hiccups later as you create those dazzling kaleidoscope panels.
Step-by-Step Instructions:
Alright, now we’re getting to the fun part!
Below are the step-by-step instructions for creating the stunning Chromazone quilt.
You can follow along as you cut, sew, and piece it all together.
And remember, the full pattern can be accessed through the link below!
Full Pattern: Click Here
Additional Tips for Quilting Success
During your journey with the Chromazone quilt, don’t hesitate to lean on the quilting community, share your progress, or even ask for advice!
People love to help, and who knows—perhaps you’ll inspire someone else to take on the challenge.
Document your journey through photos, as it is a great way to chart your progress and look back at your accomplishments.
Lastly, be patient with yourself.
Mistakes are simply part of the learning process.
Treat them as opportunities for growth and remember that every stitch is part of your unique story and creative expression.
Remember, the goal is not to be perfect but to enjoy the journey of bringing the Chromazone quilt to life!
Design Considerations for Your Chromazone Quilt
While the Chromazone quilt has its established guidelines, don’t shy away from making it your own!
Consider what colors evoke a special feeling for you or perhaps even use fabrics that have sentimental value.
Each quilt tells a story, and when you infuse personal choices, your piece will have that special touch that no one else can replicate.
If you want to take it a step further, why not explore advanced techniques such as adding personalized embroidery or embellishments to your quilt?
This can add an extremely unique flair and make your Chromazone quilt stand out even more!
Celebrate Your Creativity!
As you complete each embrace of color and pattern, take a moment to pause and celebrate your creativity!
Creating the Chromazone quilt—or any quilt, for that matter—is a beautiful journey of self-expression.
You’ve put in the dedication and time to craft something that is not only visually stunning but also resonates with your spirit.
So, once you finish this quilt, pat yourself on the back and enjoy the warm snuggly feelings that come with it.
Did you know we have tons of amazing content waiting for you?
Feel free to explore other articles on quilting!
You can discover more delightful creations I’ve prepared by clicking here.
What a fantastic adventure we’ve had together!


