Hey there, fellow fabric enthusiasts!
Julie here, and today I’m thrilled to dive into an exquisite quilt pattern that has become my latest obsession: the Shibori quilt pattern!
I remember the first time I laid eyes on it at a local quilt show.
The stunning blend of colors and intricate designs quickly pulled me in.
It felt like standing before a magnificent piece of art that I desperately wanted to create.
As I explored more about the Shibori quilt pattern, I found it brought together traditional dyeing methods and modern quilting techniques flawlessly.
The playfulness of the design allows for creativity while providing a structured yet fun approach to quilting.
Even if you’re a beginner, don’t shy away—this Shibori quilt pattern is perfect for learning and expressing your unique quilting vibes!
Discovering the Artistic Journey of Shibori
Shibori, a Japanese fabric dyeing technique, involves various methods of folding, twisting, and binding the fabric to create enchanting patterns.
The Shibori quilt pattern takes its inspiration from this artistry, transforming those dyeing methods into delightful quilt designs.
The moments spent crafting this quilt will allow you to connect with the fabric on a deeper level, appreciating every color and pattern alike.
By incorporating Shibori techniques into quilting, the result is a beautiful interplay of light and shade that captures attention and imagination.
Through this pattern, you can enjoy the meditative flow of stitching while exploring an array of fabric choices.
Plus, who wouldn’t want to incorporate a bit of cultural artistry into their quilting repertoire?
Getting to Know the Essentials: Materials for Your Shibori Quilt
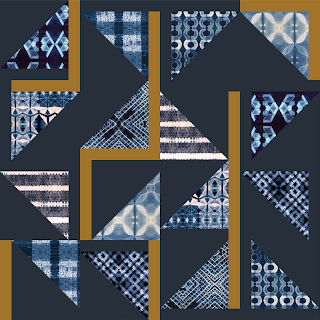
- Fat Quarters (1) 14.5” square in assorted patterns (total of 8 pieces)
- Old Gold fabric: 1/2 yard for strips
- Navy fabric: 2 1/2 yards for blocks and strips
- Binding: 1/2 yard in 2.5” WOF
- Backing: 4 yards for the quilt’s backside
- Rotary cutter, cutting mat, and quilting ruler for accurate cutting
- Machine sewing supplies including thread, pins, and scissors
Before you start cutting, it’s crucial to carefully select your materials.
The vibrant Shibori colors will beautifully contrast against the Navy base fabric.
Take your time choosing fabrics to ensure you love each piece as it comes together!
Establishing your workspace is vital, too—ensure you have room to spread out and access everything easily.
Always remember that preparation is key.
Prewash and press your fabrics to avoid shrinking issues once the quilt is complete.
This step is a little time-consuming but is totally worth it for the final results!
Now, let’s get down to the nitty-gritty of creating your stunning Shibori quilt!
Preparations Before You Dive In
Alright, my crafty friends, before we plunge into the stitching stage of the Shibori quilt pattern, let’s do a little prep work.
Make sure your sewing machine is set up, threaded with matching thread, and ready to roll!
It’s helpful to have an organized approach; trust me, it makes the process smoother and far less stressful.
Keep your cutting tools sharp and handy, as you’ll be cutting lots of assorted squares.
It really enhances the precision—an essential aspect of assembly!
Remember to have a good playlist or podcast ready, as I like to have some fun background noise while diving into my quilting projects!
Step-by-Step Instructions:
Below, I’ve outlined the fabulous step-by-step instructions for the Shibori quilt pattern.
For even more detailed guidance and illustrations, check the full pattern linked right here!
Full Pattern: Click Here
Additional Tips for a Successful Experience
While piecing together your Shibori quilt pattern, remember to take your time.
It’s not a race!
Enjoy the process, and don’t be afraid to try different color combinations during assembly.
Getting creative will only enhance the uniqueness of your final quilt.
If you do run into trouble, don’t panic!
Mistakes happen to the best of us.
Simply unpick and redo as necessary—this is all part of the quilting journey.
Plus, think of it this way: each little bump along the road adds character to your quilt in an unexpected way!
Putting It All Together: Techniques and Design Considerations
As you start piecing your blocks together in the Shibori quilt pattern, it’s good to periodically step back and visualize the overall design.
Think about how the colors flow and contrast in relation to each other.
You might even find it helpful to lay out your blocks on the floor before sewing to see how everything looks!
Advanced quilters can delve deeper into Shibori techniques and explore ways to add more texture to the quilt.
This can include adding hand stitching or additional quilting patterns that reflect the Shibori spirit.
It’s all about embracing creativity, so get adventurous!
Celebrate Your Creativity and Continue Exploring!
As you wrap up your journey with the Shibori quilt pattern, take a moment to relish your accomplishments!
It’s not just about finishing; it’s about the joy of creating, experimenting, and learning throughout the process.
Celebrate the unique piece you’ve crafted as it reflects your artistic touch and time spent creating.
I invite you to explore the blog further—there’s a treasure trove of articles just waiting for you!
From technique breakdowns to delightful fabric choices, you’ll find tons of amazing content to inspire your next project.
You can discover all this magic right here.
Trust me, you won’t be disappointed!
So, armed with the beautiful Shibori quilt pattern, go forth and create something beautiful.
Each stitch is a step toward developing your artistry further, so have fun every step of the way!


