Imagine a weekend filled with the hum of the sewing machine, the feel of vibrant fabrics under your fingertips, and the satisfaction of creating something beautiful.
SEE A NEW PATTERN HEREThis is the joy of quilting, a joy that’s about to be yours as you embark on the journey of creating the Apple Green Quilt. This free pattern by Bart Raymond for Springs Creative is a delightful project that promises to add a splash of color and a touch of charm to your home.
Now, I didn’t design this quilt. That credit goes to Bart Raymond. But it reminds me of a quilt my aunt made when I was a child. It was a bright green quilt, just like the apples in her garden.
Every time I wrapped myself in that quilt, I could almost smell the sweet scent of apples. That’s the beauty of quilting, isn’t it? It’s not just about creating a piece of fabric art; it’s about stitching together memories and emotions.
SEE A NEW PATTERN HEREAbout the Apple Green Quilt
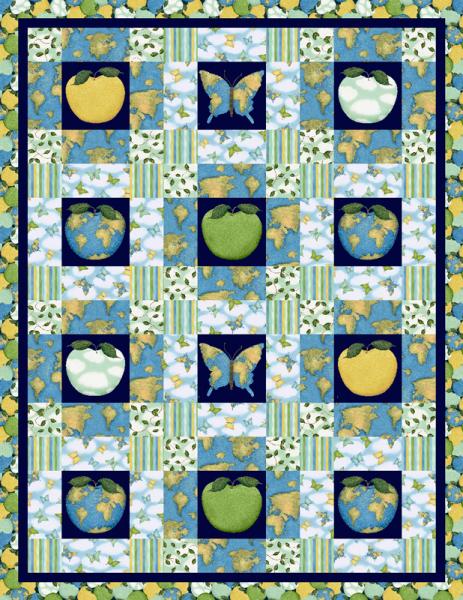
The Apple Green Quilt is a beautiful project that features unique block designs and vivid colors. It’s a great beginner project that you can make in a weekend and enjoy on Monday! This quilt is designed using the Apple Green fabric collection by Susan Winget, a collection that we absolutely love!
The finished size of the quilt is 51″ x 66″ (130cm x 168cm), making it a perfect throw for your couch or a cozy quilt for picnics in the park.
Materials Needed
Here’s what you’ll need to create your own Apple Green Quilt:
- 1¼ yards Block Print (should have 4 rows of apples)
- 1 yard Quilter’s Cotton – Navy
- ½ yard Apple Packed
- ½ yard Leaf Vine Cloud
- ½ yard Stripe
- 2/3 yard Butterfly Cloud
- 2/3 yard World Map
- ½ yard Wedding Ring (for binding)
- 4 yards Wedding Ring (for backing)
- 1½ yards Fusible web
- Twin size batting
- Basic sewing supplies
- Sewing machine
Step-by-Step Instructions
Cutting Requirements
Before you start sewing, you’ll need to cut your fabric. Here are the cutting requirements for the Apple Green Quilt:
From Panel Block Print cut:
- Twelve applique pieces leaving the colored square around the piece to be appliqued. Unit 1
From Quilter’s Cotton – Navy cut:
- Three strips 8” x WOF. From these strips cut twelve 8” squares. Unit 2
- Six strips 1 ½” x WOF for inside border. Unit 3
From Apple Packed cut:
- Six strips 2 ½” x WOF for outside border. Unit 4
From Leaf Vine Cloud cut:
- Three strips 4 ¼” x WOF. From these strips cut twenty four 4 ¼” squares. Unit 5
From Stripe cut:
- Three strips 4 ¼” x WOF. From these strips cut twenty four 4 ¼” squares. Unit 6
From Butterfly Cloud cut:
- Five strips 4 ¼” x WOF. From these strips cut twenty four 4 ¼” x 8” rectangles. Unit 7
From World Map cut:
- Five strips 4 ¼” x WOF. From these strips cut twenty four 4 ¼” x 8” rectangles. Unit 8
From Wedding Ring ½ yard piece cut:
- Six strips 2 ¼” x WOF for binding. Unit 9
Quilt Assembly
Now that you’ve got all your pieces cut, it’s time to start assembling your quilt.
- According to the manufacturer’s instructions, fuse the Block Print applique pieces to the fusible web. Cut the pieces out on the printed edge of the design. Set aside until you get the twelve blocks completed.
- Block 1: (Press seam towards World Map) as you go. Sew a Unit 5 – 4 ¼” Leaf Vine Cloud square to each side of a Unit 8 – 4 1/4” x 8” World Map rectangle. Make 12. Sew a Unit 8 – 4 ¼” x 8” World Map rectangle to two sides of a Unit 2 – 8” Navy square. Make 6. Sew a Leaf Vine Cloud/World Map unit to the top and bottom of the World Map/Navy unit to create Block 1. Make 6 blocks.
- Block 2: (Press seams towards Stripe) as you go. Sew a Unit 6 – 4 ¼” Stripe square to each side of a Unit 7 – 4 1/4” x 8” Butterfly Cloud rectangle. Make 12. Sew a Unit 7 – 4 ¼” x 8” Butterfly Cloud rectangle to two sides of a Unit 2 – 8” Navy square. Make 6. Sew a Stripe/Butterfly Cloud unit to the top and bottom of the Butterfly Cloud/Navy unit to create Block 2. Make 6 blocks.
- Referring to the quilt photo, lay out the twelve blocks. Peel the paper back off of the applique pieces then press the applique pieces to the center of the Navy square.
- Matching seams on each block, sew the blocks together into rows. Press the seams in rows 1 and 3 to the left. Press the seams in rows 2 and 4 to the right.
- Matching the seams on each row, sew the rows together in two sections as follows: rows 1 and 2, then rows 3 and 4. Join these two sections together. Press the seams in one direction.
- Border #1 – Sew the Unit 3 – 1 ½” Navy inner border strips together in a long strip. Measure the sides of the quilt top, average the two measurements and use the average number to cut two border strips. Sew these border strips to the sides of the quilt top. Measure the top and bottom of the quilt top, average the two measurements and use the average number to cut two border strips. Sew these border strips to the top and bottom of the quilt top.
- Border #2 – Same as Step 7 using the Unit 4 – 2 ½” Apple Packed outer border strips.
- Layer, quilt and bind as desired.
Full Pattern: Click Here
Creating the Apple Green Quilt is a journey filled with fun and creativity. As you stitch each piece, you’re not just creating a quilt; you’re creating a piece of art that’s filled with the warmth and joy of a weekend well spent.
So, get your materials ready, set up your sewing machine, and let’s bring a splash of color into our lives with this delightful quilt project. Enjoy the process, and most importantly, have fun!


