Hey there, fellow quilting enthusiasts!
SEE A NEW PATTERN HERE
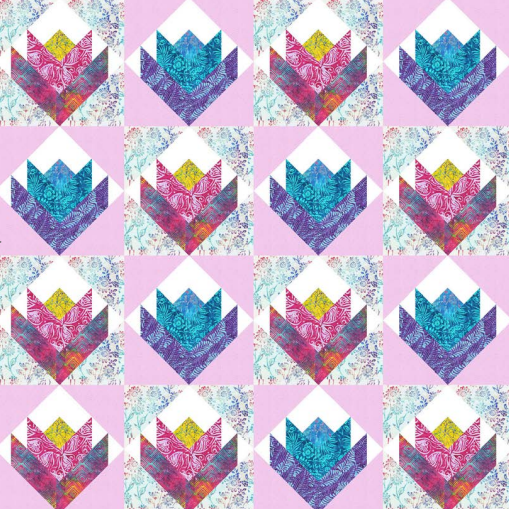
It’s Julie here, and I’m beyond excited to dive into a project that left me feeling vibrant and inspired: the In Bloom quilt!
Picture this: one rainy afternoon, I stumbled upon a palette of vivid fabrics that reminded me of a blooming garden.
I couldn’t resist plotting out this beauty!
The hues practically danced in my hands, and I knew right then, I had to create something special.
Nothing brings warmth to a space quite like a hand-crafted quilt.
So with my sewing machine humming, and a cup of tea by my side, I embarked on this journey of sewing the In Bloom quilt.
After carefully cutting, piecing, and quilting, I felt like a burst of sunshine had entered my room once it was completed!
Let me take you through my quilting adventure with the In Bloom pattern; I promise you’ll be thrilled with the outcome!
[From Palette to Pattern: The Essence of In Bloom]
The essence of the In Bloom quilt pattern truly shines through its use of colors and shapes that mimic nature.
Designed by Natalie Crabtree, you can see how her inspiration comes alive in the quilt’s layout.
Incorporating elements reminiscent of blooming florals, each block tells a visual story that captures the whimsical beauty of spring.
The 80″ x 80″ size makes it perfect for showcasing this vibrant artwork!
As I constructed the quilt, I marveled at how it stitched together like a great narrative.
Each piece played its part, from the bold orchid colors to gentle hues of blue, creating a gorgeous tapestry that brings to mind sunny days spent outdoors.
This quilt isn’t just a cover; it’s a conversation starter, an art piece that energizes any room.
Let’s not forget that the process of assembling it is as invigorating as the final product!
[Mastering Techniques for Flawless Blocks]
When I started with the In Bloom quilt, I knew mastering the techniques was key for achieving precision and style.
The use of Half Square Triangles (HST) is not just beautiful; it’s a fantastic way to learn piecing techniques.
Once you nail down the fundamentals, you’ll find both the assembly of Block #1 and Block #2 a breeze!
Don’t get too caught up with perfection; instead, let your sewing machine create those little ‘happy accidents’ that add character to your quilt.
The assembly process might seem daunting at first, but trust me, it’s extremely rewarding once you see those blocks come together.
Each block you finish brings you one step closer to completing the In Bloom quilt!
Materials Required:
- 100Q-1046 White lava solids – 1¼ yards
- 100Q-1521 Orchid lava solids – 2 yards
- 2041Q-X Multi – 1¼ yards
- 2042Q-X Neon Multi – ¼ yard
- 2046Q-X Magenta – ½ yard
- 2047Q-X Multi – ⅝ yard
- 2048Q-X Blue – 1⅛ yards
- 2049Q-X Blue – ½ yard
- 2050Q-X Purple – ⅝ yard
- 2052Q-X Purple (incl.binding) – 1¼ yards
- Backing fabric – 7 1/3 yards
- 88″ square of batting
[Prepping for Success: Getting Started with In Bloom]
Before you jump into the In Bloom quilt, let’s chat about some prepping tips.
First, ensure you have a calm and well-lit space to lay out your fabrics.
Trust me, it makes a world of difference when you can clearly see those delightful colors come together!
Organizing your cutting pieces by sections can also streamline the process, ensuring you grab the right fabric at the right time.
Also, making a quick test template for your blocks is a brilliant way to avoid mistakes later on.
Just a small effort before you dive in will save you those few extra moments of frustration during the assembly.
Remember, enjoy every part of crafting the In Bloom quilt, because this journey is just as stunning as the final product!
Step-by-Step Instructions:
Now that you’re all prepped, let’s get to the nitty-gritty!
The detailed instructions for piecing the In Bloom quilt are below, and there are images provided to help you visualize each step.
If you’d like to access the full pattern, you can find it via the link below!
Full Pattern: Click Here
Additional Tips for Quilting Success
As you piece together the In Bloom quilt, consider using a quarter-inch foot for your sewing machine.
It’s a game-changer for accuracy in your seams!
Additionally, remember to press your seams well after each step; it does wonders for keeping everything aligned and tidy.
Embrace your sewing journey!
Quilting is all about creativity, and sometimes the best designs come from daring to stray from the original pattern.
Don’t shy away from adding your personal flair to the In Bloom quilt.
Let your sewing machine sing!
[Exploring Advanced Techniques: HST 101]
Half Square Triangles (HST) are a phenomenal technique you’ll utilize throughout your In Bloom quilt.
They require precise cutting and can be made in multiple sizes, which makes them versatile for future projects!
After achieving the perfect HST, you’ll not only enhance your quilt but your skills as well.
Practicing this technique now will strengthen your confidence for any future quilting endeavors.
And let’s be clear, mastering HST is like waving your own creative flag.
You’ll be excited to incorporate these units into all your quilting projects!
[Celebrate Your Work: The Joy of Completion]
As you tie up your last stitch on the In Bloom quilt, take a moment to celebrate your incredible accomplishment!
Every quilt tells a story, and your hard work and creativity are reflected within every seam and corner.
You’ve done something beautiful, and that’s absolutely worth celebrating!
If you’re itching for more creative adventures, my blog is full of delightful projects just waiting for you.
With tons of amazing content to inspire your next steps, you’ll find your next favorite project in no time.
Ready for a new crafting journey?
Explore your next adventure by clicking right here!
Now, as I wrap up this blogging adventure on the In Bloom quilt, I hope you feel motivated to stitch your own masterpiece.
Remember, each quilt is a reflection of you, and I can’t wait to see where your creativity takes you!


