Discover How to Recreate This Beautiful and Beginner-Friendly Quilt Block
If you’re looking for a clean, beginner-friendly quilt block with a soft and timeless look, the Blueberry Pie Quilt Block is a perfect choice.
This design stands out because it combines simple shapes with a balanced layout, creating a visually appealing pattern without requiring complex techniques.
In this guide, you’ll understand how this block is structured, how to recreate it step by step, and how to customize it to match your own quilting style.
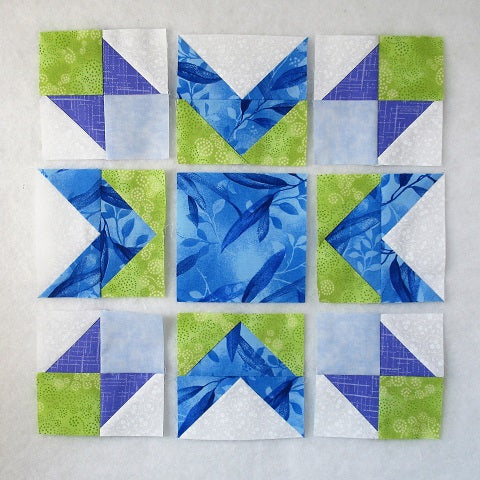
The Blueberry Pie Quilt Block follows a structured grid layout that gives it a clean and organized appearance.
At first glance, it may look complex, but the construction is actually quite simple. The design is created by combining basic quilting units arranged in a symmetrical pattern.
The block typically includes:
- Half square triangles (HSTs)
- Solid fabric squares
- A consistent contrast between light and dark fabrics
This combination creates a star-like visual effect while maintaining a soft and balanced aesthetic.
Essential Techniques You’ll Use
Understanding the techniques behind this block is key to recreating it successfully.
✔ Half Square Triangles (HSTs)
These are one of the most important elements in this design.
They are created by sewing two fabric squares together and cutting them diagonally. Once pressed, they form a square made of two contrasting triangles.
These units are responsible for the diagonal movement within the block.
Fabric Contrast and Placement
The beauty of this block comes from contrast.
By placing darker fabrics in strategic positions and using lighter fabrics as a base, the design becomes more defined and visually striking.
Even if you change colors, keeping this contrast is essential.
Grid-Based Assembly
The block is assembled in rows, making the process much easier to follow.
Instead of sewing everything at once, you’ll work line by line, which helps maintain alignment and accuracy.
This is especially helpful for beginners.
1. Create Your HST Units
Start by pairing your light and dark fabric squares.
Sew them together, cut diagonally, and press them open.
Make sure all units are trimmed evenly for accuracy.
2. Organize Your Layout
Lay out all your pieces before sewing.
This step helps you visualize the final result and ensures your colors are correctly positioned.
3. Sew Rows Together
Begin by sewing pieces into horizontal rows.
Take your time to keep seams aligned and consistent.
4. Join the Rows
Once your rows are complete, sew them together to form the full block.
Press seams carefully to keep the block flat and clean.
The Blueberry Pie Quilt Block has become a favorite among quilters for several reasons.
First, it offers a clean and structured look that works well in both modern and traditional quilts.
Second, it’s easy to repeat across a full quilt, making it ideal for larger projects.
Finally, it’s beginner-friendly, allowing even new quilters to achieve a polished result.
Ways to Customize Your Quilt Block
One of the best things about this pattern is how versatile it is.
You can easily adapt it to create different looks.
✔ Try Different Color Palettes
While blue and white create a classic “blueberry” look, you can experiment with:
- Pastel tones for a softer feel
- Bold colors for a modern style
- Vintage florals for a traditional touch
Mix Fabric Styles
Instead of using only solid fabrics, try mixing prints and textures.
This adds depth and personality to your quilt.
Adjust the Block Size
Larger blocks can speed up your project, while smaller blocks create more intricate designs.
Choose what works best for your quilting goals.
🔗 Get the Full Original Pattern
If you’d like to follow the complete tutorial with exact measurements and detailed cutting instructions, you can access the original pattern here:
Final Thoughts
The Blueberry Pie Quilt Block is a perfect example of how simple techniques can create something truly beautiful.
By understanding how the block is built and how the elements work together, you can confidently recreate it and even adapt it into your own unique designs.
Whether you’re just starting or looking for a relaxing project, this block is a great addition to your quilting journey.
🔥 Download the free pattern now and begin your next quilt journey today.


