When I first began quilting, I was drawn to patterns that could tell a story. There was something about the way colors and shapes could converge into a harmonious design that spoke to me deeply.
One day, while rummaging through my fabric stash, I came across a few vibrant scraps that seemed to be calling out to each other, begging to be united in a single project. That’s when I decided to create a quilt block that would allow these fabrics to shine individually, yet come together beautifully.
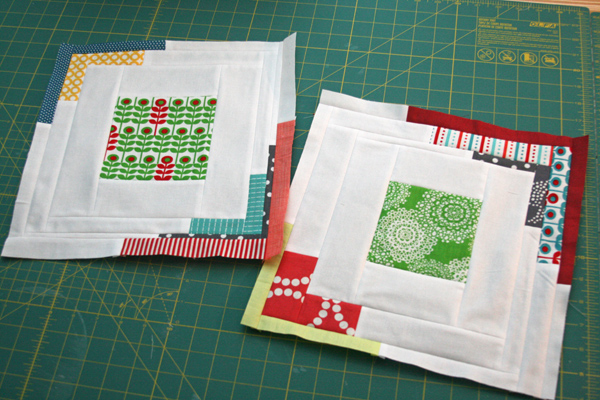
Thus, the “Converging Corners Block” came to life—a celebration of contrasts meeting in perfect harmony.
Over the years, I’ve found this block to be not only visually captivating but also a joy to sew. It has a dynamic quality, thanks to the way it combines a simple design with striking visual impact. If you’re like me and love to experiment with colors and fabrics, this block is perfect for bringing those creative impulses to life. Let’s dive into the details of creating this unique and vibrant quilt block.
Exploring the Harmony of Contrasts: The Converging Corners Block
The “Converging Corners Block” is an exploration of balance and contrast. With its structured yet dynamic design, this block combines clean lines and bold fabric choices to create a sense of movement.
The beauty of this block lies in its ability to bring together various colors and patterns, creating a focal point that draws the eye in. It’s a perfect project for quilters who love to play with color and want to add a touch of modernity to their quilting repertoire.
The Art of Fabric Selection for the Converging Corners Block
One of the key aspects of making the Converging Corners Block is fabric selection. This block thrives on contrast—think bright, bold colors set against more muted tones, or vibrant patterns against solid fabrics.
The goal is to create a block where each fabric stands out, yet contributes to a cohesive overall look. For this project, you’ll want to raid your fabric stash and select pieces that speak to you. Don’t be afraid to mix and match! The more variety, the more interesting the final quilt will be.
Materials You Will Need
To create the “Converging Corners Block,” gather the following materials:
- Assorted fabric scraps in various colors and patterns for the corners.
- Solid white fabric (or any other solid color of your choice) for the frame.
- Rotary cutter and cutting mat to cut precise strips.
- Quilting ruler for accurate measurements.
- Sewing machine with a quarter-inch presser foot.
- Thread in a coordinating or contrasting color.
- Iron and ironing board for pressing seams.
- Pins or fabric clips to hold pieces together.
Getting Started: Setting the Foundation for Your Quilt Block
Before diving into the steps, let’s consider some initial tips to help ensure a successful quilting experience:
- Pre-Wash and Iron Your Fabrics: It’s always a good idea to pre-wash your fabrics to prevent any shrinking or color bleeding later. Press them flat to make cutting more accurate.
- Precision is Key: Accurate cutting and sewing are essential for this project. Take your time with each step to ensure all your pieces align perfectly.
- Plan Your Layout: Lay out your fabric scraps before sewing to decide on the arrangement. This step is crucial for achieving the desired balance and contrast in your block.
Full Pattern: Click Here
Step-by-Step Instructions: Creating the Converging Corners Block
Now that we have all our materials ready, it’s time to dive into the step-by-step process of creating the “Converging Corners Block.” Follow these instructions carefully to bring your quilt block to life.
Step 1: Cutting Your Fabric Pieces
Begin by cutting your fabric into the necessary pieces:
- Center Square: Cut a 2.5″ x 2.5″ square from a patterned fabric of your choice. This will be the focal point of your block.
- Frame Strips: Cut strips of solid white fabric to frame the center square. You’ll need four strips, each 2.5″ wide. The lengths should be approximately:
- 2 strips: 2.5″ x 4.5″
- 2 strips: 2.5″ x 6.5″
These measurements may vary slightly depending on your seam allowances and personal preferences. The goal is to create a square frame around the center square.
Step 2: Assembling the Center of the Block
- Attach the Side Strips: Take the two shorter white strips (2.5″ x 4.5″) and sew them to the left and right sides of your center square using a 1/4″ seam allowance. Press the seams open or to one side, depending on your preference.
- Add the Top and Bottom Strips: Next, sew the two longer white strips (2.5″ x 6.5″) to the top and bottom of the newly framed center square. Again, press the seams.
At this point, you should have a small square block with your chosen patterned fabric in the center, framed by white strips.
Step 3: Adding the Converging Corner Strips
The next step is to add the colorful strips that will create the “converging” effect.
- Cut and Arrange Corner Strips: Cut assorted fabric scraps into strips of various widths—between 1.5″ and 3″ wide, and lengths that range from 5″ to 8″. The goal is to have enough strips to cover each corner of your block.
- Sew the First Corner: Start with the top left corner of your block. Take one strip and align it with the edge of the corner. Sew it to the block using a 1/4″ seam allowance. Press the seam.
- Build Out the Corner: Continue adding strips to the corner, sewing each new strip to the previous one and pressing the seams. Aim for an overlap that covers the entire corner section. Repeat this process until you have added enough strips to cover the desired width of the corner.
- Repeat for Remaining Corners: Move on to the top right, bottom left, and bottom right corners. For each corner, repeat the process of sewing and pressing strips, ensuring that the strips converge towards the center of the block.
Step 4: Trimming the Block
Once all the corner strips are in place, it’s time to trim your block to size.
- Square the Block: Using your quilting ruler and rotary cutter, trim the edges of the block to square it up. The final block should measure 12.5″ x 12.5″ before sewing into a quilt. Be sure to trim carefully to maintain a straight and even edge.
- Check for Accuracy: Measure your block to ensure it’s the correct size. Double-check all seams are securely sewn and that the block lays flat.
Step 5: Completing Your Block
Your “Converging Corners Block” is now complete! You can make multiple blocks to create a quilt or use a single block for a smaller project like a pillow cover or a wall hanging.
Additional Tips for a Flawless Converging Corners Block
- Mix Up Your Fabrics: Use a variety of fabric textures and patterns to add more interest and depth to your block. Don’t be afraid to mix solids, prints, florals, and geometrics.
- Press Seams Properly: Always press seams as you go, either open or to one side, to ensure a crisp and clean block.
- Chain Piecing: If making multiple blocks, consider using the chain piecing method to save time. Sew multiple strips together without cutting the thread in between, then cut them apart later.
- Experiment with Layouts: Try different arrangements for your blocks to see how the colors and patterns interact. You may find a new design that you love!
Creating the “Converging Corners Block” is a wonderful way to experiment with color and design while honing your quilting skills. This block’s beauty lies in its simplicity and versatility—it’s a canvas for your creativity, allowing you to explore different fabric combinations and create a quilt that is truly your own. Whether you’re a seasoned quilter or just starting out, this project offers a rewarding experience and a striking final product.
Remember, the joy of quilting comes not just from the finished piece, but from the journey of creating something with your own two hands. I hope this tutorial inspires you to explore your fabric stash and create a quilt that tells your story. Happy quilting!


