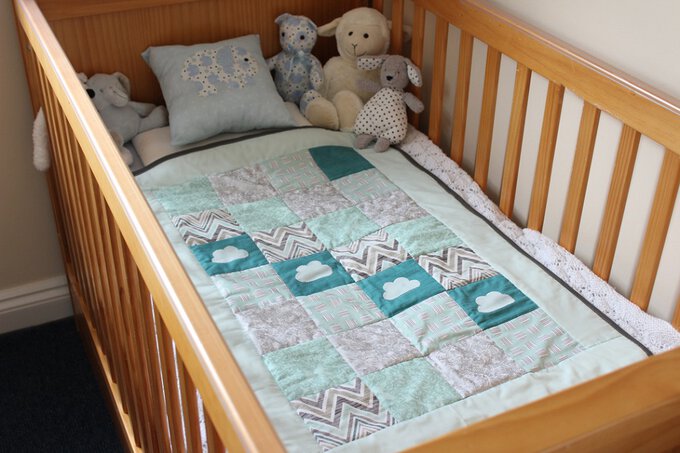
There’s a unique joy that comes with the arrival of a new baby. It’s a time filled with anticipation, love, and a sense of wonder for the new life about to unfold. As a quilter, one of the ways I love to celebrate this special time is by creating a baby quilt.
SEE A NEW PATTERN HEREIt’s a gift that not only provides warmth and comfort to the little one but also carries the love and care of the person who made it. I remember the first baby quilt I ever made. It was for my niece, and I spent countless hours choosing the perfect fabrics, cutting each piece, and stitching them together. Each stitch was a testament to my love for her, and when I finally handed over the quilt, it was one of the most rewarding moments of my life.
Creating a Cherished Keepsake: The Journey of Making a Baby Quilt
Today, I want to share with you a simple yet beautiful baby quilt pattern. This quilt is perfect for beginners looking to venture into the world of quilting or for seasoned quilters looking for a quick and satisfying project. The charm of this quilt lies in its simplicity and the opportunity it provides to play with colors and patterns. So, let’s get started and create a keepsake that will be cherished for years to come.
Before we delve into the step-by-step process, let’s take a moment to appreciate the beauty of a handmade baby quilt. Each quilt is a unique piece of art, a labor of love that carries the warmth and care of the person who made it. It’s a gift that goes beyond the material, offering comfort and a sense of belonging to the little one who receives it.
SEE A NEW PATTERN HERECreating a baby quilt is not just about sewing pieces of fabric together. It’s about choosing the perfect colors and patterns, carefully cutting each piece, and stitching them together with precision and care. It’s about pouring your love and affection into every stitch, creating something that will be cherished for years to come.
As we embark on this journey of creating a baby quilt, remember that it’s not just about the end product. The process itself is a beautiful journey, filled with creativity, learning, and a sense of accomplishment. So, let’s get started and create a keepsake that will be cherished for years to come.
Materials Needed:
- Sewing Machine
- Sewing Kit
- Patchwork Ruler
- Rotary Cutter/Fabric Scissors
- Single-Sided Fusible Foam Stabiliser
- Fat Quarters
- Iron
Step-by-Step Instructions
Step 1: Designing the Layout
Start by laying out your charm pack squares on a flat surface. Experiment with different arrangements until you find a design that you like. Remember, there’s no right or wrong here, so feel free to get creative.
Step 2: Preparing the Applique
Choose a shape that you’d like to feature on your quilt. This could be a heart, a star, or even the baby’s initial. Once you’ve decided on a shape, use your spare squares or backing fabric to cut out the applique.
Step 3: Sewing the Applique
Next, sew the applique onto the squares where you want them to appear. You can use a simple straight stitch for this, or if you’re feeling adventurous, try a zigzag or satin stitch for a different look.
Step 4: Assembling the Squares
Now it’s time to start assembling your quilt. Begin by sewing the squares together into rows. Place the squares with their right sides together and use a ¼ inch seam allowance.
Step 5: Joining the Rows
Once you’ve sewn all your squares into rows, you’ll need to join these rows together to form the quilt top. Again, place the rows with their right sides together and use a ¼ inch seam allowance.
Step 6: Pressing the Seams
After your quilt top has been assembled, use an iron to press all the seams. This will give your quilt a neater, more professional look.
Step 7: Preparing the Quilt Sandwich
Next, lay out your backing fabric on a flat surface, followed by your wadding. Then place the quilt top on top, ensuring the right side is facing up. Pin through all three layers to secure them together.
Step 8: Trimming the Quilt Sandwich
Once your quilt sandwich is secure, trim the edges so they’re the same size as your quilt top.
Step 9: Quilting the Layers
Now you’re ready to quilt the layers together. You can do this by stitching in the seams where the squares are joined. This is known as “stitch in the ditch” quilting.
Step 10: Preparing the Binding
To prepare the binding, cut strips of fabric long enough to go around all four sides of your quilt.
Step 11: Attaching the Binding
Unfold the bias binding and pin it to the reverse side of the quilt, making sure the edges match. Sew the binding to the quilt, stitching as close to the edge as possible.
Step 12: Finishing the Binding
Full Pattern: Click Here
Finally, fold the bias binding over the edge of the quilt to the front side. Sew it in place, stitching close to the inside edge of the binding. Make sure to catch the binding on the reverse side in the stitching. This will give your quilt a neat, finished look.
And there you have it! A beautiful, handmade baby quilt, ready to be gifted and cherished. This quilt is more than just a piece of fabric; it’s a labor of love, a token of affection, and a keepsake that will be treasured for years to come.
Remember, the beauty of quilting lies not just in the finished product but in the process itself. It’s in the joy of choosing the perfect fabrics, the satisfaction of seeing the pieces come together, and the love that goes into each stitch. So, whether you’re making this quilt for your child, a grandchild, a niece or nephew, or a friend’s baby, know that you’re creating something truly special.
As you continue your quilting journey, I hope that each project brings you as much joy and satisfaction as this baby quilt has brought me. Keep exploring, keep learning, and most importantly, keep quilting. Happy quilting!


