There’s something undeniably comforting about a handmade quilt. For me, it’s a bridge to the past, a connection to generations that came before.
I remember a winter evening, the air crisp with the scent of snow, when I received a package from a distant relative. Inside was a rag quilt, each patch telling a story, each frayed edge whispering tales of love, care, and tradition. It wasn’t just a quilt; it was a tapestry of memories.
Rag quilting, with its rustic charm and cozy texture, is a beautiful blend of tradition and creativity. Whether you’re a seasoned quilter or just starting, the allure of rag quilting is undeniable.
And if you’ve been hesitant, thinking of frayed edges and unconventional techniques, fear not! This guide will walk you through the delightful journey of creating your very own rag quilt.
The Essence of Rag Quilting
At its core, rag quilting is about embracing imperfections. Unlike traditional quilting, which seeks precision and perfect seams, rag quilting celebrates the raw, the rustic, and the rugged.
The frayed edges, which are a hallmark of this style, give the quilt its unique, shabby-chic look. And the best part? It’s beginner-friendly. Since it doesn’t involve intricate piecing and is crafted from individual blocks or strips, even a novice can create a beautiful quilt.
1. Designing Your Quilt: Before diving into the fabric cutting process, it’s crucial to decide on the block size for your quilt. Traditional block sizes range from 6 inches to 12 inches.
The block size you choose will influence the overall look of your quilt. Larger blocks mean less fabric and less ragging, while smaller blocks result in more ragging, giving the quilt a distinct shabby chic appearance. However, smaller blocks will require more fabric. Decide on the ragging size, with 3/4 of an inch being a popular choice, but you can opt for 1/2 an inch if you prefer less ragging.
2. Cutting the Squares: Start your quilting journey by cutting out the squares. Begin with a strip the size of your chosen block, cutting across the fabric’s width. Rotate the strip, ensuring you trim off the selvedge, and then cut the strip into the block size you’ve chosen. When working with minky fabric, be prepared for fuzzies; having a lint roller nearby can be a lifesaver.
The minky squares should be the same size as the flannel squares. For the batting, the size will depend on the ragging length. For instance, for a 6-inch square with a 3/4 inch ragging, the interior batting square would be 4.5 inches.
3. Preparing the Quilt Blocks: Before sewing, ensure all blocks are correctly oriented. If using minky, ensure the nap (the raised, fuzzy surface of the fabric) is consistent across all blocks.
Start with the minky or bottom block facing down, place the batting in the center, add a layer of plain flannel for added thickness, and finally, place the top block with the fabric facing outward. Pin each block in place and repeat for all blocks.
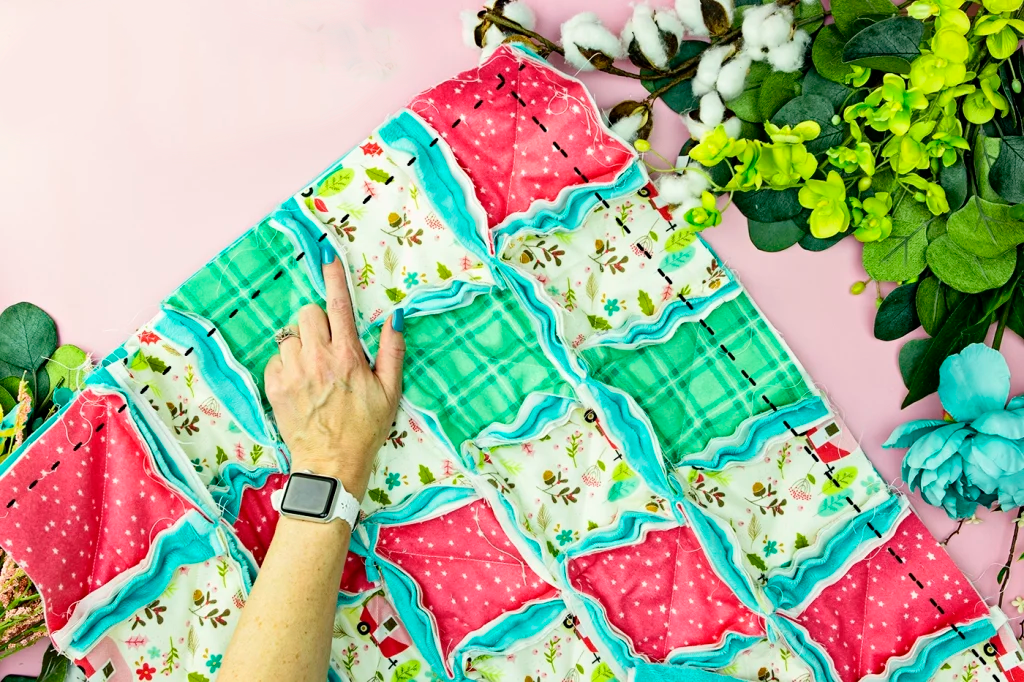
4. Sewing the Quilt Blocks: For blocks larger than 6 inches, sew them together using an “X” from corner to corner. For 6-inch blocks, a single diagonal line suffices. Chain sewing, a technique where blocks are continuously fed through the machine without stopping, can be a time-saver.
5. Assembling the Rows: Lay out your blocks in the desired order for each row. Ensure the nap of the minky fabric is consistent and the diagonal stitch aligns correctly. Sew the blocks together using a 3/4 inch seam allowance. Continue this process until all rows are complete.
6. Joining the Rows: Now, it’s time to bring the quilt together. Sew the rows together, ensuring the blocks align perfectly at the corners. A technique called “nesting the seams” can help achieve this alignment. As the quilt grows, be mindful of its weight and ensure it doesn’t pull on the needle while sewing.
7. Finishing the Outer Edges: There are two methods to finish the quilt’s edges. The simpler way involves sewing a straight stitch around the quilt’s edge, 3/4 inch from the boundary, and ragging it like the rest of the quilt. A more advanced method involves binding it with minky.
8. Snipping the Seams: This step transforms your quilt into a rag quilt. Using scissors or ragging shears, snip the seam allowance approximately every quarter to half inch. This process can be time-consuming, so find a comfortable spot, perhaps with a movie or podcast playing, and enjoy the repetitive, meditative action.
9. Washing the Rag Quilt: To complete the ragging process, wash your quilt. Add some old towels to the wash to aid in agitation. Avoid using liquid fabric softener as it can affect the ragged edges. After a few washes, your rag quilt will achieve its desired look.
Materials You’ll Need:
- Flannel: This is your primary fabric, chosen for its softness and its ability to fray beautifully.
- Minky (optional): If you’re looking for a plush backing, minky is a great choice.
- Batting: This adds weight and warmth to your quilt. A thinner batting is recommended for rag quilts.
- Ragging Shears: While optional, these are highly recommended for achieving that perfect frayed edge.
- Rotary cutter, ruler, and mat: Essential tools for precise cutting.
- Thread: Choose a durable thread that complements your fabric choices.
- Walking Foot: Especially important if you’re working with heavier fabrics like minky.
- Sewing Essentials: This includes basics like scissors, pins, and more.
Full Pattern: Click Here
Quilting is more than just a hobby; it’s a journey through time, a celebration of memories, and a testament to the love and care that goes into every stitch. The rag quilt, with its frayed edges and rustic charm, is a beautiful representation of life itself – imperfect, raw, yet incredibly beautiful. As you hold your finished quilt, think of the stories it tells, the warmth it provides, and the memories it holds. Whether you’re crafting it for yourself or gifting it to a loved one, a rag quilt is more than just fabric and thread; it’s a piece of your heart, a slice of your soul, and a treasure for generations to come.


