Every scent, every sound, and every sight has the power to transport us back in time, to a moment that left an indelible mark on our hearts.
For me, it’s the comforting aroma of freshly baked bread wafting through the air, the gentle clinking of porcelain dishes being washed, and the soft texture of a quilted dish rug under my fingertips.
These sensory experiences take me back to my grandmother’s cozy kitchen, a place where love was expressed not just through the meals she prepared but also through the intricate details of her home decor.
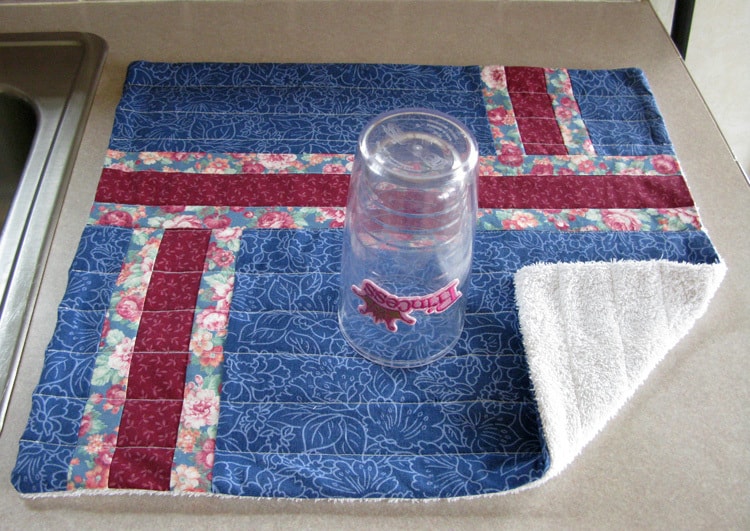
My grandmother, a passionate quilter, believed that every corner of her home should tell a story, and her kitchen was no exception. Among the many handcrafted items in her kitchen, one that stood out was a beautifully quilted dish rug. It wasn’t just a functional item to her; it was a canvas where she weaved her stories, memories, and love for her family.
I remember her telling me about the first dish rug she ever made, how she had carefully chosen the fabrics, and the joy she felt when it was finally placed beside her sink. It was more than just a dish rug; it was a testament to her creativity, dedication, and love for quilting.
Inspired by her stories and the cherished memories of our time together, I embarked on a journey to create my own quilted dish rug. And today, I want to share this journey with you, guiding you step-by-step to craft a dish rug that’s not just functional but also filled with memories, stories, and a whole lot of love.
Now, let’s dive into the process and bring this beautiful memory to life in the form of an elegant dish rug.
Materials Needed:
- Main fabric (blue) – 1 fat quarter or a piece of fabric 18″ x 22″
- Accent fabric (wine) – ¼ yard or a fat quarter
- Accent fabric (floral print) – ¼ yard or a fat quarter
- An old towel, at least 18″ x 22″ in size
Step-by-Step Guide: Crafting the Elegant Dish Rug
- Preparation and Organization:
- Begin by selecting a spacious and well-lit workspace.
- Lay out all your fabrics and tools, ensuring everything is within arm’s reach.
- Iron all your fabrics to ensure they’re smooth and free of wrinkles, which will make the cutting and sewing processes smoother.
- Cutting the Fabric:
- Start with the main fabric (blue). Lay it flat and measure an 18″ x 22″ rectangle. Use a rotary cutter and ruler for precision.
- For the towel, ensure it’s clean and free of lint. Trim it to match the 18″ x 22″ size of the main fabric.
- From the accent fabric (wine), cut a 2″ strip across the width of the fabric.
- From the floral print fabric, cut two 1½” strips across the width.
- Piecing Together the Design:
- Sew a 1½” floral strip to one side of the 2″ wine strip. Repeat with the other floral strip on the opposite side. Ensure the seams are straight and even.
- Press the seams towards the floral print to give a neat finish.
- Revisit the main fabric (blue). Cut 4½” off the 22″ width, resulting in two distinct pieces.
- Attach the pieced strip (floral-wine-floral) to the larger blue piece, followed by the smaller blue piece. This creates a beautiful coordinated design.
- Assembling the Main Body:
- Rotate your fabric so the pieced sections run horizontally.
- Trim 6″ off one side, and then sew the coordinating strip to one side. To create an alternating pattern, flip the coordinating strip before sewing it to the opposite side.
- Preparing the Towel Backing:
- Lay out the towel, ensuring it’s smooth and free of wrinkles.
- Place your pieced fabric on top, right side up.
- Trim any excess towel material so it aligns perfectly with your fabric.
- Sewing and Turning:
- Pin the fabric and towel together, ensuring there are no bubbles or wrinkles.
- Sew around the perimeter with a 1/2-inch seam allowance, leaving a 4-inch gap on one side for turning.
- Trim the corners to reduce bulk when turning.
- Carefully turn the dish rug right side out through the gap. Use a point turner or a blunt tool to push out the corners.
- Press the dish rug, ensuring the edges are crisp and the opening is neatly folded in.
- Quilting and Finishing Touches:
- Now, it’s time to add some quilting flair. Mark straight lines or any desired pattern on the dish rug.
- Quilt along the marked lines. This not only adds a decorative touch but also ensures the fabric and towel stay together.
- Once the quilting is done, sew a top stitch around the entire perimeter of the dish rug, about 1/4-inch from the edge. This will close the gap used for turning and give a polished finish.
- Admiring and Caring for Your Dish Rug:
- Lay out your finished dish rug and take a moment to admire your handiwork. The blend of colors, patterns, and your meticulous stitches have resulted in a functional yet beautiful kitchen accessory.
- For care, it’s recommended to wash the dish rug in cold water and tumble dry on low. This will ensure it remains vibrant and durable for years to come.
Full Pattern: Click Here
As I lay the finished dish rug on my kitchen counter, I can’t help but be transported back to those cherished moments in my grandmother’s kitchen. The act of creating something with our own hands, especially something as intimate and personal as a quilted item, is profoundly transformative. It’s not just about the final product; it’s about the journey, the memories we weave into each stitch, and the stories that unfold with every piece of fabric we choose.
This elegant dish rug, with its intricate patterns and vibrant colors, is more than just a functional kitchen accessory. It’s a tapestry of memories, a bridge between the past and the present, and a testament to the timeless beauty of handcrafted items. Every time you use it, you’re not just drying dishes; you’re touching a piece of history, a piece of your heart, and a piece of your soul.
In our fast-paced world, where everything is mass-produced and disposable, taking the time to create something with love and care is a revolutionary act. It’s a reminder of the value of craftsmanship, patience, and the simple joys of life. So, as you place your dish rug in your kitchen, know that you’ve not just added a beautiful accessory to your space; you’ve also woven a piece of your story, your memories, and your love into the very fabric of your home.


