Reflecting on my quilting journey, the “Garden Patch” block from the “Apple Pie in the Sky” quilt-along is a vivid memory.
I remember when I first encountered this block; it felt like a perfect blend of simplicity and complexity, much like my early days with quilting itself.
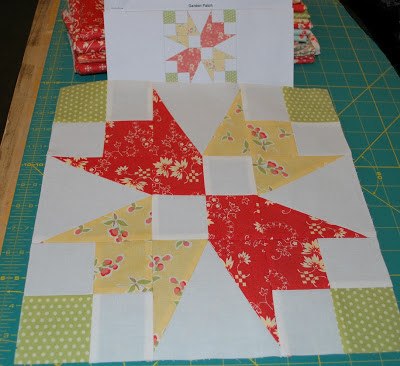
I was new to the art, eager to learn and experiment, and the “Garden Patch” block, with its charming tulip motif, felt like the ideal project to capture the spirit of spring.
My quilting space was always filled with fabrics in an array of colors, much like a garden filled with diverse flowers. This block allowed me to channel my love for nature into my craft. As I sewed each piece, I could imagine the tulips blooming, their colors bright against the white background.
This block was my way of bringing the outside in, capturing the vibrancy of the garden and the warmth of the sun, stitch by stitch.
Blossoming Tulips: The Heart of the Garden Patch Block
What makes the “Garden Patch” block so special is its ability to evoke the simple joy of a spring garden. The design centers around tulip motifs, a symbol of renewal and beauty, which can be personalized through fabric choices. Whether you prefer soft pastels to mimic the subtle hues of dawn or bold prints for a more modern interpretation, the “Garden Patch” block offers endless possibilities.
This flexibility allows each quilt to tell its own unique story, one that can be as varied and colorful as a real flower bed.
Full Pattern: Click Here
Preparing for the Garden Patch Block
Essential Details: Choosing the Perfect Fabrics and Colors
Before starting the project, choosing the right fabric is crucial. The “Garden Patch” block comes to life with a combination of bold and subtle prints. You can opt for a mix of floral and geometric designs to create a balance. The selection of a neutral background fabric helps to enhance the primary prints, allowing the tulip design to stand out.
Materials Needed
To create the “Garden Patch” block, you’ll need the following materials:
- 10 white/background squares, 2 1/2″ x 2 1/2″
- 4 green print corner squares, 2 1/2″ x 2 1/2″
- 2 yellow print squares, 2 1/2″ x 2 1/2″
- 2 yellow print rectangles, 2 3/4″ x 5 1/4″
- 4 red print squares, 2 1/2″ x 2 1/2″
- 2 red print rectangles, 2 3/4″ x 5 1/4″
- 4 white/background squares, 4 3/4″ x 4 3/4″ OR 1 strip, 4 3/4″ x 13″ for triangles
Getting Ready: Tips for a Smooth Start
Before cutting, read through all instructions carefully. Make sure to measure twice and cut once to avoid any mistakes. Preparing all your materials and organizing them by size and color will make the piecing process smoother and more enjoyable. Remember to press your fabrics well before cutting to ensure precision.
Step-by-Step Instructions
Step 1: Preparing Your Pieces
Begin by cutting all fabric pieces as listed in the materials section. Lay out all your squares, rectangles, and triangles in the order they’ll be sewn. This will help you visualize the block and ensure all pieces are correctly positioned.
Step 2: Creating the Tulip Stems
To form the stems, take the green print squares and sew them to the white background squares. Press seams open to reduce bulk. Arrange the pieces to form the base of the tulips, ensuring that the greens align perfectly.
Step 3: Constructing the Tulip Heads
For the tulip heads, pair the red and yellow squares. Sew the red print squares to the white triangles using a quarter-inch seam allowance. Next, attach the red and yellow rectangles. Press the seams towards the darker fabric to maintain a crisp, clean finish.
Step 4: Assembling the Block
Arrange the tulip heads and stems in a 4×4 grid. Join the pieces row by row, ensuring the seams align perfectly. Press each row’s seams in opposite directions to nest them for a flatter finish.
Step 5: Final Touches
Join the rows together to complete the block. Press the entire block well to set the seams and give it a professional finish. Trim any uneven edges to make the block square and ready for quilting.
Additional Tips for Success
- Pressing Matters: Always press seams as you go. This will help keep the block flat and make the final assembly easier.
- Starch Spray: Using a light starch spray while pressing can help keep your fabric stiff, making it easier to work with.
- Chain Piecing: To save time, use chain piecing for similar units. This involves sewing one piece after another without cutting the thread, reducing the time spent between cuts.
Completing the “Garden Patch” block is more than just a quilting project—it’s a celebration of the beauty and simplicity that quilting brings to our lives. Each stitch represents a moment of mindfulness, each fabric choice a reflection of our personal style and creativity. As we carefully piece together the tulip-inspired blocks, we’re not just creating a quilt; we’re crafting a vibrant narrative that speaks to the renewal and joy of springtime.
This block is an invitation to slow down and savor the process. With each step, from selecting fabrics to the final press, we are reminded of the joy in creation and the satisfaction that comes from making something with our own hands. The “Garden Patch” block, with its bright colors and floral design, brings a piece of the garden into our quilting rooms, making every stitch a bloom of happiness.
And as you complete your quilt, imagine the comfort it will bring—a cozy reminder of the effort, love, and creativity sewn into each block. This project is more than just fabric and thread; it’s a keepsake, a testament to the quilter’s craft, and a beautiful addition to any home.


