My journey with quilting began in a cozy corner of my grandmother’s living room, surrounded by colorful threads and stories that seemed to weave themselves into the fabric of my life.
Among the many crafts she introduced me to, quilting held a special place in my heart.
It was not just the act of stitching pieces together but the stories each quilt told, the legacy of love and care passed down through generations. Years later, as I ventured into creating my own quilts, I found myself drawn to the intricate beauty of hexagons quilts.
The geometric patterns, the blend of colors, and the patience required to piece them together reminded me of my grandmother’s meticulous hands at work.
Embracing the Hexagons Edge: A Creative Leap
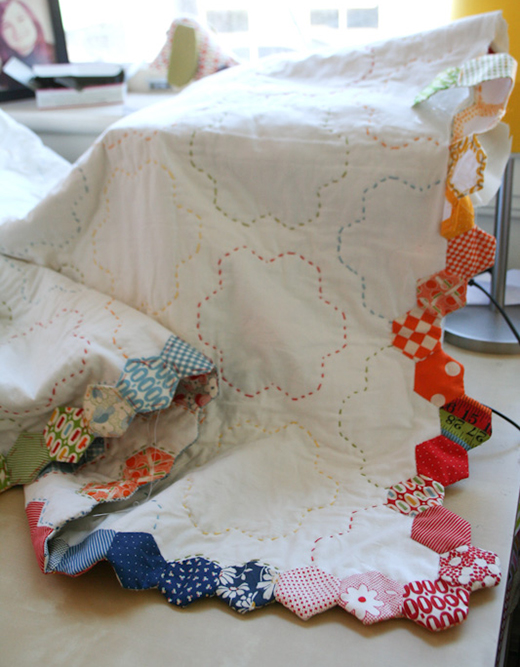
The border method is not just a technique; it’s a creative leap. By opting for a hexagon-shaped border, the quilt gains a seamless transition from center to edge, showcasing the hexagons’ beauty without interruption.
This approach requires a thoughtful calculation of the outer ring of hexagons, ensuring each piece aligns perfectly to form a continuous pattern. It’s a testament to the quilt’s design and the quilter’s foresight, transforming traditional quilting methods into a canvas for innovation.
A Hexagonal Harmony: Crafting Beyond the Ordinary
When I first stumbled upon the idea of finishing hexagon quilts with a hexagon-shaped border, it felt like a revelation. Moving away from the traditional straight binding to embrace a border that mirrored the quilt’s core design was both a challenge and an adventure.
This method, which I affectionately dubbed “the border method,” not only simplified the process by eliminating the need for partial hexagons but also introduced a unique aesthetic to the quilt’s edge. It was as if the quilt itself was refusing to be bound by the conventional, choosing instead to flaunt its hexagonal beauty unabashedly.
Full Pattern: Click Here
Materials
- Batting
- Backing fabric
- Hexagon paper templates
- Thread (preferably matching the fabric)
- Needle
- Scissors
- Tweezers (for paper removal)
This eclectic mix of materials underlines the simplicity and accessibility of quilting, making it a craft that invites creativity at every skill level.
Preparing Your Palette: Tips Before You Stitch
Before diving into the stitching, remember to embrace the process. Quilting, especially with hexagons, is a journey of patience and precision. Whether you choose to baste the batting and backing to your quilt front or let the hand quilting hold everything together, ensure each step reflects your unique approach to the craft.
The materials listed above are your toolkit for bringing the hexagon quilt to life, each playing a crucial role in ensuring your quilt not only looks beautiful but feels personal and heartfelt.
Step-by-Step Instructions
- Begin with Basting: If you haven’t already, lightly baste the batting and backing to your quilt top. This optional step can help prevent the layers from slipping as you work. If you’re confident in your hand quilting to keep everything in place, feel free to skip this step.
- Hexagon Harmony: Count the hexagons that form the outer ring of your quilt. This number will guide you in preparing the same amount of hexagon paper templates for the border. Baste these templates to your chosen fabric, mirroring the technique used for the quilt’s main body.
- Creating the Border: Piece together the basted hexagons, forming a ring that matches your quilt’s perimeter. If your quilt design is asymmetric, your border should reflect this, creating a mirror image when viewed from the right side.
- Trim to Tidy: Ensure the edges of your batting and backing fabric are even with the front of your quilt by trimming any excess. This step is crucial for a clean, professional finish.
- Position and Pin: Lay your hexagon loop on top of the quilt, right sides facing each other. The papers at the back of your border hexagons will be visible. Pin in place to prevent shifting.
- Stitching the Edge: Choose your preferred stitch – whipstitch for durability or ladder stitch for speed – and begin sewing around the quilt’s edge. Focus on attaching the border to the edge hexagons of your quilt, ignoring the back fabric and batting for now.
- Reveal and Remove: Once the border is attached, remove all basting papers from the front hexagons. If necessary, gently trim any threads to free the papers.
- Flip and Fine-tune: Flip the border over to the back of the quilt, creating a smooth edge. This step encases the batting and backing fabric neatly between the border and the quilt’s body. Ensure all corners are poked out and the fabric lies flat.
- Final Attachment: Secure the hexagons to the backing fabric, removing stabilizing papers as you go. This not only affixes the border in place but also gives you the opportunity to adjust for any minor discrepancies in alignment.
Additional Tips
- Embrace Imperfections: Your stitches may not always be even, but remember, the beauty of a quilt lies in its overall effect. What might seem like a mistake up close can blend seamlessly into the pattern from a distance.
- Paper Removal: Keep tweezers handy for removing paper templates, especially in tight spaces. This small tool can save you a lot of frustration.
- Take Your Time: Rushing can lead to mistakes. Enjoy the process, and remember, every stitch adds to the quilt’s story.
Finishing your hexagon quilt with a hexagonal border not only adds a unique touch but also connects you deeper with the craft’s heritage. This method, while slightly unconventional, showcases the versatility and creativity quilting offers.
As you step back and admire your work, remember the journey each hexagon represents, the patience cultivated, and the joy found in every stitch. Your quilt is more than fabric and thread; it’s a mosaic of moments, a testament to creativity, and a legacy of love. Happy crafting, and may each quilt you create be a reflection of your journey, both as a quilter and as a storyteller.


