When I began my quilting journey, I was drawn not only to the comfort quilts provided but also to the imaginative stories they could tell.
Quilts have a unique way of capturing moments and feelings, and with the Painted Carousel Quilt, I wanted to create a piece that was both whimsical and full of life.
The inspiration for this project comes from the enchanting world of carousels—a magical space where vibrant colors and playful patterns come together.
With fabrics from Sue Penn’s Painted Ponies collection, this quilt is like a carousel in fabric form, spinning with joyful motifs and intricate appliqué details. The Painted Carousel Quilt is designed to evoke a sense of nostalgia and fun, using bold colors and a mix of patterns to create a lively design. This project is perfect for quilters who want to explore the beauty of appliqué techniques while bringing to life a quilt that feels like a storybook come to life.
Building the Painted Carousel Quilt
The Painted Carousel Quilt is an intricate design that features a striking combination of triangles, appliqués, and detailed canopies. Each section adds to the story, with playful ponies, delicate flowers, and swirling canopies taking center stage.
This quilt is a celebration of color and creativity, and by using fabrics from the Painted Ponies collection, it perfectly captures the charm of a classic carousel.
Materials Needed for the Painted Carousel Quilt
Here are the materials you’ll need to bring your Painted Carousel Quilt to life:
Fabric Requirements:
- 1594-11, 1594-124, 1595-124, 1597-22, 1597-124, 1598-11, 1598-44, 1598-66, 1351-Lipstick, and 1351-Purple: ¼ yard each
- 1596-99 (for binding): ¾ yard
- 1596-124: ½ yard
- 1593-99 or 1593-124 (for backing): 1 ½ yards
- 1351-Onyx: 1 ½ yards
Additional Materials and Supplies:
- Batting: 46″ x 56″
- Lightweight paper-backed fusible web: 1 ¼ yards
- Threads for construction and quilting
- Coordinating threads for appliqués
Preparation for the Painted Carousel Quilt
Before diving into the construction of the Painted Carousel Quilt, it’s important to have all your materials and pieces ready. Take your time to carefully review the cutting instructions and templates provided, as they are essential for achieving precise results.
As you work, remember to label each piece to keep track of the different fabric patterns and triangle sizes. The Painted Carousel Quilt relies heavily on appliqué, so it’s crucial to wait until the “Preparing the Appliqués” step to cut out those pieces.
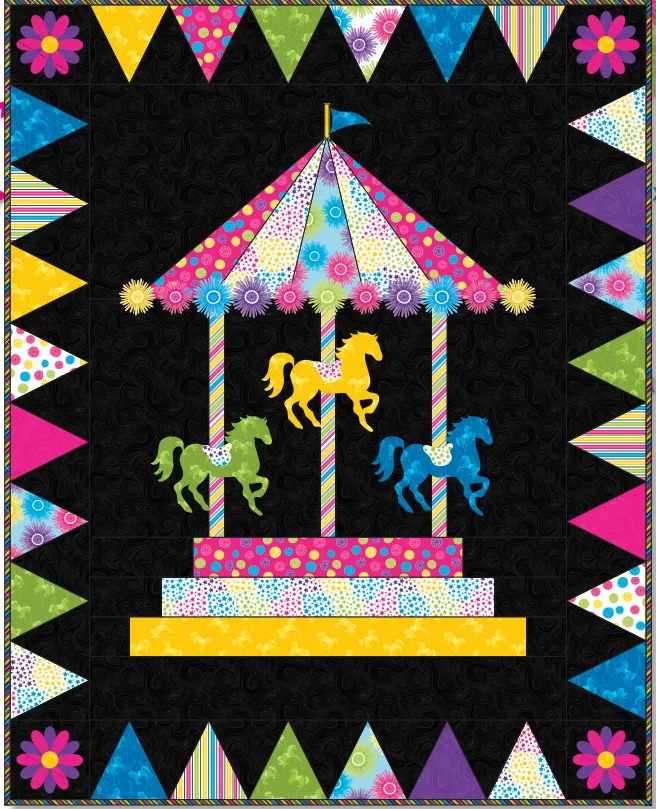
Full Pattern: Click Here
Step-by-Step Instructions
Creating the Center Panel of the Painted Carousel Quilt
- Top Section: Sew a 3″ x 7″ rectangle of 1351-Onyx to each short end of a 3″ x 17 ½” Pink Dots (1597-22) piece. Press the seams toward the Onyx fabric.
- Middle Section: Sew a 3″ x 5″ rectangle of 1351-Onyx to each short end of a 3″ x 21 ½” White Stars (1595-124) piece. Press seams toward Onyx.
- Bottom Section: Sew a 3″ x 3″ square of 1351-Onyx to each short end of a Yellow Ponies (1598-44) rectangle. Press seams toward Onyx.
- Assemble the Steps: Sew the three sections together along the long edges, creating a stair-step effect. Attach a 4″ x 30 ½” rectangle of Onyx to the bottom step to complete the center panel.
Constructing the Carousel Poles
- Cut Bias Poles: Use spray starch to stabilize the bias edges of the fabric before cutting three 1 ½” x 15 ½” bias strips from White Stripes (1596-124).
- Sew the Poles: Attach one pole between two 6 ½” x 15 ½” Onyx rectangles. Press seams toward the Onyx sections. Then, sew one pole to each side of the unit.
- Expand the Pole Section: Sew an 8″ x 15 ½” Onyx rectangle to each side of the poles to create a 30 ½” x 15 ½” unit.
- Complete the Center Panel: Sew a 14″ x 30 ½” Onyx rectangle to the pole section. Attach the steps to the pole unit to complete the center panel of your Painted Carousel Quilt.
Adding Appliqués to the Painted Carousel Quilt
- Prepare the Canopy: Begin with the Blue Flower (1594-11) Canopy 3 section, placing it in the top section of the center panel. Align the bottom edge with the center pole. Pin in place.
- Assemble the Canopy: Referring to the quilt diagram, pin the White Star (1595-124) Canopy 2 and Canopy 2 Reversed sections to each side of Canopy 3. Add the Pink Dots (1597-22) Canopy 1 and Canopy 1 Reversed sections to complete the canopy design.
- Fuse the Canopy: Following the manufacturer’s instructions, fuse the canopy sections in place. Then, fuse the yellow rectangle for the flagpole and the blue flag at the top point of the canopy.
- Add the Horse Appliqués: Place the horse appliqués on the poles as shown in the diagram, or arrange them as you prefer. Fuse the saddles and horses in place.
- Attach the Flowers: Referring to the project image, fuse the fussy-cut flowers to the bottom edge of the canopy. Sew the edges of all appliqués using straight, satin, or other decorative stitches with coordinating thread.
Constructing the Pennant Borders
- Sew the Triangles: Lay out two short borders and two long borders as shown in the diagram. Sew the triangles together, pressing the seams toward the Onyx triangles.
Creating the Cornerstone Appliqués
- Make the Corner Blocks: Fold each 5 ½” Onyx square into quarters and finger-press the folds to mark the center. Place a purple flower on the square, aligning the centers, and fuse in place. Add pink flowers on top, offsetting them so that the petals alternate. Finish by fusing the yellow centers in place.
Finishing the Painted Carousel Quilt
- Sew the Quilt Top Together: Attach the long borders to each side of the center panel and press the seams toward the center. Add corner blocks to each end of the short borders and sew them to the top and bottom of the center panel.
- Quilting and Binding: Sew 1 ½ yards of Tossed Ponies print together to create a 44″ x 54″ backing. Layer the backing, batting, and quilt top, and baste them together. Quilt as desired, trim the excess fabric, and sew on the binding to complete the Painted Carousel Quilt.
The Painted Carousel Quilt isn’t just a quilt; it’s a joyful celebration of color and creativity. From the playful ponies to the delicate appliqué flowers, each element tells a story of whimsy and delight.
Whether you’re creating this quilt for a special child in your life or keeping it for yourself as a reminder of the magic in everyday moments, the Painted Carousel Quilt is a labor of love. As you bring each section together, you’re not just crafting a quilt—you’re weaving a world of imagination, where every stitch brings a little more joy into your life.

